


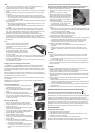


15
USE
• Pull the cord (4) out of the appliance. The cord must not be pulled out any
further than the red mark. Plug in and switch on the power.
• Press the on/off button (1) to start and stop the appliance.
• Press the lock button (16) on the tube and push or pull the tube to the required
length.
• Suction strength can be regulated by opening and closing the air vent (23) on
the handle.
o When the vent closes full suction is achieved. This is the normal setting.
o When the vent opens, more air is allowed in, reducing suction power at the
oor nozzle. This function is for cleaning curtains and other light items which
can get sucked into the nozzle.
• The oor nozzle brushes (11) have two settings, which can be selected using the
brush switch (12).
o When cleaning hard surfaces (stone or wooden ooring, tiles, lino etc.), the
nozzle brushes should be extended.
o When cleaning carpets and rugs, the brushes should be retracted into the
nozzle.
• IMPORTANT! If the suction strength of the appliance is reduced, the nozzle,
hose or dust container suction may be blocked, or lters may be blocked or
dirty. Never use the appliance if this is the case, as this will damage the motor
irreparably. Remove the cause of the blockage or clean the lters.
• IMPORTANT! The appliance is provided with thermostatically controlled
overheat protection that automatically shuts off the motor in case of blockage.
If this happens, turn off the appliance and unplug it. After 30 minutes, the
appliance will have cooled off and will be ready to use when you have removed
the blockage.
Tips
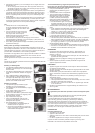
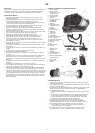
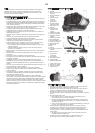
• There is a nozzle holder (22) on the telescopic
tube for storage of the brush nozzle (13) and
crevice nozzle (14) when these are not in use
(see photo).
• Each nozzle has a special purpose. Experiment
in order to discover which nozzle functions
best in different situations. The brush nozzle
is suited to vacuuming corners and crevices
because it rotates.
• If you want to take a break while vacuuming, you can insert the parking bracket
on the back of the oor nozzle (17) or on the tube (17) in the parking holder at
the back of the appliance (2).
• You can lift and carry the appliance using the carrying handle (6). Never pull or
lift the appliance by the cord.
Changing lters and emptying the dust container
This appliance is not equipped with a dust bag. The dust/dirt is sucked up into
the transparent dust holder instead. Once the dust is in this container, it whirls
around so that it does not block suction. The air sucked in is cleaned by means of
a washable permanent lter in the dust container, a motor protection lter and an
exhaust lter.
We recommend that you clean the lters at least twice a year or as required. We
recommend replacing the lters after 6 to 12 months’ use, when they are soiled, or if
the appliance’s suction strength is reduced.
IMPORTANT! The appliance must not be used if the lters and the dust container
are not in place.
IMPORTANT! Turn off the appliance and unplug it before changing the lters or
emptying the dust container.
Replacing the Exhaust Filter
• Remove the exhaust lter cover (a) by grasping the
handle and ipping it up rmly.
• Remove the lter from the exhaust port and change
it or clean as described in the section on cleaning
below.
• Replace the exhaust lter in the exhaust port.
• Fit the cover over the exhaust lter so that the small
pins on the cover engage the upper edge of the
exhaust port. Press the cover into place. You will hear
a ’click’ when it locks.
Replacing the Motor Filter
• Remove the dust container by pressing the lock
button on the handle and removing the container.
• Press the lock button on the motor lter cover ( c) up
and remove the cover.
• Grasp the pin at the botton right and remove the lter
element (e) from the appliance.
• Remove the lter (d) from the lter holder and replace
or clean the lter as described in Cleaning below.
• Replace the lter in the lter holder.
• Replace the lter element in the port.
• Fit the motor lter cover by pushing the upper edge
under the groove and pressing it in until the lock pins
click into place.
• Replace the dust holder in the appliance.
o Turn the dust container so that the lock button on
the handle faces the appliance.
o Insert the front of the dust container into the slot
on the bottom of the appliance, and press the
handle down until the dust container clicks into
place.
Emptying the dust container and cleaning the permanent lter
It is easy to see when the transparent dust container needs emptying. Empty
the dust container regularly, and never use the appliance when it is full.
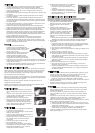
• Remove the dust container by pressing the
lock button on the handle and removing the
container.
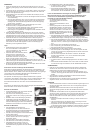
• Take the dust container to a dustbin.
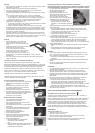
• Press the release button on the back of the
dust container (see photo). The hinged base
will ip down and the dust will fall out. NB!
Never press the release button unless you are
holding the dust container over a dustbin or
similar waste receptacle.
o Close the dust container again by ipping
the hinged base up and pressing it into
place until the lock pins engage.
• Take the dust container apart and clean it (refer to the section on cleaning
below).
o Grasp the dust container handle with one hand and support its base with the
other hand. Turn the transparent part (f) until the lock pins disengage and the
”I” marks on the two parts are parallel.
o Remove the handle (i) from the transparent part.
o Pull the inner cylinder (g) on the handle out rmly.
o Screw the inner cylinder (h) loose and remove it.
• Reassemble the dust container after cleaning.
o Fit the out cylinder on the handle. Next t the outer cylinder. The parts should
be positioned as indicated on the drawing. Press them rmly into place.
o Insert the handle into the transparent part and turn it until the lock pins
engage and the symbols “I” and “III” on the two parts are parallel.
• Replace the dust holder in the appliance.
o Turn the dust container so that the lock button on the handle faces the
appliance.
o Insert the front of the dust container into the slot on the bottom of the
appliance, and press the handle down until the dust container clicks into
place.
STORAGE
• Before putting the appliance away, rewind the cord. Switch off at the socket,
unplug, and press the automatic cord rewind button (5) until the cord is fully
rewound.
o Hold the plug rmly while reeling the cord in to avoid it hitting the appliance
or other nearby objects.
• Store in a cool dry place. Do not place heavy objects on top of the appliance.
• The oor nozzle can be parked in the holder on the back of the appliance when
storing horizontally.
CLEANING
• Clean the appliance by wiping it with a cloth wrung in tepid water. A little
detergent can be added if the appliance is heavily soiled.
• Do not use scouring pads or any form of strong solvents or abrasive cleaning
agents as they could damage the outside of the appliance.
• The dust container and the permanent lter can be washed with ordinary soapy
water. Ensure all parts are completely dry before replacing them and using the
apparatus again.
• Always keep both lters clean (refer to Replacing lters and emptying the dust
container above).
o Shake and beat the lters carefully to remove dust and dirt.
o The lter and the lter element for the motor lter can be washed carefully in
warm water with a little soap if necessary.
o Check it is completely dry before replacing in the appliance. NEVER replace
a lter pad wet.
• Replace lters with the same type when worn or cannot be cleaned properly.
INFORMATION ON DISPOSAL AND RECYCLING OF THIS PRODUCT
Please note that this Adexi product is marked with this symbol:
This means that this product must not be disposed of together with ordinary
household waste, as electrical and electronic waste must be disposed of separately.
In accordance with the WEEE directive, every member state must ensure correct
collection, recovery, handling and recycling of electrical and electronic waste.
Private households in the EU can take used equipment to special recycling stations
free of charge. In some member states you can, in certain cases, return the used
equipment to the retailer from whom you purchased it, if you are purchasing new
equipment. Contact your retailer, distributor or the municipal authorities for further
information on what you should do with electrical and electronic waste.
GUARANTEE TERMS
The guarantee does not apply:
• if the above instructions are not followed
• if the appliance has been interfered with
• if the appliance has been mishandled, subjected to rough treatment, or has
suffered any other form of damage
• If faults have arisen because of faults in your electricity supply.
Due to the constant development of our products in terms of function and design,
we reserve the right to make changes to the product without warning.