


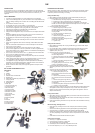

12
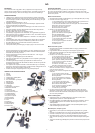
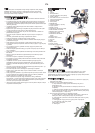
USE
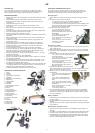
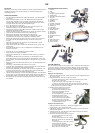
• Place appliance on back (like a rucksack) and adjust shoulder straps and belt to
suit.
a. Adjust shoulder straps using buckles at top and bottom.
b. Fasten belt around waist using the Velcro fastening.
• NOTE: Check position of on/off button (25) for quick access in event of
emergency. The on/off button is at the bottom of the left side of the appliance
when you have it on.
• Plug in and switch the power on.
• Press the on/off button to start and stop the appliance.
• While in use, the suction force can be regulated by opening and closing the air
valve (3) on the handle.
a. When the vent closes full suction is achieved. This is the normal setting.
b. When the vent opens, more air is allowed in, reducing suction power at
the oor nozzle. This function is for cleaning curtains and other light items
which can get sucked into the nozzle.
• The oor nozzle bristles have two settings which can be selected using the
brush function button on top of the nozzle.
a. When cleaning hard surfaces (stone ooring, tiles, etc.), the nozzle
brushes should be extended.
b. When cleaning carpets and rugs, the brushes should be retracted into
the nozzle.
• If vacuum strength drops during use, check dust bag (see Replacing Dust Bag
below).
• If full suction is not restored, by replacing bag, check hose or nozzle for
blockage, or motor lter bag/lter could be dirty.
• NOTE: Check cause of fault and correct. Do not use appliance if any air holes
are blocked. Permanent motor damage can result.
Tips for vacuum cleaning
• Use holsters on front of belt for accessories to ensure they are always handy.
• Each nozzle has a special purpose. Try each of them out in different situations.
• When appliance is not on your back, carry using the carrying handle. NOTE:
Never pull or lift the appliance by the cord.
• Hose can be tted to right or left side depending on which hand you want to
use. Remove and turn lid to switch side (see Motor Filter Bag, Dust Bag and Lid
above).
• Switch appliance function between blow and suck by moving hose.
o NOTE: The appliance will never blow dust and dirt out – only ltered air – as all
the lters and dust bag will still be correctly tted.
o To use as a blower instead of vacuum cleaner, change air ow as follows:
a. Disconnect power, place appliance on oor.
b. Remove hose by turning clockwise and detaching from connector.
c. Remove exhaust lter (see Replacing Exhaust Filter below).
d. Take lter pad out of lter and place in exhaust hole.
e. Fit exhaust connector over lter pad, with the studs in the bottom tting
into the holes in the bottom edge of the hole.
f. Press into place tting the stud in the top of the connector under the
release button with a click.
g. Fit hose to connector (see Fitting Hose and nozzle above).
h. Remember to switch hose back to normal position and replace exhaust
lter in exhaust hole when nished with blowing function.
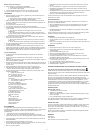
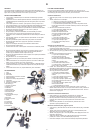
CHANGING THE DUST BAG
If the appliance loses suction strength during use, the dust- or motor lter bag can
be dirty, and need replacing. Both bags are in the internal compartment (6).
NOTE: Never use the appliance if the bag is full or with no dust- and motor lter bag
at all.
• Disconnect power, place appliance on oor.
• Remove hose by turning clockwise and detaching from connector.
• Open lid by pressing in the two lock studs on the sides and pulling upwards.
• Tip dust bag in lid upwards by pulling the curved edge on side of dust bag
holder.
• Carefully extract bag from holder away from lid.
• Place bag carefully in refuse bin. Make sure that there are no holes in it. Do not
fold or press the bag.
• Insert a new dust bag in holder.
• Click holder into place, check bag is secure and facing the right direction.
• Pull motor lter bag out of appliance and clean (see Cleaning below).
• Replace motor lter bag, check rubber edge of bag ts properly all the way
round.
• Replace lid, ensuring that it will allow the hose connector to be on the side you
want (depending on which hand you will use to operate the vacuum cleaner
with).
• Press lid down until both lock tabs click into place.
We recommend cleaning the motor lter bag at least twice a year, or whenever it is
dirty.
REPLACING EXHAUST FILTER
Used to lter exhaust air from the appliance. The appliance must not be used if
there is no exhaust lter tted.
• Remove the exhaust lter by pressing down the release button and pulling the
lter out.
• Remove the lter pad, replace or clean as described under Cleaning below.
• Replace lter pad in lter and replace in appliance. Close it locks into place with
a click.
We recommend replacing the lter pad after 4 to 6 months’ use, when it becomes
dirty, or if the appliance’s suction strength is reduced.
STORAGE
• Before storing, roll cord up without bending it.
• Store in a cool dry place. Do not place heavy objects on top of the appliance.
• Straps and harness need not be removed, but check they are secure when using
it next.
CLEANING
• Clean the appliance by wiping it with a damp cloth.
• Do not use any form of solvent, or strong or abrasive cleaning agent.
• Make sure all lters are kept clean (see above).
o Shake and beat the lter pad carefully to remove dust and dirt.
o Pad can be washed carefully in warm water.
o Check it is completely dry before replacing in the appliance. NEVER replace a
lter pad wet.
o Replace lter pads with the same type when worn or cannot be cleaned
properly.
o Remove motor lter bag (see Replacing Dust Bag below).
o Turn bag upside down, hold handle under bottom and shake hard.
o Replace bag in appliance.
INFORMATION ON DISPOSAL AND RECYCLING OF THIS PRODUCT
Please note that this Adexi product is marked with this symbol:
This means that this product must not be disposed of together with ordinary
household waste, as electrical and electronic waste must be disposed of separately.
In accordance with the WEEE directive, every member state must ensure correct
collection, recovery, handling and recycling of electrical and electronic waste.
Private households in the EU can take used equipment to special recycling stations
free of charge. In certain member states, used appliance can be returned to the
dealer where they were bought on the condition you buy new products. Contact
your retailer, distributor or the municipal authorities for further information on what
you should do with electrical and electronic waste.
GUARANTEE TERMS
The guarantee does not apply:
• if the above instructions are not followed
• if the appliance has been interfered with
• if the appliance has been mishandled, subjected to rough treatment, or has
suffered any other form of damage
• if faults have arisen as a result of faults in your electricity supply.
Due to the constant development of our products in terms of function and design,
we reserve the right to make changes to the product without prior warning.
QUESTIONS AND ANSWERS
If you have any questions regarding use of the appliance and cannot nd the answer
in this user guide, please try our website at www.adexi.eu.
Go to the "Consumer Service" menu, click on "Question & Answer" to see the most
frequently asked questions.
You can also see contact details if you need to contact us for technical issues,
repairs, accessories and spare parts.
IMPORTER
Adexi Group
www.adexi.eu
We cannot be held responsible for any printing errors.