ADVANCED PLAYBACK FUNCTION
3.2 HDMI OUTPUT
VIDEO SETUP
TV SYSTEM
HD OFF
VIDEO
TV TYPE 1080i
1080P
HDMI OUTPUT
720P
This function allows the user to select thescreen resolution for HDMI
output. If no video outputs when a resolution is selected, press the HD
button to adjust to the resolution that your TV supports.
Note:
• The player will not automatically adjust itself to the optimal
resolution that matches your TV when the HD button is pressed.
You can enter the setup menu to select .
• If your TV or monitor without HDCP, blue screen without picture
appears when playing the DVD discs which are protected by
copyrights.
• See your TV owner’s manual for more information on how to
select the TV’s Video Input source.
3.3 VIDEO
VIDEO SETUP
TV SYSTEM
HDMI OUTPUT
INTERLANCE-YUV
P-SCAN YPBPR
VIDEO
S-VIDEO
TV TYPE
Choose the type of video output that matches the video connection between
the unit and the TV.
INTERLACE-YUV: Select this if the unit connected to the TV using Y, Cb,
Cr video jacks and progressive scan is not being used.
P-Scan YPBPR: Select this if the unit connected to the TV using Y, Pb,
Pr video jacks and progressive scan is being used.
S-VIDEO: Select this if the unit connected to the TV using the S-Video
output jack.
Note:
• You can only choose the video output in HD OFF mode.
• When one HDMI output option (720p,1080i or 1080p )is selected,
the video menu is turn to gray, and the video output is forcibly
turned to component output.
4:3 PS Select this when the unit is connected to a normal TV. Wide-
screen images are shown on the screen, but with some parts cut
automatically.
4:3 LB Select this when the unit is connected to a normal TV. Wide-
screen images are shown on screen, with black belts on the top and
bottom
16:9 Select this when the unit is connected to a wide-screen TV.
Note:
• Some discs may not be able to be played according to your
selection.
• Discs recorded in 4:3 mode will only be played in 4:3.
• The TV TYPE should correspond to the TV screen.
VIDEO SETUP
TV SYSTEM
HDMI OUTPUT
VIDEO
4:3 LB
16:9
TV TYPE 4:3PS
3.4 TV TYPE
4. AUDIO SETUP
AUDIO SETUP
DYNAMIC RANGE SPDIF/PCM
DIGITALOUTPUT SPDIF/RAW
4.1 DIGITAL OUTPUT
If an A/V Receiver or amplifier is connected to the unit’s “COAXIAL”
socket, the following settings can be selected.
SPDIF/RAW: Outputs the original audio format, AC3, DTS and PCM (for
CD).
SPDIF/PCM: Outputs decoded PCM data.
Note:
• This unit cannot support DTS decode.
4.2 DYNAMIC RANGE
Reduces large variations in volume for night-time listening and
avoid loud sound such as explosion.
On: Loud sounds such as explosions are tuned down slightly.
Off: The unit plays back at the recording level on the disc.
AUDIO SETUP
DIGITALOUTPUT
OFF
DYNAMIC RANGE ON
PLAYING DVD/CD VCD DISC
8
6
3
5
9
10
4
12
11
2
7
1
1. (Open / Close)
• Press to open the disc tray.
Note:Load the disc on the disc tray with the disc label facing upward.
• Press again to close the disc tray. The unit will start playback
automatically.
2.
(Play)
• Press to start playback.
3.
(Pause / Frame-by-Frame Advance)
The image can be frozen and advance frame by frame.
• For CD, press
to pause the playback. Press again or directly
press
to resume the normal playback.
• For DVD / VCD, press
to pause the playback. Press again
to go to STEP mode. Each press of the
button will advance the
frame in STEP mode.
Press
to resume the normal playback.
4.
(Backward / Forward Search, Slow Motion)
• Press
to search backward or forward. Press to resume
the normal playback.
Each time the
or button is pressed, the speed of backward
/ forward search changes at speed: x2, x4, x8, x20.
• In PAUSE mode, press
to start forward slow motion play at
speed: 1/2, 1/3, 1/4, 1/5, 1/6, 1/7. Press
to resume normal
playback.
Note:
Slow motion is not applicable to CD playback.
5.
(Skip Forward/Backward)
When a disc is playing, a chapter/track can be skipped backward/
forward.
• Press the
button to skip to the beginning of the previous
chapter or track.
• Press the
button to skip to the beginning of the next chapter
or track.
• For audio CD discs, use the numeric buttons (0 - 9 on the remote
control only) to directly jump to a track number.
6.
(Stop)
• Press
once to stop the current playback instantly and enter the
Resume Play mode.
Press
again to resume playback from the point where the disc
was stopped.
• Press
twice to stop playback completely. It is now impossible
to resume playback from the place where playback was stopped.
Press
again to start playback from the beginning of the disc.
7. MENU
• Press to display the Disc Menu.
Notes:
This button has no function during playback of a CD.
For VCD, this function is only available at PBC ON mode.
8. TITLE
• Press to display the title menu if available on disc (DVD only).
9. ZOOM/CLEAR
Picture size can be magnified or reduced during playback.
• When a disc is playing, press the ZOOM/CLEAR button. Each
time the ZOOM/CLEAR button is pressed, the ZOOM settings will
be changed as follows
:
ZOOM 2 --> ZOOM 3 --> ZOOM 4 --> ZOOM 3/4
--> ZOOM 2/3 --> ZOOM 1/2 --> ZOOM : OFF
• While an image is magnified, use the
, , and keys to
shift the image for viewing.
• To return to the original normal view, press the ZOOM/CLEAR key
until the message ZOOM : OFF is shown. The screen will return to
normal.
CLEAR: Press to delete the information you input in setup menus.
10. ANGLE/PBC
ANGLE (To change the Viewing Angle on a DVD disc)
Different viewing angles can be selected when playing a DVD
video disc that contains scenes recorded from multiple angles.
• Press ANGLE/PBC repeatedly to select different viewing angles
if available on the disc.
PBC (VCD/SVCD)
• When a VCD/SVCD is playing, press ANGLE/PBC repeatedly to
switch between PBC ON and OFF.
• If PBC ON is selected, the disc menu (if available) will appear on
the TV. Use the numeric keys (0-9) to select the options in the
menu.
Note:
This function is only available when scenes shot from multiple
angles have been recorded on the DVD disc. If multi-angle viewing
is not available,
OFF is displayed.
11. AUDIO (To select the Audio Languages available on the disc)
During playback, different audio languages can be selected.
• When a disc is playing, press AUDIO to show the current audio
language.
• Press repeatedly to select the desired audio language.
Note:
• For VCD, audio output (Mono L, Mono R) can be selected.
12. SUBTITLE (To select the Subtitle Languages available on the disc)
During playback, you can change the subtitle language or disable
the subtitle function.
• While a disc is playing, press SUBTITLE to show the current subtitle
playback language.
• Press repeatedly to select the desired subtitle language.
Notes:
• This function can only be used for discs on which different subtitle
languages have been recorded.
• The number of languages recorded may be different depending on
the disc.
: [ 1 2CH ]
: [ 3 ENGLISH ]
While the disc is playing, press DISPLAY to display playback information
available, depending on the disc.
For DVD:
• Press DISPLAY once to display the playback information and playing
time of current chapter as below:
• Press DISPLAY two times to further display more playback information
as the following:
• Press DISPLAY thrice to check the remaining time of the current chapter.
• Press DISPLAY four to check the playing time of the current title.
• Press DISPLAY five times to check the remaining time of the current
title.
For CD:
For VCD:
• Press DISPLAY once to display the playback information and playing
time of the current track.
• Press DISPLAY twice to check the remaining time of the current
track.
• Press DISPLAY three times to check the playing time of the current
disc.
• Press DISPLAY four times to check the remaining time of the current
disc.
1.1 TT (Title Info)
• Displays the Title Number being played and the Total Number of
Titles recorded on the disc.
1.2 CH (Chapter Info)
• Displays the Chapter Number being played and the Total Number of
Chapters recorded on the disc.
1.3 Elapsed time
• Displays the elapsed time from the beginning of the title/chapter/
disc/track being played.
1.4 Audio
• Displays the audio language and audio output mode currently
selected.
1.5 Subtitle
• Displays the subtitle language currently selected.
1.6 Angle
• Displays the viewing angle currently selected.
When a disc without multi-angle is played,
OFF is displayed.
1.7 TRK (Track Info)
• Displays the Track Number being played and the Total Number of
Tracks recorded on the disc.
1.8 Unmute Icon
• When the sound is unmuted, the icon will be displayed.
1.9 Repeat Mode
• Displays current repeat mode.
Note: After checking the settings, press DISPLAY again to make the information
disappear.
2. GOTO FUNCTION
This function allows you to select any point on the disc and to start playback
from this point.
2.1 Selecting a Specific Title/Chapter for DVD or Track for CD/VCD
Any specific Title/Chapter/Track can be selected to start playback by directly
selecting the Title/Chapter for the DVD or Track number for the CD/VCD.
• Press GOTO.
• Press
or to highlight the Title / Chapter / Track field and press
the corresponding numeric key 0 - 9.
• Press OK to confirm. The unit will then start playback from the selected
position.
Note: Press CLEAR to reset the highlighted Title / Chapter / Track.
2.2 Locating a Specific Time
A specific time can be selected by directly entering the time (hours, minutes,
seconds).
• Press GOTO.
• Press
or to highlight the time.
• Using the numeric keys 0 - 9, directly key in the time when playback
should start.
- The first two digits are for the hours.
- The next two digits are for the minutes.
- The last two digits are for the seconds.
• After entering the time, press OK to confirm. The unit will then start
playback from the selected time.
Notes:
• Some discs may not allow use of this function.
• Some scenes may not be located precisely as specified.
• This method for accessing a specific location is available only
within the current title of the DVD disc or current track of the CD disc.
• For VCD, it works at PBC OFF mode only.
• Press ZOOM/CLEAR to reset the highlighted time.
1. DISPLAY BUTTON
DVD
7/36
1/41
00:03:12
TT
CH
Disc format
Title
Current title
Total title
Chapter
Current chapter
Total chapter
Elapsed time
Audio
Subtitle
Angle
1/4
5.1CH
OFF
ENG
1/2ENG
---
Disc format
Track
Current track
Total track
Elapsed time
Repeat Mode
Unmute
CD
00:03:12
TRK
2/2
Disc format
Track
Current track
Total track
Elapsed time
Repeat Mode
Unmute
PBC status
VCD
PBC
00:03:12
TRK
2/2
DVD
1/41
00:03:12
TT
CH
TotalTitle
Current Chapter
Total Chapter
Time
07/36
Current Title
CD
00:03:12
TRK
Current Track
Total track
Time
02/16
3. PROGRAMMING PLAYBACK
PLAY MODE
MODE
REPEAT
OFF
OFF
PLAY MODE
MODE
REPEAT
PROG
OFF
3.1 DVD Programming
• Enter the title numbers in
--
(2 digit format, e.g. 01). Use or
to highlight chapter and enter the chapter numbers in
--
.
• Use
, , or to move to another entry.
• Repeat the above steps for more inputs.
• Press
or highlight PLAY on the screen and press OK to start
the programmed playback.
3.2 CD/VCD/SVCD Programming
• Enter the track numbers in
--
.
• Refer to DVD Programming for program operation.
3.3 Clear the Programs
• Highlight the current input on the screen and press CLEAR to
delete the program.
Note:
• Highlight CLEAR on the PROG screen and press OK to delete all
programs.
4. Random Playback
• Press the PLAYMODE button.
• When MODE is highlighted, use
or to select RANDOM mode.
Then press OK to confirm.
Note:
• For VCD, it works in PBC OFF mode only.
5. Repeat Playback
A specific title, chapter or track can be played repeatedly.
Note: During VCD / SVCD playback, repeat playback is only available
when PBC is OFF.
5.1 Repeating a Title/Chapter/Track/All disc
• Press the PLAYMODE button, then use
or to select the REPEAT
option.
• Use
or button to select the repeat mode and press OK to
confirm.
For DVD Disc : OFF > CHAPTER > TITLE
For CD / VCD / SVCD Disc : OFF > REP 1 > REP All
For MP3/JPEG/WMA files: OFF>REP DIR>REP1>REP ALL
5.2 Repeating a Specific Section
A-B repeat playback allows a specific section to be repeated.
• While the disc is playing, press the A-B button to set the beginning
of the section (point A) to be played repeatedly.
• Press A-B button again to set the end of the section (point B) to
be played repeatedly.
• The unit will then immediately begin replaying the selection ( A to
B) repeatedly.
• Press the A-B button again to clear the programmed repeat playback
and return to normal playback.
Note:
• The A-B repeat function can only be used within the same title or
track. If points A and B are defined in different titles or tracks, A-
B repeat is cancelled.
6. VCD/SVCD Playback control
• While a VCD / SVCD is playing, press ANGLE/PBC repeatedly to
switch between PBC (Playback Control) ON and OFF.
• If PBC ON is selected, the Disc Menu (if available) will appear on
the TV. Use
or Numeric keys (0-9) to select a play option.
• If PBC OFF is selected, the unit will skip the disc menu and start
playback directly.
• Press MENU to return to the Disc Menu with PBC ON mode.
7. Bookmark
The Bookmark feature allows a point to be marked for playback.
7.1 Creating a Bookmark
• During DVD / CD / VCD playback, press BOOKMARK to access the
bookmark menu.
• Press OK to add the first bookmark, then use the
/ buttons
to move the cursor and press OK to add additional bookmarks.
7.2 Recalling a Bookmark
• During playback, press BOOKMARK to access the bookmark menu.
• Use
or button to highlight the desired bookmark and press
to play from the bookmark point. Press CLEAR to delete the
highlighted bookmark.
Note:
• For VCDs, this function works in PBC OFF mode only.
PROGRAM
Title
Chapter
PROGRAM
PLAY MODE
MODE
REPEAT
RANDOM
OFF
PLAY MODE
MODE
REPEAT
OFF
REP ALL
REPEAT A-
A-B CANCEL
PBC: [ OFF ]PBC: [ OFF ]
MARK ------------ T1 C1 00:03:21
PLAYING MP3/JPEG/WMA/MPEG4 FILES
4
2
3
6
5
7
8
1
1. (Play)
• Press to start playback.
2.
(Pause)
• Press to pause the playback.
• Press
again or to resume normal playback.
3.
(Skip)
• Press to skip a track or picture forwards or backwards.
4.
(Stop)
• Press to stop playback and display the Selection Menu (For JPEG and
movie files).
Note: Press
to play from the beginning.
5. ZOOM/CLEAR
ZOOM
• Press to zoom into the picture during a JPEG file slideshow or MPEG
playback.
CLEAR
• Press to delete the information you inputted.
6. Active Navigation
• Press to rotate the pictures when playing the pictures.
• Press to select a file and then press OK to confirm in the selection
menu.
• Moves the picture frame in ZOOM status.
7. Audio ( MPEG 4)
• During playback, press AUDIO to show the current playback audio
language.
• Press repeatedly to select the desired audio language.
8. Subtitle ( MPEG 4)
• The unit only can support the MPEG4 files with external subtitle.
• To use the subtitle function:
1) Download or create the subtitle file with specified format, e.g.
Subrip (*.srt), MicroDVD (*.sub), SAMI Captioning (*.smi), SubViewer
2.0 (*.sub).
2) Name the MPEG 4 movie and subtitle file with the same characters
(e.g. abc.avi & abc.srt). Burn them on to a CD disc or copy them into
the USB device.
3) Insert the disc or USB device and select the MPEG4 file to play,
then press SUBTITLE to turn subtitle on or off.
SELECTION MENU
Music
Picture
Movie
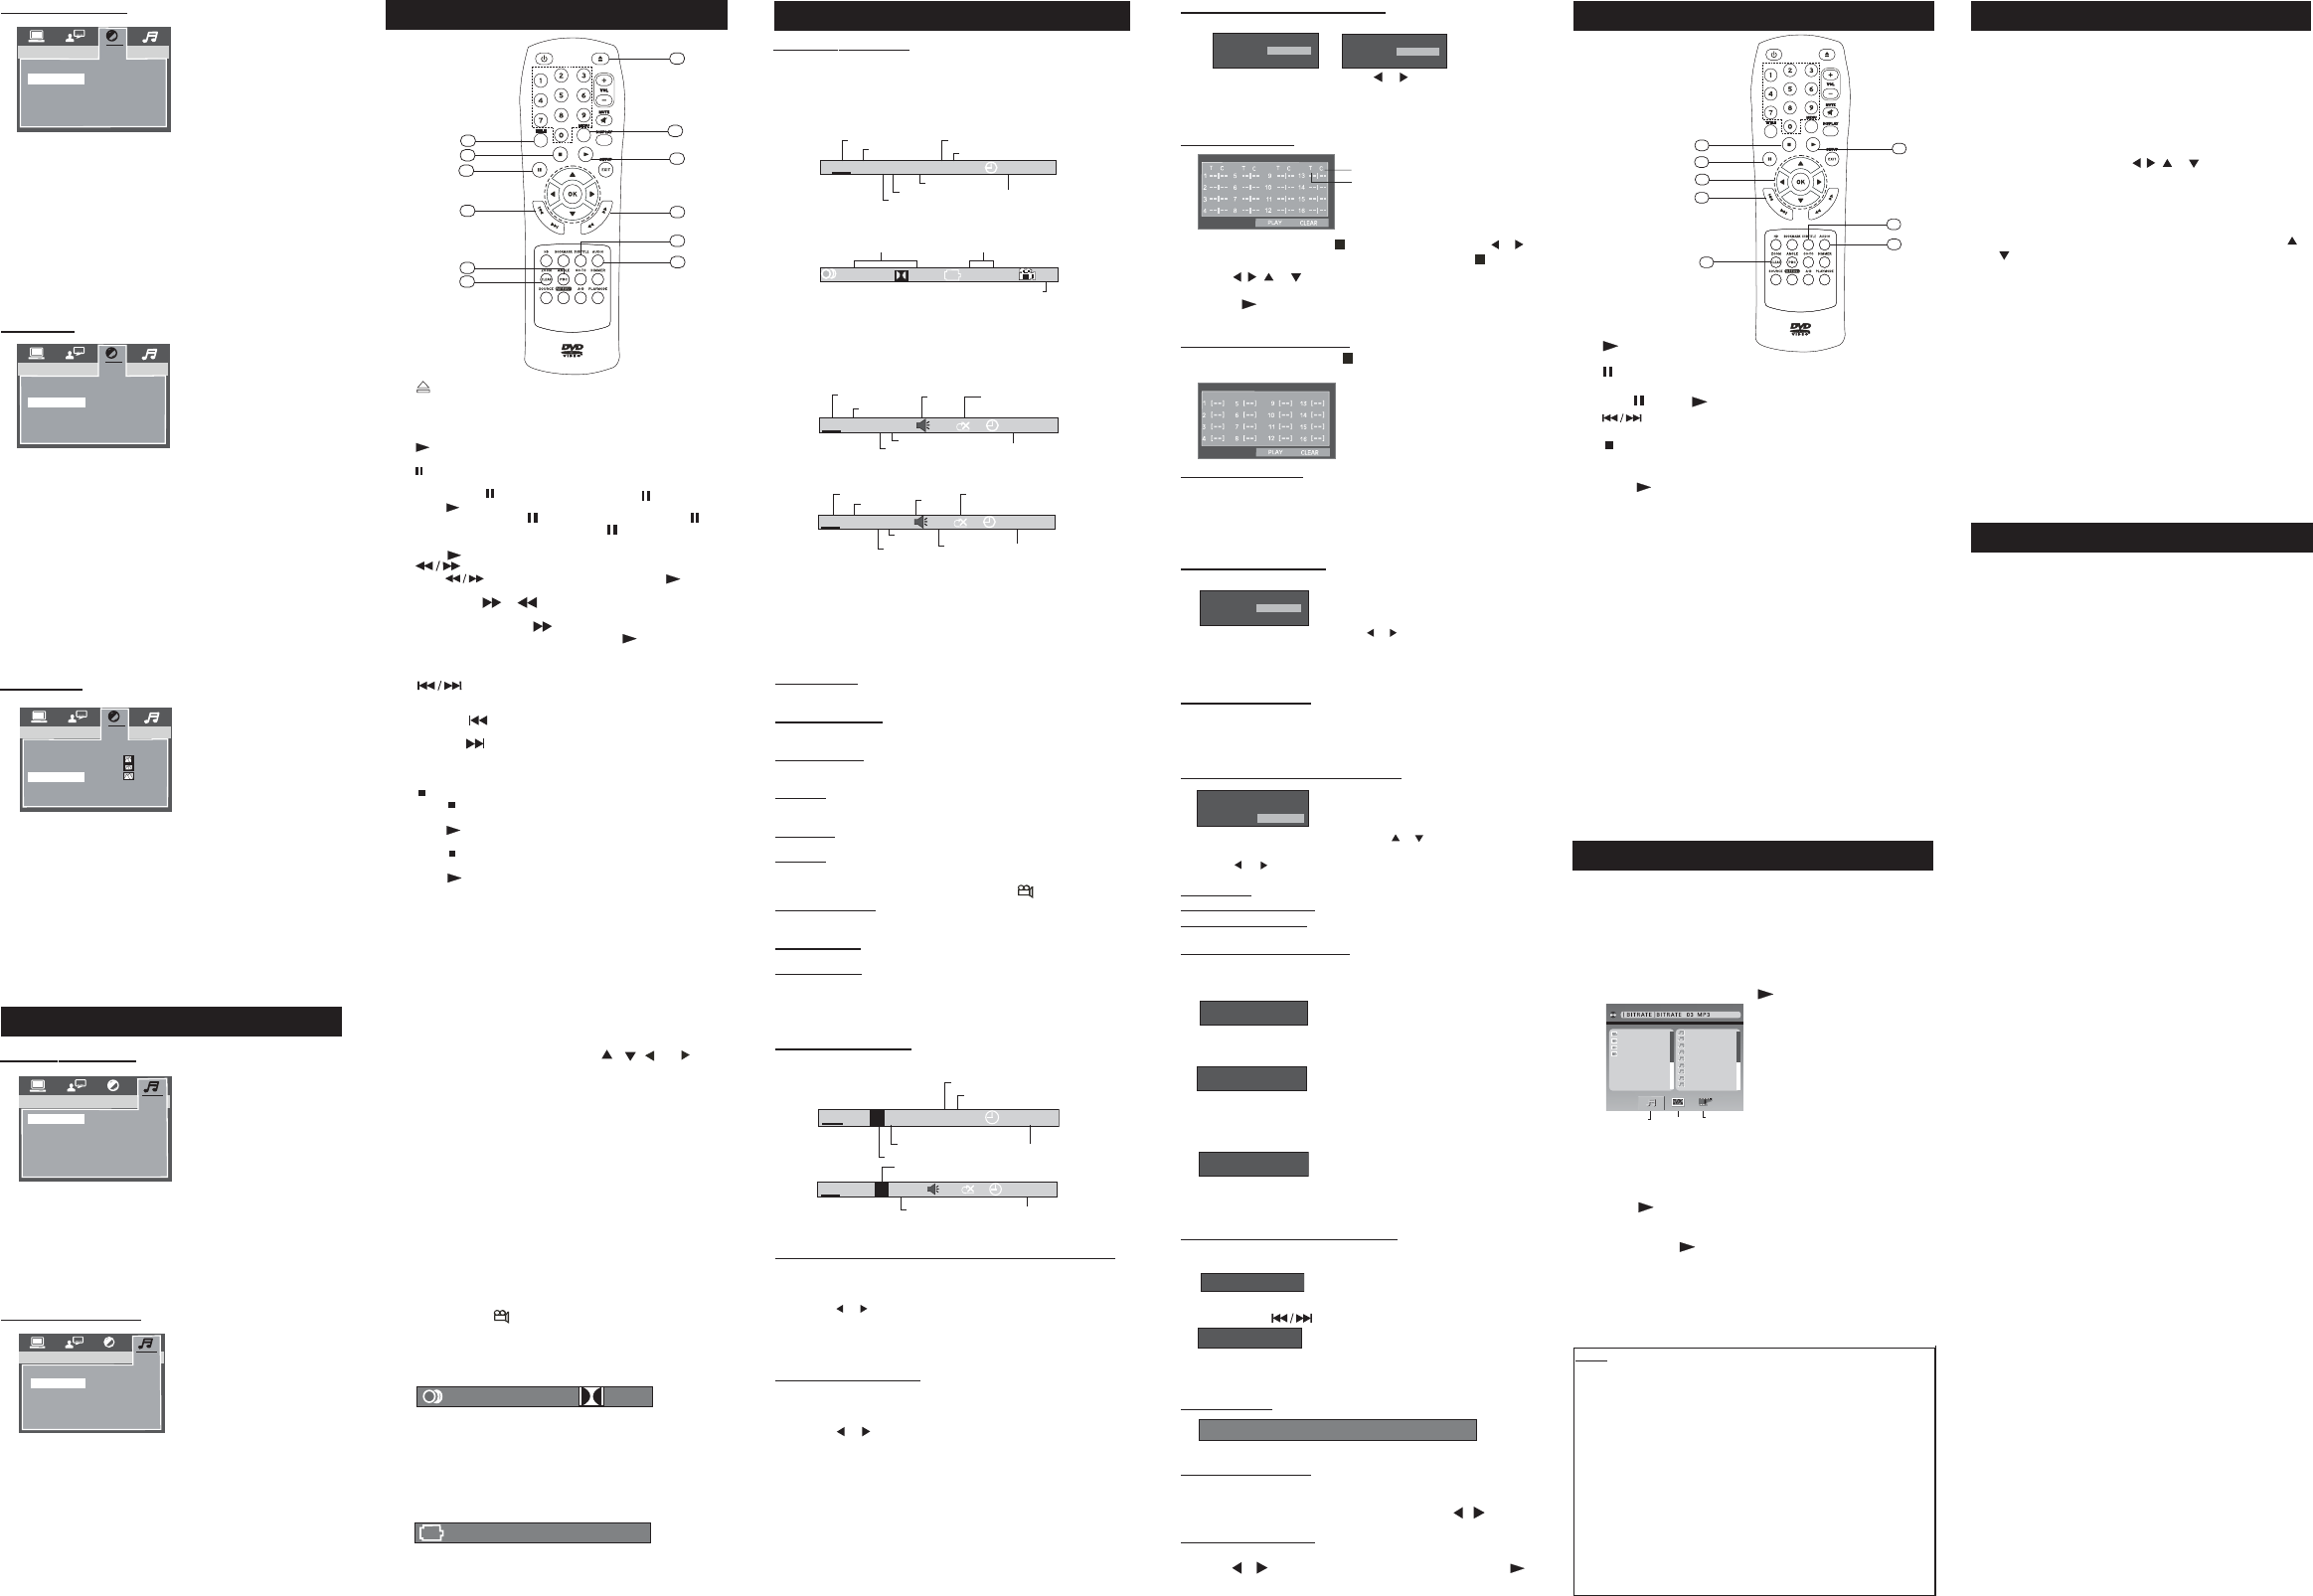
01 .BITRATE
02 .FOLDER TEST
03 .FOLDER 1
04 . ADDCHARAK
01 .BITRATE_03
02 .
03 .
04 .
05 .
06 .
07 .
BITRATE_04
BITRATE_05
BITRATE_06
BITRATE_07
BITRATE_08
BITRATE_09
08 .BITRATE_10
09 .BITRATE_11
• Press the PLAYMODE button.
• When MODE is highlighted, use
or to select PROG mode.
Then press OK to confirm.
Note:
During VCD/SVCD playback, the function is only available when PBC is
OFF.
The Selection Menu will appear when MP3/ WMA/JPEG/MPEG 4 files are
read.
All folders will appear on the left side menu and numbered in ascending order.
When one of the folders is highlighted, all the contents of the folder will be
displayed on the right side.
Music/Picture/Movie files can be selected individually for desired playback.
Use the navigation keys to highlight the Music/Picture/Movie icon at the bottom
of Selection Menu and press OK to confirm.
Then select the files and press OK or
to start playback.
[MUSIC] --- MP3 / WMA Files
The unit will play the MP3 / WMA file currently selected. It will then play all the
files in the subfolders contained within its folder. After that, the unit will play
the remaining folders on the disc.
[PICTURE] --- JPEG Files
Press PLAY
, the unit will start the slideshow from the JPEG file currently
selected. Then you can zoom or rotate the displayed pictures. You can also
select a folder and display all the files in that folder. Select the folder of your
choice and press the
button.
[MOVIE] --- MPEG 4 Files
The unit will start to play the whole file currently selected.
Notes:
• MP3 and JPEG files can be played simultaneously.
• The highlighted icon at the bottom of the menu indicates what kind
of file is playing.
With this player, you can record your favorite CD music
to a USB disk with
MP3 format.
1. Check that the USB disk has been properly connected.
2. Insert a CD disc that contains the music you want to record into
the disc tray.
3. Press the SOURCE key on the remote control to select the DISC
mode to play.
4. Press RIPPING, the CD RIPPING menu then displays on the
screen.
• In the OPTIONS menu, use
, , or to move to the encoder
options and then press OK to change the settings.
SPEED: Set the encoding speed between 1X and 4X.
BITRATE: Set the encoding bit rate among 128KBPS, 160KBPS,
192KBPS, 256KBPS and 320KBPS.
• In the TRACKS menu, the default is to record all the tracks that
have a “cross” mark in the box next to them. You can use
or
to select the track that you do not want to record and then press
OK to confirm deletion.
• In the START menu, you can check the total tracks, total time and
total size that you want to record.
Press OK to start playing and recording the selected tracks.
--> The track progress bar and total progress bar will display on
the screen indicating the recording progress.
--> During recording, highlight CHANGE SPEED and press OK to
change the encoding speed. For the encoding speed 4X, the
sound will be muted.
--> Highlight CANCEL and press OK to stop recording.
--> USB FULL appears if the storage space on the USB disk is full.
When recording is complete, press OK to confirm.
• Highlight QUIT and press OK to exit the CD RIPPING menu.
• The tracks are saved in the folder named “RIPPING”.
Notes:
• This unit can not support NTFS format. If the USB disk doesn’t
work on it, please check the USB disk file system and format it
with FAT or FAT32.
• If “USB ERROR” appears during CD Ripping, or the MP3 files
cannot be read after ripping, please format the USB disk with FAT
or FAT32 and then start the ripping again.
CD RIPPING
TROUBLESHOOTING GUIDE
If it appears that the unit is faulty, first consult this checklist. It may be that
something simple has been overlooked.
Note: Under no circumstances should you try to repair the unit yourself as
this will void the warranty. Only qualified service personnel can remove
the cover or service this unit.
NO POWER
• Check that the player is switched on.
• Check if the power cord is properly connected.
NO PICTURE
• Check if the TV is switched on.
• Check if the correct AV input is selected on the TV (refer to the TV
manual for more details).
• Check the video connection between the player and TV.
NO PICTURE AT HDMI OUTPUT.
• Check if the TV HDMI input is selected.
• Check if the HDMI resolution selected corresponds to the resolution
of your HD TV.
• Check if your HD TV supports HDCP.
BAD QUALITY PICTURE
• Check the disc for fingerprints and clean with a soft cloth, wiping
from the center to the edge.
• A small amount of picture distortion may sometimes appear, this
is not a malfunction.
• Check if the disc format is compatible with the TV (PAL/NTSC).
NO COLOR IN PICTURE
• Check if the disc format is compatible with the TV (PAL/NTSC).
• Check that the DVD player is not connected through a VCR.
PICTURE INTERFERENCE
• Relocate the unit further away from possible interference or
emission sources (e.g. radio, power amplifier, radiator etc.).
NOT RETURNING TO START-UP SCREEN WHEN
DISC IS REMOVED
• Check to see if the program requires another disc to be loaded.
• Reset by unplugging the player from the power, then connect the
power again.
THE PLAYER DOES NOT RESPOND TO THE
REMOTE CONTROL
• Aim the remote control directly at the sensor on the front of the
player.
• Avoid all obstacles which may interfere with the transmission
path.
• Inspect and/or replace the batteries.
NO SOUND
• Check audio connections.
• If using a Hi-Fi amplifier, try another sound source.
• Clean the disc.
• Check if the disc is defective by trying another disc.
NO AUDIO AT DIGITAL OUTPUT
• Check the digital connections.
• Check the Digital Out menu to make sure that the digital output is
correctly set.
• Check if the audio format selected is compatible with the player.
NO AUDIO AT HDMI OUTPUT
• Check if the DTS digital out is selected as audio output if DTS is
played.
DISC CANNOT BE PLAYED
• Ensure disc is placed properly into the disc tray.
RESTORE THE FACTORY DEFAULT SETTINGS
• Under DVD mode with NO DISC in the unit, press “76000” on
Remote Control to reset the DVD player to the default settings.
The DVD player will switch to standby mode automatically.
IMPROPER FUNCTIONING
• The normal function of the product may be disturbed by external
interference. Just reset the product by disconnecting and
reconnecting the power cord.
NOTE:
This equipment has been tested and found to comply with the limits for
a Class B digital device, pursuant to part 15 of the FCC Rules. These
limits are designed to provide reasonable protection against harmful
interference in a residential installation. This equipment generates,
uses and can radiate radio frequency energy and, if not installed and
used in accordance with the instructions, may cause harmful interference
to radio communications. However, there is no guarantee that interference
will not occur in a particular installation. If this equipment does cause
harmful interference to radio or television reception, which can be
determined by turning the equipment off and on, the user is encouraged
to try to correct the interference by one or more of the following measures:
--- Reorient or relocate the receiving antenna.
--- Increase the separation between the equipment and receiver.
--- Connect the equipment to a supply outlet different from that to which
the
receiver is connected.
--- Consult the dealer or an experienced radio/TV technician for help.


