


2© COPYRIGHT 2004 LUX PRODUCTS CORPORATION. ALL RIGHTS RESERVED
CAUTION: Do not short the 120 / 240 Vac wires with the thermostat.
This will damage the thermostat and void the warranty.
WARNING: To avoid the risk of fire hazard, all connections to
aluminum conductors must be made using approved
CO/ALR solderless wire connectors. Do not use the
supplied solderless wire connectors.
5. Bend the solid conductors, then push them and the wire connectors
into the electrical box. Secure the thermostat base to the electrical
box with the mounting screws.
6. Snap the cover in place.
7. Turn the power on.
INSTALLING BATTERIES
The thermostat requires batteries to operate your furnace and retain its
programming in memory. Replace the batteries when the LO BAT
indicator appears in the display or at least once a year.
NOTE: When replacing batteries, you have approximately 1 minute
before the programs are lost.
1. Remove the fresh batteries from their package.
2. Open the front door of the thermostat and tilt out the battery
compartment.
3. Remove the used batteries if necessary.
4. Install two new Energizer
®
or DURACELL
®
"AA" size alkaline batteries
in the battery compartment. Observe the polarity marking shown in
the compartment.
5. Place the battery compartment back in the thermostat.
6. Close the door.
Note: If this is the first time you are installing batteries, the thermostat
will display “SUN 12:00 AM”. Within 90 seconds, the thermostat will
begin to display the room temperature alternately with the time. To
correct the display, see SETTING THE TIME AND DAY.
WARNING: Use Energizer
®
or DURACELL
®
Alkaline Batteries Only.
Rotate dial to SET WEEKDAY PROGRAM. To program the
WEEKEND, rotate the dial to SET WEEKEND PROGRAM. With dial on
set WEEKDAY Program, you will see this display.
The thermostat alternately displays the current time and the room
temperature. It also displays the day of the week and the currently
active control program that is controlling the temperature: MORN, DAY,
EVE, or NIGHT. The set point temperature will appear in the right side
of the display.
Programming the thermostat
You can change any of the preset times and/or temperatures to
suit your schedules for the weekday and weekend programs. Each day
is divided into four periods: Morning, Day, Evening, and Night.
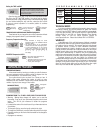
A blank programming chart is provided for you to record your
temperature settings in that chart.
M
O
MORN
DAY
EVE
NIGHT
H
E
A
T
AM
T
U
W
E
T
H
F
R
This thermostat is “armchair programmable.” You can make any program or
setting changes with the thermostat body off or on the wall thermostat base.
OPERATION
To program temperature.
To change the start time
for MORN.
To move to DAY.
To change the temp.
setting for MORN.
To program temperature.
To change start time
for DAY.
To move to EVE.
To change the temp.
setting for DAY.
To program temperature.
To change the start
time for EVE.
To move to NIGHT.
To change the temp.
setting for EVE.
To program temperature.
To change the start
time for NIGHT.
Rotate dial to RUN position to
start the programs.
To change the temp.
setting for NIGHT.
UP
DOWN
UP
DOWN
NEXT
NEXT
NEXT
NEXT
NEXT
NEXT
NEXT
UP
DOWN
UP
DOWN
UP
DOWN
UP
DOWN
UP
DOWN
UP
DOWN
Push in the RESET key. This
sets the built-in heating
programs. To review the built-in
programs, rotate the dial to SET
WEEKDAY PROGRAM or SET
WEEKEND PROGRAM.
You can use the built-in
programs as shown, or change
them as you wish. Each day is
divided into four periods. Each
period has its own starting time
and temperature.
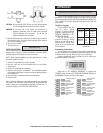
The Built-In Programs
PERIOD HEAT
WEEKDAYS
MORN 6:00 AM 70°
preprograms DAY 8:00 AM 62°
EVE 6:00 PM 70°
NIGHT 10:00 PM 62°
MORN 6:00 AM 70°
WEEKENDS DAY 8:00 AM 62°
preprograms EVE 6:00 PM 70°
NIGHT 10:00 PM 62°
The dial must be in the RUN position to
close the door.