


9
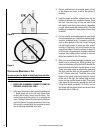
NOTE: DIAGRAMS & ILLUSTRATIONS ARE NOT TO SCALE.
installation ProCeDure - faCtory-Built Zero
ClearanCe firePlaCes
Fireplace and Chimney Requirements
The Performer™ C/A210 insert must only be installed in
a zero clearance factory-built fireplace using 6” (152mm)
stainless steel pipe extending from the insert’s flue into the
chimney of the fireplace. For optimum safety and perfor-
mance we recommend
a full length stainless steel liner directly connected to the
insert’s flue outlet.
The Performer™ C/A210 insert must only be installed in
a zero clearance factory-built firplace that is structurally
sound. Fireboxes
or chimneys that have flaws, burnouts, or warping must be
replaced or repaired prior to installation. Check with your
fireplace manufacturer if any problems exist.
All convection vents and louvers must be left unmodified
and unobstructed.
The Performer™ C/A210 insert can only be installed in the
following brands of factory-built zero clearance fireplaces:
SUPERIOR, HEATILATOR, MAJESTIC, MARTIN, PREWAY,
MARCO, TEMCO, and FMI.
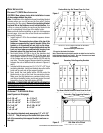
The firplace cavity must be 36” (914mm) in width, 21”
(533mm) in height, and 14” (356mm) in depth. Installation
in larger size fireboxes of the same brands is permissible.
Installations into other brands of the same size is permissible
only with approval from local building officials.
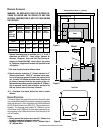
Modifications allowed to the factory-built fireplace are as
follows:
- Remove the damper
- Remove the smoke shelf or smoke baffle
- Remove ember catches
- Remove viewing screen/curtain
- Remove side and rear bricks
- Remove the fire grate
- Remove doors
Clearance to Combustibles
See “Required Clearances” on page 7.
Fireplace Pre-Installation Preparation
NOTE: LENNOX HEARTH PRODUCTS RECOMMENDS PRO-
FESSIONAL INSTALLATION BY A LICENSED AND BONDED
INSTALLER. SEE YOUR DEALER FOR RECOMMENDATIONS.
IMPROPER INSTALLATION OR MIS-USE WILL VOID YOUR
WARRANTY AND CREATE A SERIOUS SAFETY HAZARD.
Remove any doors or screen materials from the fireplace
opening. Remove the damper mechanism completely. Also
remove grates or ember catches inside the fireplace hearth.
If your fireplace is equipped with a smoke shelf or baffle and
if it interfers with the installation it may be removed. Side
and rear refractory may also be removed, if necessary, to
facilitate installation. No modifications shall be done unless
allowed on the previous list. Retain all removed parts, they
must be reinstalled before the fireplace can be used in it’s
original condition.
Insert Pre-Installation Preparation
Install the two 3” (76mm) long bolts (with the head up)
through the nuts attached to the insert on the lower rear
corner of each side. This will allow you to level the insert
when placed into the fireplace.
Measure from the front of the top surround mount to the
center of the flue. Determine if there is an alignment problem
in connecting a liner from the chimney to the insert’s flue.
If there is an alignment problem, connection can be made
using a short piece of stainless flex or a stainless steel offset
box (available from your dealer). Before installing the liner,
make any attachment brackets or drill any holes in the liner,
offset box, or insert. Once installed, it may be difficult or
impossible to drill additional holes.