


11
4 SMART SYSTEM control module (continued)
Outdoor Knight XL User’s Information Manual
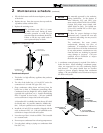
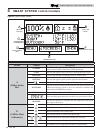
Manual and auto reset high limit set points
The set points used by the Manual Reset High Limit and the
Auto Reset High Limit are adjustable through the display. To
access these settings, press the NAVIGATION dial once, then
press the LEFT SELECT [LIMITS] key once. The two settings
appear. Rotate the NAVIGATION dial as needed so the arrow
(>) points to the limit setting you wish to adjust. Press the
NAVIGATION dial once. The value of that setting will begin
to flash. Rotate the NAVIGATION dial to change the value
to the desired set point. Press the RIGHT SELECT [SAVE]
key to save the new value, or the LEFT SELECT [EXIT] key to
leave the set point at the original value. The other high limit
setting may then be changed using the same procedure, if
desired. When finished, press the RIGHT SELECT [HOME]
key to store the new settings, or the LEFT SELECT [EXIT] key
to return to the Space Heating and DHW Set Points Menu.
Night Setback Override
Any Night Setback On trigger currently active or scheduled
within the next seven (7) days can be skipped. To skip a
trigger, rotate the NAVIGATION dial until the arrow (>) is
next to the trigger you wish to skip. Press the NAVIGATION
dial once. “SK” will appear next to that trigger to indicate
that it will be skipped. You can restore an upcoming trigger
by selecting that trigger, and pressing the NAVIGATION dial
again. The “SK” next to that trigger will disappear.
To save any changes and return to the Home Screen, press
the RIGHT SELECT [HOME] key. To return to the Status
Screen without saving the changes, press the LEFT SELECT
[EXIT] key.
Temperature Units
The control can be configured to display temperature in
either °F or °C. This parameter can be changed by the user
or the installer by accessing the Temperature Units parameter.
The default is °F. To change the temperature units, access
the clock menu as described in the User section (this page).
Rotate the NAVIGATION dial until the arrow (>) is pointing
to “TEMPERATURE UNIT °F”. Press the NAVIGATION
dial once. The temperature unit will begin to flash. Rotate
the NAVIGATION dial until the desired temperature unit
is shown. Save the new setting as described in the Saving
Parameters section (page 10).
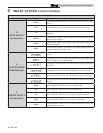
There are three (3) individual user set points for better zone
control. These are listed as SH1 Set Point through SH3 Set
Point. If multiple set points are calling for heat the highest set
point has priority. The range is SH Minimum Set point to SH
Maximum Set point (32°F (0°C) - 190°F (88°C)). The default
is 125°F (52°C).
By installing a tank sensor, the SMART SYSTEM control can
perform the tank thermostat function. The SMART SYSTEM
control automatically detects the presence of this sensor, and
generates a DHW call for heat when the tank temperature
drops 6°F (-14°C) below the tank set point differential (Tank
Set point Differential parameter), and finishes the call for heat
when the tank temperature reaches tank set point + offset.
This parameter can be changed by the installer by accessing the
DHW Tank Set point parameter. The temperature range of this
parameter is 68°F (20°C) to 190°F (88°C). The default value is
125°F (52°C).
Press the NAVIGATION dial once. A menu will appear
showing the SH1, SH2, SH3, and DHW Set Points. Rotate
the NAVIGATION dial until the arrow (>) is pointing to the
setting you wish to change. Press the NAVIGATION dial again.
The value of the selected setting will begin to flash. Rotate the
NAVIGATION dial to adjust the value. Save the new setting as
described in the Saving Parameters section (page 10).
Space heating (SH1, SH2, SH3) and tank set points
CAUTION
Mixing valves are required for the
protection of any low temperature loops.