OPERATING INSTRUC-
TIONS
FUEL
Egg size Bituminous coal for residential
furnaces, or any of the specially pack-
aged fireplaces coals can be used.
Coal with a low ash content (2% to 6%)
is recommended. (See Page 12 & 13)
NOTE: Store coal in a dry, well-venti-
lated area.
LIGHTING
1. Set the thermostat on "High" for
maximum draft.
2. Open the feed door and place paper
and kindling on the grate for starting the
fire.
3. Light fire and close feed door.
4. Add about 15 pounds of coal de-
pending on model after fire is burning
briskly. Use care not to smother the
kindling fire.
5. Set thermostat higher or lower for
desired temperature.
ADDING FUEL
When starting a fire, add small amounts
of fuel periodically as required (enough
to burn for 3 to 5 hours). As you become
more familiar with the operation of your
heater, it is possible to add coal to burn
for longer durations of between 8 to 12
hours, but doing so carelessly will pro-
mote incomplete combustion and con-
siderable sitting, along with a very dirty
inefficient fire.
1. Set thermostat to HIGH before open-
ing feed door.
2. Coal Fire- Never smother the fire
when adding coal (see CAUTION). Gas
accumulation and a mild smoky explo-
sion will occur:
a. Add fresh kindling if the bed of
coals has cooled.
b. Add up to 20 lbs. of coal. Never
add coal above top of the firebrick.
c. Stir the coal and watch the fire.
Be sure the new coal is burning
before you close the doors and turn
the thermostat down.
11
14
3. Shake Grates vigorously back and
forth to dump ashes into ash pan. Do
this at least once every 12 hours of
operation.
4. Empty ash pan regularly. Do not
allow ashes to build up to grate, as grate
will warp and burn out, and you might
spill the ashes when removing the pan.
Dispose of hot ashes properly. (See
note 11 on page 3)
CAUTION: BUILD A FIRE ON INTE-
GRAL GRATE THAT IS PROVIDED
WITH THE HEATER.
MINIMUM FIRE
The burning rate at the low setting can
be further adjusted by opening or clos-
ing the minimum fire air shutter (Fig.
10,Pg. 14) on the draft control door.
1. Partially close the shutter to make the
fuel burn longer.
2. Open the shutter, exposing a large
opening, to reduce the formation of
creosote on soot (see notes on Chim-
ney Maintenance).
3. Do not operate the heater with the
minimum fire air shutter completely
closed.
CAUTION: DO NOT OVERFIRE THE
HEATER, AS STATED EARLIER, THIS
CAN PRODUCE A DANGEROUS
CONDITION AND EVEN CAUSE A
HOUSE FIRE. IF ANY PORTION OF
THE HEATER OR ANY CHIMNEY
CONNECTOR GLOWS RED OR DIS-
COLORS, THE HEATER IS BEING
OVERFIRED.
CAUTION: DO NOT OPERATE THIS
HEATER WITH FEED OR ASH DOOR
OPEN. THIS HEATER IS DESIGNED
FOR THERMOSTATIC OPERATION.
OPERATION WITH EITHER DOOR
OPEN WILL OVERHEAT AND DAM-
AGE THE HEATER.
CAUTION: NEVER STORE FLAM-
MABLE LIQUIDS, ESPECIALLY
GASOLINE, IN THE VICINITY OF THE
HEATER.
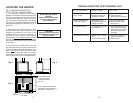
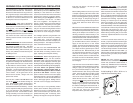
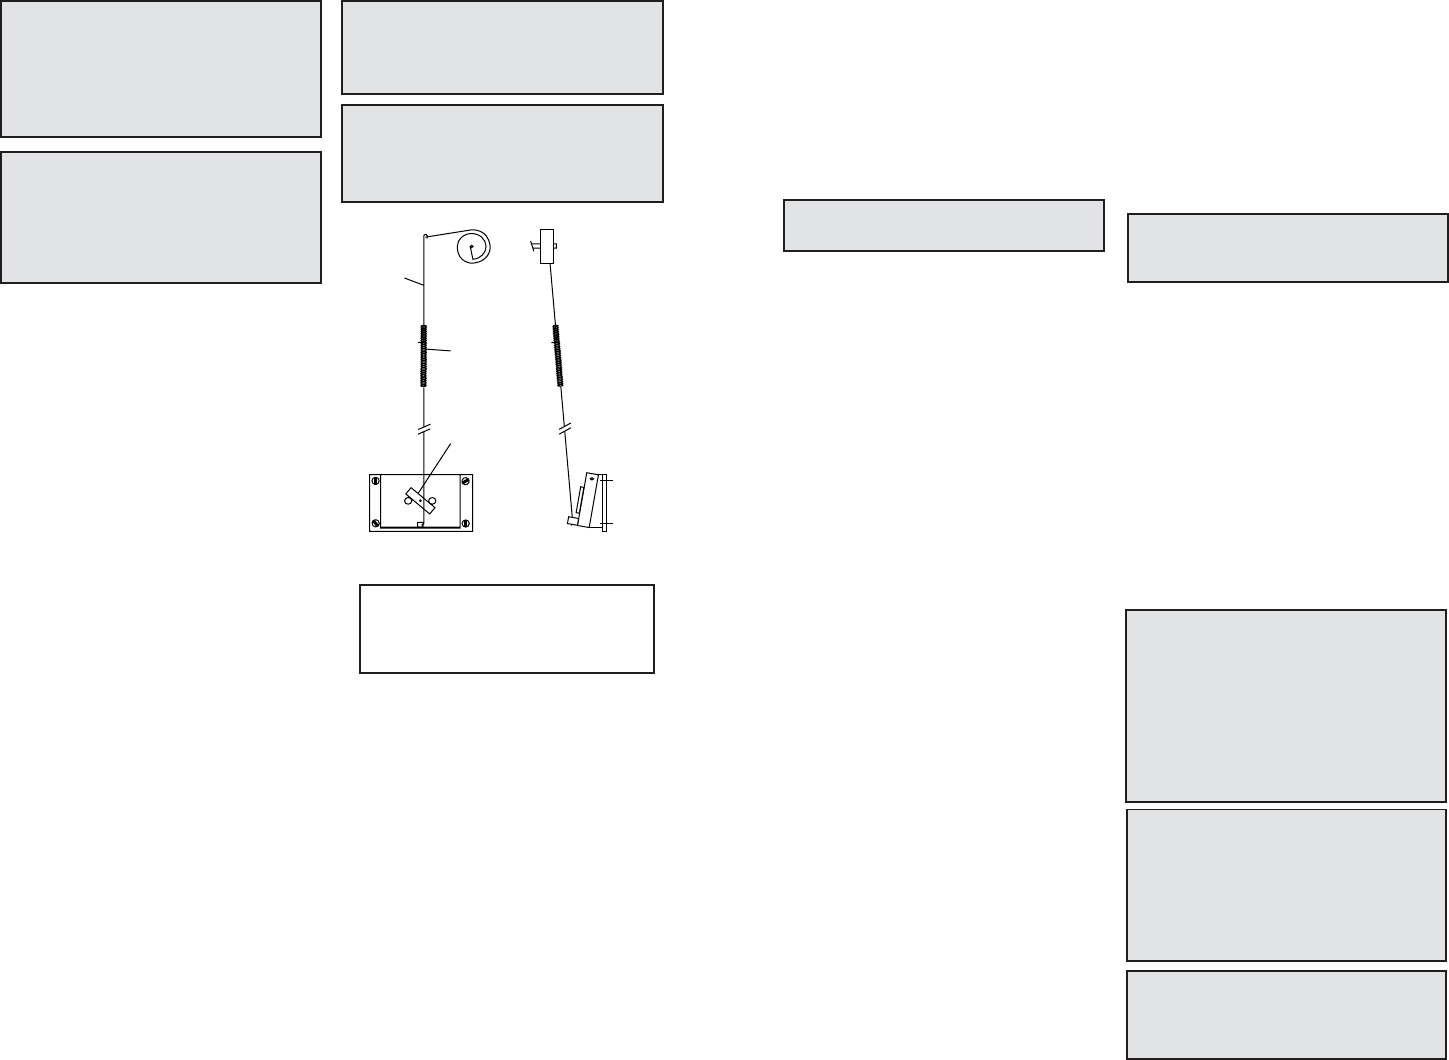
Fig. 10
NOTE: More than one recalibration
may be necessary. At room temp.
(72*F) and "Low" setting, the draft
damper door should be closed.
CAUTION: NEVER USE THE MANU-
FACTURED COAL BRICKS THAT
ARE MADE FROM COAL DUST AND
A WAX-TYPE BINDER.
WARNING: THE USE OF WOOD IN
THIS STOVE EXCEPT FOR COAL IG-
NITION PURPOSES, IS A VIOLATION
OF FEDERAL LAW.
CAUTION: GASES THAT ARE
DRIVEN FROM FRESH COAL MUST
BE BURNED OR THEY WILL ACCU-
MULATE AND EXPLODE. NEVER
SMOTHER A FIRE WHEN ADDING
FRESH COAL.
CAUTION: NEVER USE GASOLINE,
GASOLINE-TYPE LANTERN FUEL,
KEROSENE, CHARCOAL LIGHTER
FLUID, OR SIMILAR LIQUIDS TO
START OR "FRESHEN UP" A FIRE IN
THE HEATER.
ADJUSTING THE THERMOSTAT
The thermostat control was calibrated
at the factory. The operation of the heater
may require a change in calibration.
Calibration adjustments should be made
at room temperature.
If the room temperature is not satisfac-
tory, the thermostat operating range
may be changed as follows:
A. To increase the amount of heat at a
"HIGH" setting, adjust the wire link-
age to increase the draft damper
opening (Fig. 10).
1. Unhook linkage wire at point C
2. Take point A in left hand and B
right hand then turn B clockwise
about 3 turns.
3. Then hook linkage wire back to
draft control damper door at
point C.
B. To decrease the amount of heat at
"LOW" setting:
1. Check feed and ash doors to be
sure that they are closed tightly.
2. Check the connector pipe to see
that it is sealed in the flue collar
and at all joints.
3. If no air leaks are found, adjust
linkage the same as above,
except turn B counterclockwise
about 3 turns.
C. Adjusting the minimum Air Shutter:
The minimum air shutter has an
infinite number of settings. Several
adjustments may be necessary for
the unit to work most effectively for
your particular installation.
1. The minimum air shutter may be
adjusted to the closed position in
installations where the draft is
"above normal". Generally, .06
w.c. or above would be consid-
ered "above normal".
2. In installation where the draft is
"below normal", the minimum air
shutter would be adjusted toward
the open position.
MINIMUM FIRE
AIR SHUTTER
(C)
(B)
(A)


