


CAUTION: Please read these instructions before installing the luminaire. To avoid electric shock, turn off the power from the electric panel before beginning. For safety, this
luminaire must be grounded. Consult an electrician to make sure all the requirements of the US or Canadian Code for electricity and the current local regulations comply. Keep these
instructions as reference.
Installation Instructions for Surface LED
Colorwash Luminaire
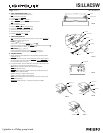
Note 1: This portable luminaire (Fig.1) uses LED (light emitting diode lamps), which require no maintenance. Designed for residential, commercial and industrial applications, non
hazardous dry locations, ceiling (Fig.2), wall-mounted (Fig.3) and floor applications (Fig.4).
Note 2 : This portable luminaire includes a 96 in. extension cord and can also be hardwired using flexible metal conduit (Fig.5), two 3/8 in. connectors are supplied.
A. OPTICAL ASSEMBLY ADJUSTMENT:
1. Adjust head on assembly at the desired angle. (Fig.6)
2. Lock in place inserting locking screws through hinge. (Fig.7)
Note: Use a 3/16 in. Allen key (not supplied).
B. CEILING or WALL MOUNT INSTALLATION: (Fig.2)
Note: Provide anchors to support 8 lb (3.6kg) luminaire.
For ceiling mount
1. Install 2 anchors at 20-1/2 in. (520mm) from luminaire center. (Fig.8)
Note: For more stability, install 4 anchors 2 in. from center of the luminaire.
(Fig.9)
For wall mount
1. Mount 2 anchors 15 in. (381mm) apart. (Fig.12)
2. Determine light beam orientation (uplight or downlight). (Fig.3a & 3b)
3. Loosen screw from the mounting tabs. (Fig.10 & 11)
4. Rotate and position oblong holes located at each end. (Fig.11)
5. Locate embossed holes and screw in place. (Fig.10 & 11)
6. Install screws (not provided) through oblong holes. (Fig.8 & 9)
D. FLOOR INSTALLATION:
1. Position mounting tabs towards front of the luminaire (for stable floor standing),
or at each end. (Fig.10 & 11)
2. Loosen screw from the mounting tabs. (Fig.10 & 11)
3. For more stability depending on optical assembly orientation, secure with 2
screws from each end of assembly (optional). (Fig. 9 & 12)
4. Locate embossed holes and screw in place. (Fig.10 & 11)
5. Install screws through oblong holes. (Fig.12)
LOCKING
SCREW
HINGE
ALLAN KEY
FIG.7
HEAD ON
FIG.6
FIG.8
FIG.9
FIG.10
FIG.11
ANCHOR
LUMINAIRE
LUMINAIRE
EMBOSSED
SCREW
MOUNTING
TAB
HOLE
SCREW
MOUNTING TAB
FIG.1
Portatif ColorWash Ceiling
Wall
Floor
Daisy Chain
FIG.2
FIG.3a
FIG.4
FIG.5FIG.3b
Lightolier is a Philips group brand
IS:LL ACSW
Page 1 of 2 10-08/Rev-01