


I
P
5
READ AND UNDERSTAND THESE INSTRUCTIONS BEFORE INSTALLING FIXTURE
INSTRUCTION SHEET NO.
Thisfixture is intended
for installation in accordance with the National Electrical Code and local regulations.
To assure full complianm with local codes and regulations, check with your local electrical inspector before
installation. Toprevent electrical shock, turnoff electricity at fuse box before proceeding.
IS:6074
Retain these instructions for maintenance reference.
ROI 93
Page 1 of 2
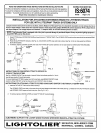
INSTALLATION FOR AITACHING EXTENSION WAND TO LYTESPAN TRACK
FOR USE WITH LYTESPAN@TRACK SYSTEMS ONLY
Lytespot extension wand can be mounted on any Basic, Advent, Multipoint or Monopoint Track. It is intended for insulation on level ceilings only. Do not
mount on slope ceilings or walls unless when used with extension wand sloped ceiling adapter (6079WH, BK) ordered separately. Will fit Lytespot fixtures
with Squat Adaptors, Low Voltage Adapters and Standard “T” Adaptors. NOTE: Do not exert sideward pressure on fixture,
NOTE: This Extension Wand is equipped with a flex joint to prevent damage by accidental impact. Heavy asymetric lighting equipment
should NOT BE used on this
device.
1.Grasp FllllNG at top of EXTENSION WAND and insert itinto the LYTESPAN TRACK. The LOCKING LEVER must be on the same side ofthe track asthe BEAD,
(See Fig. 1.)
2. Rotate the top FITTING 90° clockwise, )See Fig. 2), until LOCKING LEVER snaps and locks in place. (See Fig. 3.) Do not rotate wand from STEM or
BOllOM HOUSING,
3. To Remove: Depress LOCKING LEVER; then rotate TOP FITTING 90° counter-clockwise. Do not rotate wand from STEM or BOITOM HOUSING,
LYTESPAN
TRACK
BEAD
FITTING
LOCKING
LEVER
CLO
.1
IG. 2
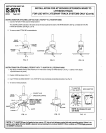
INSTRUCTIONS FOR CONVERTING Fll_llNG TO OPERATE ON
BRASS CONTACT
2 CIRCUIT TRACK SYSTEMS
See Fig.4. BRASS CONTACT can be raised or lowered, Broken line indicates position for 1circuit
track
or lower circuit of 2 circuit track system.
LOCKING
To convert attachment
FllTING for upper circuit of 2 circuit track, raise BRASS CONTACT to high
LEVER
position by lifting CONTACT
as high as stop permits and CONTACT clicks into place. FIG. 4
INSTRUCTIONS FOR AllACHING LYTESPOW FIXTURES USING SQUAT ADAPTER TO BOllOM OF LYTESPAN@ WAND
1.
Insert the FIXTURE FITTING into the WAND SOCKET,
The LOCKING LEVER must start on the same side as the bead located at the bottom of the wand (See Fig. 5.) Rotate the FIXTURE FITTING 90° clockwise
until LOCKING LEVER snaps and Iockd into place. (See Fig, 5,6, & 7).
2. To remove, depress LOCKING LEVER and rotate FllllNG 90° counterclockwise,
BEAD
BRASS CONTACT
Lf~;~RG ~
\
a
/
k,
CAUTION: SUPPORT THE LOWER WAND HOUSING WHENEVER MANIPULATING THE FIXTURE.
B. I <5 n-l
7-<>L IE R“
EiHy!ii&y&&