


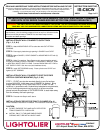

APERTURE CONE
ASSEMBLY
FIG. 5
TO REPLACE BALLAST (Fig. 5 & 6)
Before changing the ballast, switch off the main power supply to the fixture.
STEP 1: Remove APERTURE CONE ASSEMBLY from REFLECTOR
HOUSING by grasping inside of cone and pulling down.
STEP 2: Remove lamp.
STEP 3: Pull REFLECTOR HOUSING down until CLIPS stop at the bottom
lip of LOWER HOUSING. Press CLIPS inward to remove REFLECTOR
HOUSING.
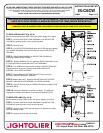
STEP 4: Detach LAMPHOLDER from REFLECTOR HOUSING by
squeezing LAMPHOLDER SPRING.
STEP 5: Remove WING NUTS, then separate UPPER HOUSING from top
of Lower HOUSING to access BALLAST/PLATE ASSEMBLY.
STEP 6: Turn SCREW counterclockwise to lossen SUPPORT BRACKET.
Repeat with other (2) screws. Carefully remove BALLAST/PLATE
A
SSEMBLY from UPPER HOUSING.
STEP 7: Detach BALLAST SUPPORT BRACKET by removing (2)
BALLAST SUPPORT BRACKET SCREWS.
STEP 8: Replace BALLAST. Reattach BALLAST/BALLAST SUPPORT
BRACKET, BALLAST/PLATE ASSEMBLY to UPPER HOUSING.
STEP 9: Align STUDS with holes in LOWER HOUSING, then tighten firmly
with WING NUTS.
STEP 10: Reverse installations from Step 4 to Step 1. For additional
instructions if needed, see Reflector Trim Instruction Sheet IS:C4T4V.
TO REPLACE LAMP (Fig. 5 & 6)
Before replace the lamp, switch off the main power supply to the fixture.
STEP 1: Remove APERTURE CONE ASSEMBLY from REFLECTOR
HOUSING by grasping inside of cone and pulling down.
STEP 2: Replace lamp. Follow lamp manufacturer’s directions for proper
care and handing of lamp.
STEP 3:
Replace cone into reflector housing.
A COMPANY
631 Airport Road, Fall River, MA 02720
READ AND UNDERSTAND THESE INSTRUCTIONS BEFORE INSTALLING FIXTURE
This fixture is intended for installation in accordance with the National Electrical Code and local regulations. To
assure full compliance with local codes and regulations, check with your local electrical inspector before
installation. To prevent electric shock, turn off electricity at fuse box before proceeding.
Retain these instructions for maintenance reference.
INSTRUCTION SHEET NO.
IS:C6CW
Page 2 of 2
A0604
INSTALLATION PROCEDURE FOR: C6CW SERIES 6” DIA. H.I.D. WALL MOUNT CYLINDER
USED WITH C6T6V SERIES FLANGLESS REFLECTOR TRIM (ORDER SEPARATELY)
WARNING: USE ONLY REFLECTOR TRIMS PROVIDED BY LIGHTOLIER. USE OF OTHER MANUFACTURES’ REFLECTOR
TRIMS MAY VOID THE UNDERWRITERS LABRATORIES LISTING AND COULD CONSTITUTE A FIRE HAZARD.