


9
NOTE: DIAGRAMS & ILLUSTRATIONS ARE NOT TO SCALE.
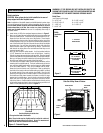
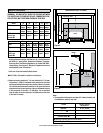
This appliance is approved for use in a masonry fireplace built to UBC
Chapter 37 or equivalent with a minimum 30-1/2” (775mm) opening
width at the front of the fireplace.
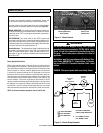
This appliance may be installed using 6” chimney in vertical installations
utilizing a 8” to 6” reducer (cat. # 71134) at the flue collar. If the venting
system is all vertical and the total vent length above the flue outlet exceeds
14 feet, it is recommended that the 8” to 6” pipe reducer is used and a
6” venting system be installed.
Do not remove brick or mortar from masonry fireplace to accommodate
insert. Approved with or without positive flue connection. Approved
with minimum 6” (152 mm) diameter stainless steel listed reline system.
Country™ Collection inserts are tested to UL 1482 / ULC S628 and listed
by OMNI-Test Laboratories, Inc.; Portland, OR.
IMPORTANT NOTE: See Draft Requirements and Selecting a Proper
Venting System on Page 4 to assist you in choosing the proper venting
system for your installation.
Remove and clean behind unit frequently, as creosote build-up may
occur rapidly.
Warning: Chimney connector must be in good condition and kept clean.
Do not install damaged parts.
4. Open or remove the existing fireplace damper. Make sure the damper
cannot fall closed.
5. Install the two 1/2” x 3” (13 mm x 76 mm) leveling bolts -heads up- a
few turns in the leveling nuts on each side of the outer chamber of
the insert at the lower rear corners.
6. Position the insert in the center of the fireplace opening and push it
back until the surround brackets are approximately 2” (51 mm) away
from the fireplace front.
7. Install the side surround panels and push the insert up snug against
the fireplace face. Then with the location selected remove the surround
panels and level the fireplace insert with the leveling bolts using a 3/4”
(19 mm) socket, extensions (to reach the bolt head) and a ratchet.
8. Glue the insulation around the outer edge of both the top and side
surround panels.
9. Install the surround panels loosely, align and tighten. Check for a
tight fit against the fireplace.
10. Locate the draft rod extension (5/16” [8 mm] round by 11-3/4” [299
mm] long) and a coupling nut (5/16”/8 mm x 7/8”/22 mm).
11. Slide the extension draft rod through the bracket attached to the
bottom of the left side hearth plate, making sure the end without the
grooves is toward the fireplace insert body. Thread the coupling nut
on the end closest to the fireplace insert body and then thread the
coupling nut on the rod from the fireplace insert.
12. Slide the fireplace insert tight to the fireplace face. Level the insert
with the leveling bolts using a 3/4” socket, extensions (to reach in to
the bolt head) and a ratchet.
13. To install the decorative brass trim on the top surround panel, connect
the 3 pieces at the mitered corners using the corner brackets sup-
plied. Slide the assembled trim down onto the top surround panel.
The surround should fit snugly in the groove towards the back of the
trim.
14. Install the top surround panel on the fireplace insert with the three
screws supplied. Tighten snugly.
15. Install the blower and blower extensions per the instructions provided
in the blower kit.
16. Install the brick and baffle as per instructions on Page 6.
CHIMNEY REQUIREMENTS
INSTALLATION PROCEDURES - MASONRY CHIMNEY
Notes:
• Although not required, a full-length stainless steel liner is recommended
for optimum safety and performance. See your Lennox Hearth Products
dealer for details.
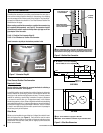
• When installing your fireplace insert with a positive flue connection
(see Page 10), be sure to leave the insulation off the surround panels
(flanges) and leave a 1/4” (6 mm) airspace insulation off the surround
panels and the facing of your fireplace.
• This appliance may be vented into a code-approved masonry chimney
with flue liner.
1. READ ENTIRE INSTALLATION INSTRUCTIONS.
2. Check all REQUIRED CLEARANCES as specified in the previous section
(Page 7) of this installation and operation manual.
3. Wear gloves during installation in case of sharp edges on the fireplace
insert and it’s parts.