


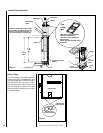

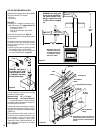

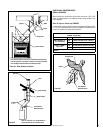

Aluminum Tape
Aluminum Tape
Fireplace
Connection
Plastic
Cover
Insulation
Flexible Pipe
Fireplace
OUTSIDE AIR CONNECTION TO THE FIREPLACE
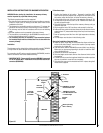
Figure 26
OUTSIDE AIR KIT - REQUIRED (Included w/fireplace)
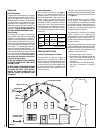
During operation, the fireplace requires fresh air for combustion and
draws air out of the house. It may starve other fuel burning appliances
such as gas or oil furnaces. As well, exhaust blowers may compete for
air, causing negative pressure in the house, resulting in smoke entering
the house from the fireplace. This situation is aggravated in modern
airtight houses. To overcome this problem, we strongly recommend that
you install an outside air assembly. Check with local authorities having
jurisdiction in your area, it may be mandatory.
Note: Should you decide not to install the outside air assembly,
proceed as follows:
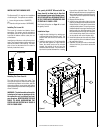
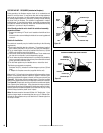
- Remove the bottom grill. The air box is located on front left and is on
a slant.
- Unscrew the four screws holding the inside air box covering plate and
remove it.
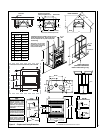
Outside Air Installation
The outside air assembly may be installed according to the following
requirements:
A) Duct length should be kept to a minimum. The maximum length of
duct is twenty (20) feet (6.1 m) for a 4 in. dia. pipe (See note below).
B) The air intake register must not be installed more than ten (10) feet
(3050 mm) above the base of the fireplace.
C) The fresh air must come from outside the house. The air intake must
not draw air from the attic, from the basement or garage.
D) The air intake should be installed where it is not likely to be blocked by
snow or exposed to extreme wind and away from automobile exhaust
fumes, gas meters and other vents.
E) The duct and register may be installed above or below floor level.
The following components are required:
- Outside air kit (UZI) (includes 4 inch flex that goes up to ten (10) feet
long)
- 4” Adaptor for fireplace connection (supplied with the unit)
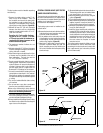
Make a 4-1/4” (110 mm) hole in the outside wall of the house at the chosen
location. From outside, place the outside air register in the hole (open
side down) and fasten the register to the wall, with screws as shown (see
Figure 25). Slip the pipe into the insulated sleeve. Place the insulated
pipe over the register tube and over the fireplace’s outside air connector
(see Figure 26). At each end, carefully pull back the insulation and plastic
cover exposing the flexible pipe. Using the aluminium tape provided,
wrap the tape around the joint between the flexible pipe and the air inlets.
Carefully push the insulation and plastic cover back over the pipe. Using
aluminium tape, fasten the plastic cover in place.
Note: We recommend not to exceed 20 feet of 4” flexible pipe. If you
require a longer length we recommend that you use a 5” diameter flex-
ible pipe for the complete run up to 30 feet and a 6” diameter pipe for a
run of up to 40 feet.
Figure 25
OUTSIDE CONNECTION
Outside
Intake
Screw
Opening
Facing
Down
Wall
Aluminum Tape
Plastic Cover
Insulation
Flexible Pipe
Aluminum Tape
NOTE: DIAGRAMS & ILLUSTRATIONS ARE NOT TO SCALE.
16