


6
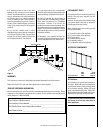
NOTE: DIAGRAMS & ILLUSTRATIONS NOT TO SCALE.
CREOSOTE FORMATION AND REMOVAL
When wood is burned slowly, it produces tar
and other organic vapors, which combine with
expelled moisture to form creosote. The creo-
sote vapors condense in the relatively cool
chimney flue of a slow-burning fire. As a result,
creosote residue accumulates on the flue lin-
ing. When ignited, this creosote makes an
extremely hot fire.
The chimney should be inspected at least twice
yearly during the heating season to determine
if a creosote build-up has occurred.
If creosote has accumulated, it should be re-
moved to reduce the risk of a chimney fire.
If creosote build-up is found, do not use chemi-
cal chimney cleaners that are poured on a hot
fire. The chemical cleaners can be dangerous
and generally only work on the flue section
nearest the fire, leaving the rest of the flue
unaffected. It is best to take the time to clean the
flue as previously described or have the chim-
ney professionally cleaned by a qualified
chimney sweep.
TROUBLESHOOTING
No Smoking Allowed
Your new fireplace is designed not to smoke if
properly installed and operated per our in-
structions. If you do experience a problem,
here are several things to check:
1. Remember – always check to ensure your
flue damper is in the open position before
lighting a fire!
2. When lighting your fire, a little smoke may
escape into the room – more likely if the
chimney is cold. To correct this, hold a lighted
newspaper up inside the firebox near the open
flue damper. This will turn around any down-
draft and clear the flue of cold air. As your log
fire burns below, the updraft will improve as
the chimney heats up.
3. Is your fire too far forward? Move it toward
the back with your poker. Keep the fire well
within the confines of your fuel grate.
4. Keep your fire up on the grate and the refrac-
tory below free of excessive ashes. The fire needs
plenty of air movement around the logs.
MAINTENANCE GUIDELINES
Your fireplace is designed to operate trouble-
free with minimum maintenance. However, like
any fine appliance, it deserves and requires
some housekeeping attention.
Your fireplace will perform better – and cer-
tainly look more attractive to family and friends
– if it is cleaned before each use. Before the first
seasonal use in Autumn and after the last fire in
Spring, it is important to inspect the fireplace
system carefully. We recommend at least two
complete fireplace inspections a year.
Before Each Use
1. Clean the firebox of excessive ashes. Some
owners prefer to leave a small layer to insulate
the cold refractory below the grate which helps
fire starting.
This fireplace has a factory supplied grate at-
tached, it is permissible to remove the grate for
cleaning; however, the grate must be re-at-
tached to the fireplace before the next burn.
2. Keep the fireplace screens clean so combus-
tion air flows freely.
3. Spot check the brick-like refractory for small
cracks. Heat from the fire expands it slightly.
When it cools, it contracts.
Refractories should be replaced when:
1. The crack opens more than ¹⁄₄" (19 mm).
2. Pitting in the surface is extensive and pits
become deeper than ³⁄₁₆" (4.76 mm).
3. Any piece of refractory larger than 2" (51 mm)
in radius and ³⁄₁₆" deep becomes dislodged.
If conditions 1, 2 or 3 occur, the refractory
should be replaced.
TWICE A YEAR CHECK-UP
Normally, twice a year, you should inspect your
fireplace following this list:
1. Inspect the opening in your chimney top and
remove any debris that could clog it. The cap is
usually held in place by four (4) screws, which
remove easily for checking or cleaning the full
length of the flue from above. Remove the
chimney top while wearing gloves to guard
against any sharp metal edges.
2. Inspect the entire flue from the top down for
obstructions such as birds nests, leaves, etc.
This may be done by using a flexible handled
chimney cleaning brush. If the chimney con-
tains offset/return elbows; a soft brush cleaning
from the top down to any elbow and then from
the firebox up to the offset/return section is the
proper method. The beam from a powerful
flashlight will help in this inspection.
3. Look up from inside the fireplace (damper
open) to see any obstructions in the lower flue
area. If present, shut the damper and glass
doors (if installed) to seal the firebox and con-
tain any soot that might fall.
If your do not have glass doors installed, a
damp sheet covering the fireplace opening and
sealed with masking tape will do. Then clean the
flue from the top down (if an offset system,
clean per Step 2) using a proper size chimney
brush with flexible pole sections. Don’t open
the doors or remove the sheet until all soot has
settled. Vacuum, don’t sweep.
4. Check the metal flashing and seals around
your chimney. Seal any cracks or loose nail-
head openings to prevent roof leaks.
5. Clean the firebox thoroughly by using a soft
brush or equivalent.
WARNING: CONTINUED OVER FIRING
CAN PERMANENTLY DAMAGE YOUR
FIREPLACE SYSTEM. SOME EXAMPLES
OF OVERFIRING ARE:
• BURNING QUANTITIES OF SCRAP
LUMBER, PINE BRANCHES, PAPER OR
CARDBOARD BOXES WHICH EXCEED
THE VOLUME OF THE NORMAL LOG
FIRE.
• BURNING TRASH, CHEMICALS OR
CHEMICALLY TREATED COMBUS-
TIBLES.