


3
Rev. A 8/99 (P.O. Box) 2084305
POLARIZED PLUG
This appliance has a polarized plug (one blade is wider than the other).
To reduce the risk of electrical shock, this plug is intended to fit in a
polarized outlet only one way. If the plug does not fit fully in the outlet,
reverse the plug. If it still does not fit, contact a qualified electrician. Do not
attempt to defeat this safety feature.
MAINTENANCE
ALWAYS UNPLUG CORD BEFORE CLEANING OR DISASSEMBLY.
CLEANING: IMPORTANT! DO NOT immerse electrical parts in water!
Wipe all parts with soft cloth moistened with water and mild detergent
only. DRY ALL PARTS COMPLETELY BEFORE RECONNECTING TO
POWER SOURCE.
LUBRICATION: Motor is permanently lubricated.
WARNING: To prevent personal injury and/or damage to the Fan,
never lean or push on the Fan while it is seated in the window or
during operation. Do not lift the sash on a double hung window
while the Fan is operating. Be sure that the Fan is secure in the
window at all times.
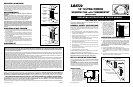
CORD STORAGE
1. Push (2) Release Tabs on the Cord Storage Door to the left and lift
Door up and out.
(Figure 4)
2. Lay the Cord in the Channel. Begin winding the Cord in a clockwise
direction, starting from left hand side of the Lower Post: up and around
the Top Post.
(Figure 5)
3. When the Cord is completely wound, tuck plug around the
adjacent Cord.
4. To reinstall Cord Storage Door, align (2) Small Tabs to
corresponding Slots, swing Door down and push until Release
Tabs snap in.
(Figure 4)
STORAGE
Clean Fan as instructed and store in a clean, dry place.
2 2084305
LIMITED WARRANTY
SHOULD ACCESSORY PARTS BE NEEDED, CONTACT THE MANUFACTURER FOR IN-WARRANTY REPLACEMENT PARTS. A COPY
OF PROOF-OF-PURCHASE MUST BE INCLUDED ALONG WITH THE TYPE AND STYLE, WHICH IS LOCATED ON THE BOTTOM OF
YOUR APPLIANCE.
This product is warranted for one year from the date of original purchase against defects in workmanship and/or materials. At our option, parts
that prove to be defective will either be repaired or replaced or the whole product will be replaced.
Should electrical or mechanical repair become necessary during the warranty period, send your complete product, postage or freight prepaid
to the nearest service center. Call the number below for the service station nearest you.
Should a part need replacement, you must give us the type and style of your appliance. You will find this at the bottom of the appliance. In either
case, a copy of your proof of purchase is requested.
This warranty does not apply if the damage occurs because of accident, improper handling or operation, shipping damage, abuse, misuse,
unauthorized repairs made or attempted, or the use of the product for commercial service.
ALL WARRANTIES, EXPRESSED OR IMPLIED, LAST FOR ONE YEAR FROM THE DATE OF ORIGINAL PURCHASE. THIS WARRANTY
DOES NOT COVER LIABILITY FOR INCIDENTAL OR CONSEQUENTIAL DAMAGES FOR ANY CAUSE WHATSOEVER.
Some states do not allow limitations on how long any implied warranty lasts, or the exclusion or limitation of incidental or consequential damages,
so that the above limitations and exclusions may not apply to you. This warranty gives you specific legal rights. You may also have other rights
which vary from state to state.
FOR PARTS:
Check package contents. If parts are missing, or replacement parts required, please call our PARTS DEPARTMENT TOLL-FREE AT 1-800-966-2028.
MONDAY THROUGH FRIDAY, BETWEEN THE HOURS OF 8 AM AND 4 PM EST. "PLEASE DO NOT RETURN PRODUCT TO PLACE OF
PURCHASE." Reference the type and style of product (located on the underside of the product) when you call.
FOR TECHNICAL ASSISTANCE and SERVICE CENTER LOCATIONS:
For any questions, comments or the location of your nearest service center, PLEASE CALL OUR
TOLL-FREE "HOTLINE" AT 1-800-233-0268. MONDAY THROUGH FRIDAY, BETWEEN THE HOURS OF 8 AM AND 5 PM EST.
Please reference product name and model no. when you call.
Appliance Service Dept. • 300 Confederate Drive Franklin, TN 37065-0569 PLEASE DO NOT SEND PRODUCT TO THIS LOCATION!
Figure 5
Channel
Small Tab
Top Post
Cord
Figure 4
Release Tab
Cord Storage Door
Small Tab
Release Tab
Lower Post
LEA Y CONSERVE ESTAS INSTRUCCIONES
MANUAL DE INSTRUCCIONES DE OPERACIÓN Y PARTES
Innovators in Home Comfort
TM
12" ULTRA FORCE
VENTILADOR para la VENTANA
con TERMOSTATO
(Modelo 1200)
INSTRUCCIONES GENERALES DE
SEGURIDAD
Cuando se utilicen aparatos eléctricos, especialmente donde haya
niños, deben seguirse siempre las precauciones de seguridad
fundamentales para reducir riesgos de incendio, choque eléctrico y
lesiones a personas y esas precauciones son:
1. No insertar nunca ni los dedos, ni lápices, ni otros objetos extraños
por la rejilla.
2. Para estar protegido contra choque eléctrico, no sumergir el Ventilador,
ni el enchufe ni el Cordón en el agua ni rociarlos con liquidos.
3. Desenchufar del toma de corriente el Ventilador cuando no se lo
utilice y cuando se lo mueva a otra parte o antes de limpiarlo.
4. No hacer funcionar el Ventilador con el Cordón o el Enchufe dañados,
después de que funcione mal o si se ha caído o se ha dañado de
cualquier manera.
5. Para desconectar del toma de corriente el Enchufe, agarrar siempre el
Enchufe y quitarlo del toma de corriente, pero no tirar jamás el Cordón.
6. No ponerlo a funcionar si hay explosivos y/o humos incendiables
7. No colocar el Ventilador ni cualquiera de sus piezas cerca de una
llama al descubierto, estufas u otros aparatos eléctricos que
calienten.
8. La utilización de accesorios no recomendados ni vendidos por el
fabricante puede ser peligrosa.
9. Evitar el contacto con cualquiera de las piezas del Ventilador que se muevan.
10. Se necesita supervición atenta cuando se use cualquier aparato
eléctrico cerca de niños.
11. No hacerlo funcionar sin las Rejillas del Ventilador en su respectivo lugar.
ADVERTENCIA: Para reducir el riesgo de incendio o choque
eléctrico, NO SE UTILICE ESTE VENTILADOR con ningún
dispositivo de control de velocidad de ELEMENTOS SÓLIDOS.
INSTRUCCIONES PARA INSTALACIÓN
El Ventilador está completamente armado y listo para su instalación.
Ha sido diseñado para que quepa en ventanas de dos batientes que
suben y bajan, de aberturas mínimas de 13-3/8" de Alto y 24" de Ancho.
DETERMINAR EL PROCEDIMIENTO CORRECTO PARA LA INSTALACIÓN:
El grande número de estilos y tipos de ventanas hace imposible describir
un procedimiento de instalación universal. Los procedimientos siguientes
son para los tipos más comunes de dichas ventanas.
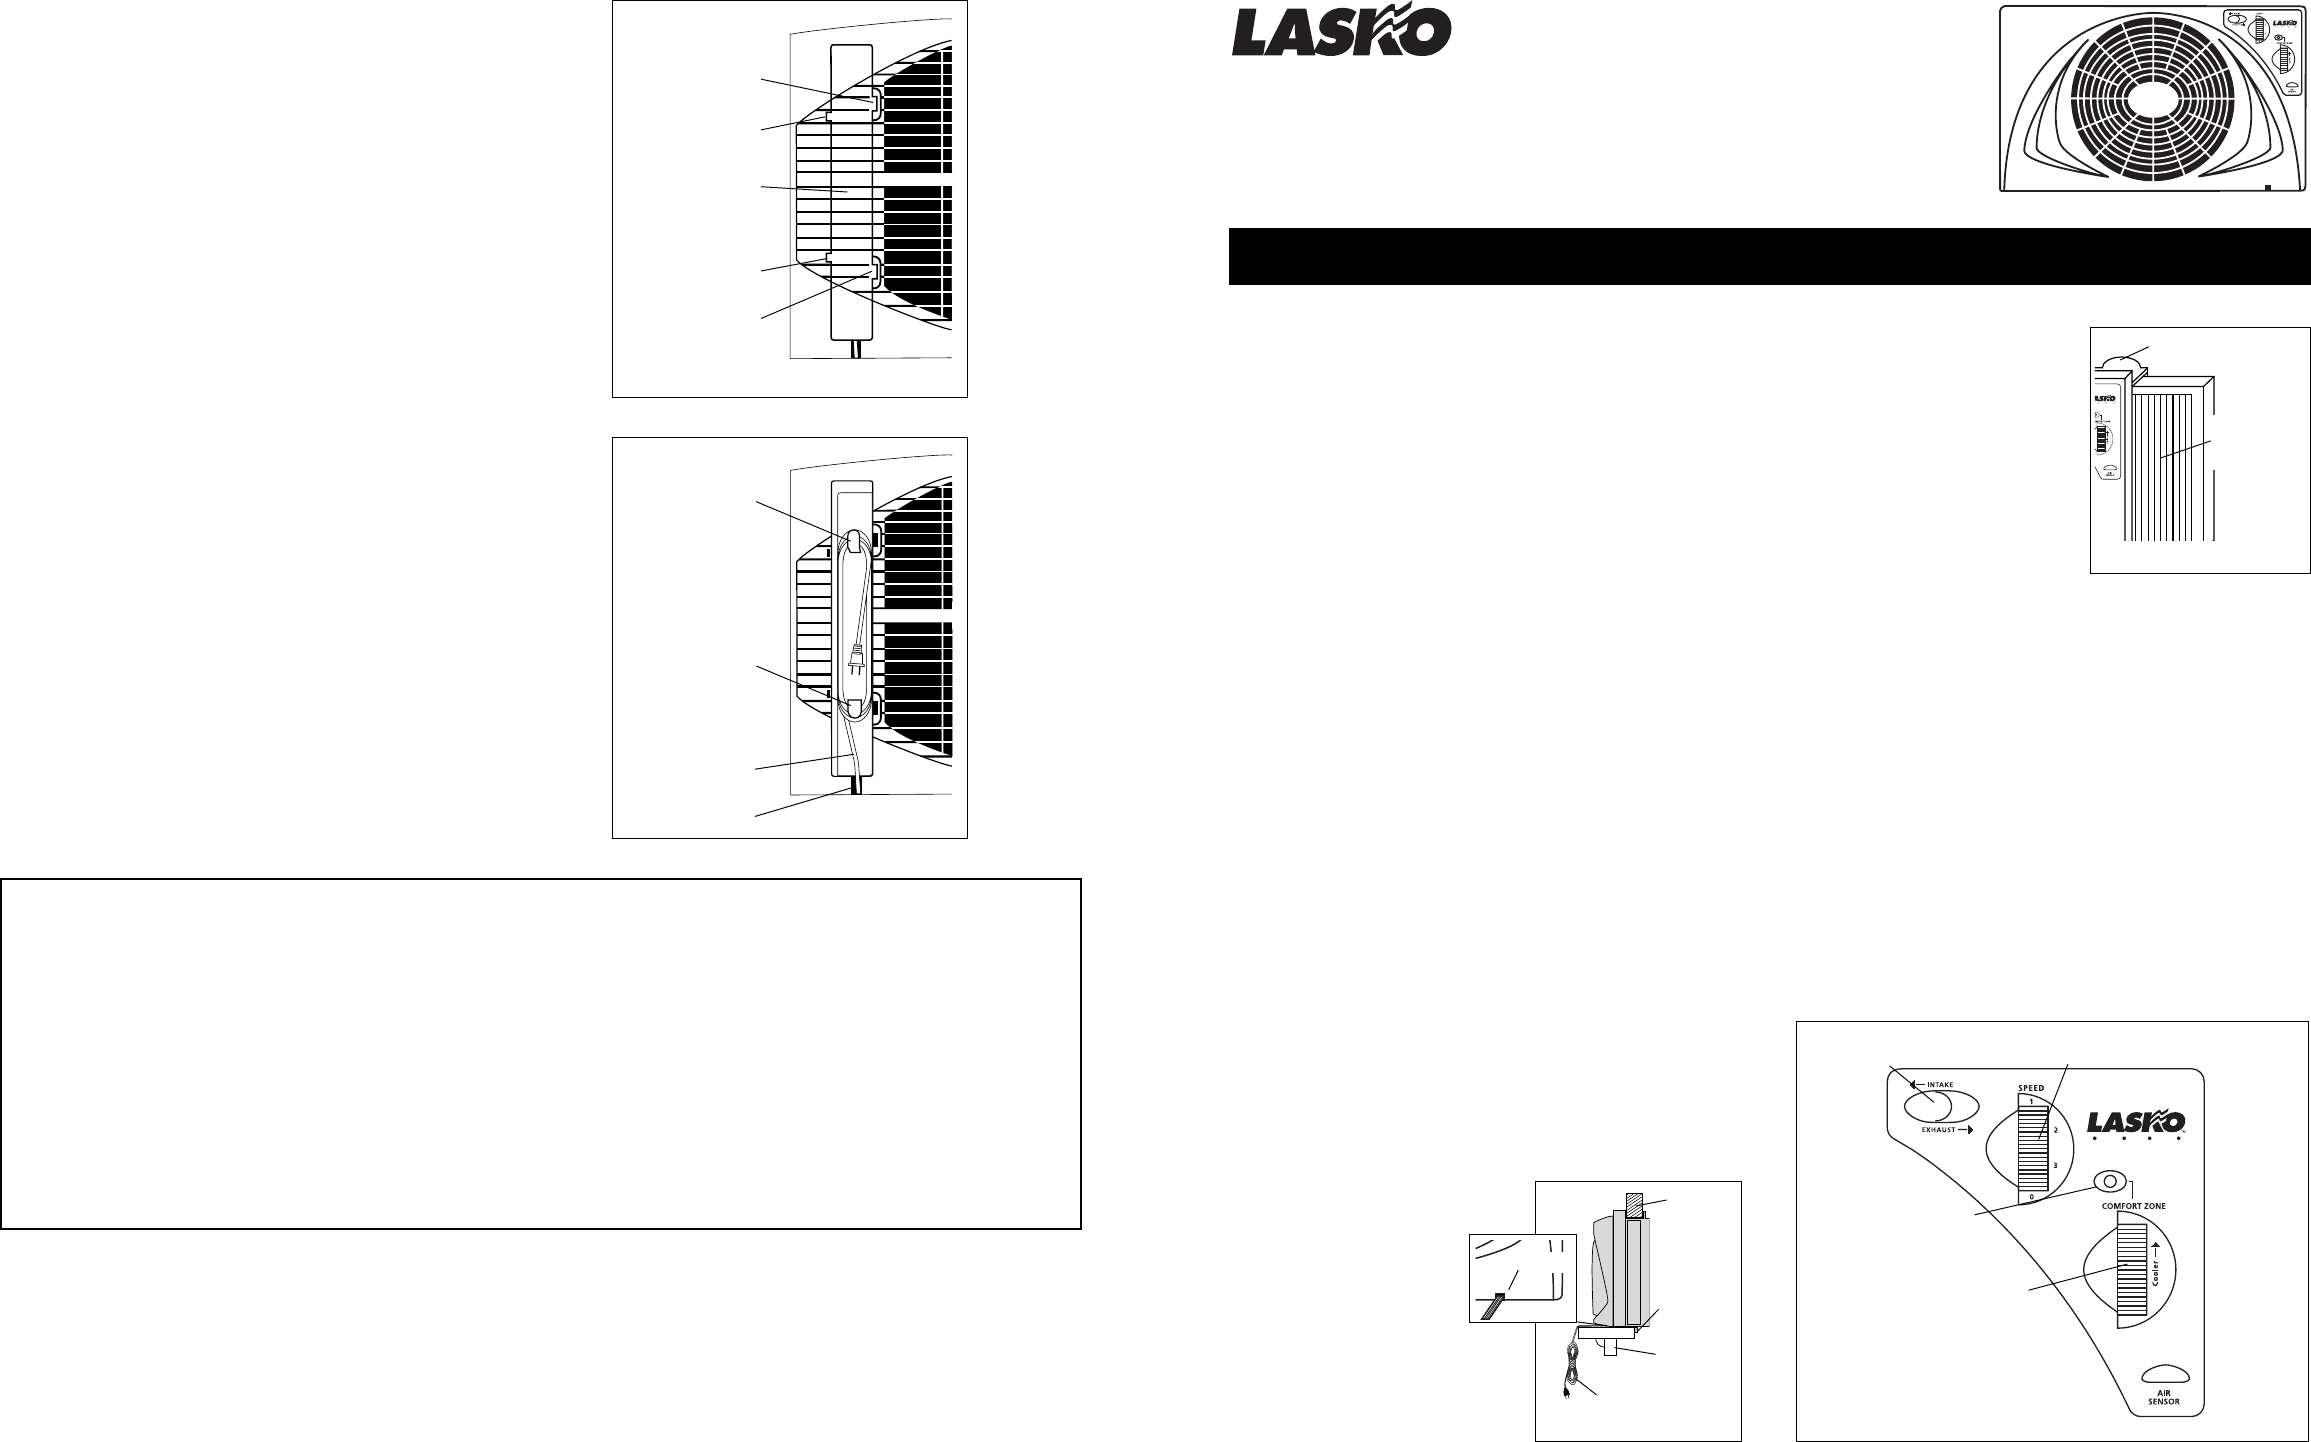
INSTALACIÓN
1. Abrir la ventana por lo menos 13-3/8".
2. Voltear el Ventilador para que el
frente le dé a usted. Colocar la parte
inferior del Ventilador sobre
el Antepecho de la Ventana,
asegurándose de que todas
las 5 Proyecciones de la
parte inferior del Ventilador
queden por detrás del
Antepecho.
(Figura 1)
Esté seguro
de que el Cordón esté por dentro de
la casa y colgando libremente sobre
el Antepecho de la Ventana y que
esté colocado por dentro de la
abertura entallada en la Rejilla
Delantera.
3. Sosteniendo el Ventilador en su
lugar por la parte delantera, bajar el
batiente de la ventana lentamente
hasta que calce entre los Agarraderos
para la Ventana en la parte superior
del Ventilador.
(Figura 2)
4. Una vez que el Ventilador esté
seguro, halar ambas Secciones de
Extensión E-Z-CLICK™ hasta que el
espacio abierto de los lados quede
completamente bloqueado. Las
Seciones de Extensión E-Z-CLICK™
quedarán sujetas automáticamente
a la longitud deseada.
(Figura 2)
INSTRUCCIONES PARA EL
FUNCIONAMIENTO
1. Enchufar el Ventilador en cualquier toma de corriente casero normal
de Corriente Alterna de 120V.
2. Poner el Interruptor de Entrada y Extracción de Aire (A) en la posición
deseada. La posición de Entrada trae aire exterior fresco hacia adentro
de la casa y la Posición de Extracción hace salir el aire del interior de la
habitación. Deslizando el interruptor hacia la izquierda o hacia la derecha
se hace reversar la dirección de las Paletas del Ventilador para que
soplen aire hacia adentro o hacia afuera.
(Figura 3)
ADVERTENCIA: Apagar siempre el Ventilador antes de cambiar
dirección de Entrada o de Extracción.
3. Con el Cuadrante de Velocidad (B), regular la Velocidad Deseada del
Ventilador.
4. Regular el Cuadrante (C) del Termostato Comfort Watch™ para que
el Ventilador refresque a nivel cómodo. El Termostato Comfort
Watch™ apagará y encenderá el Ventilador automáticamente a
medida que cambie la temperature de la habitación.
5. La Luz Indicadora del Nivel de Comodidad (D) se encenderá para
indicar que se ha alcanzado el límite de temperatura deseado.
(B) Cuadrante para Velocidad
(A) Interruptor para
Entrada y Extracción
(D) Luz Indicadora
del Nivel de
Comodidad
(C) Cuadrante del
Termostato
Comfort Watch™
Agarraderos para la
Ventana
Figura 2
Este ventilador es para uso residencial únicamente. No está
destinado para uso en ambientes comerciales o industriales.
Figura 3
Figura 1
Ventana
Antepecho
de la
Ventana
Proyección
Ranura
Cordón
Sección de
Extensión
E-Z-CLICK™
ULTRA FORCE
Rev. A 8/99 (P.O. Box)