- 3 -
CE-
Conformity
This device complies, in regards to conformance with
the basic requirements and other relevent regulations,
with the EMC Directive 2004/108/EC, as well as the
Directive for Low Voltage Devices 2006/95/EC.
Description of the appliance
Appliance (Fig. A)
1 Cutting head
2 Suspension loop
3 On/Off switch
4 Adjusting lever
Trimming guides and accessories (Fig. B)
ᕃ 1/8“ (3 mm Cutting length)
ᕄ 1/4“ (6 mm Cutting length)
ᕅ 3/8“ (9 mm Cutting length)
ᕆ 1/2“ (13 mm Cutting length)
ᕇ Trimming guide for side step cut (right)
ᕈ Trimming guide for side step cut (left)
ᕉ Blade cover
ᕊ Cleaning brush
ᕋ Blade oil
Operation
The fur to be cut must be dry and clean. Brush the
fur through to remove any knots.
•
Remove the blade guard ᕉ from the cutting
head 1
.
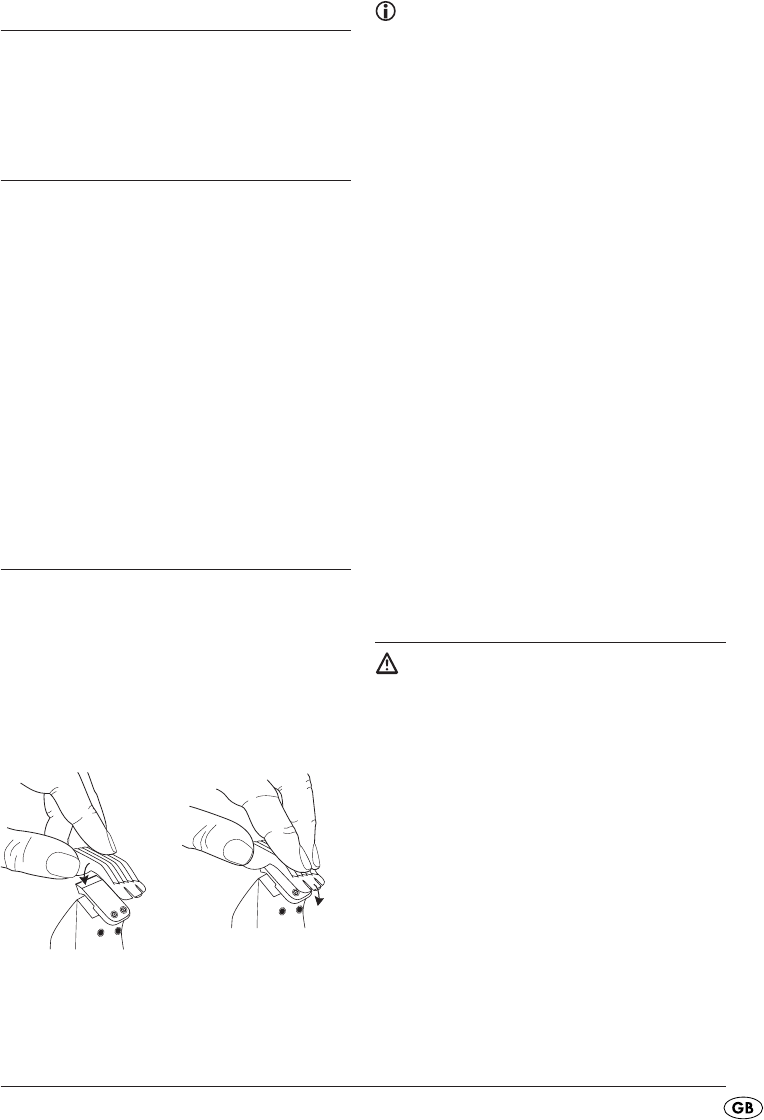
• Place the required trimming guide (ᕃ - ᕈ)
with the prongs facing upwards on the cutting
head 1 and thereby press the fl ap of the trim-
ming guide down fi rmly onto the lower metal
edge of the cutting head (see illustration).
• Ensure that the trimming guide has properly
engaged and is secured before starting to cut/
trim the fur.
Note:
It is recommended that you begin by trimming a
small area to test the individual trimming guides.
Start with a trimming guide for long fur and, if neces-
sary, change to a shorter one. The trimming guides
allow an average cutting length from 3 -13 mm.
•
Switch the appliance on by sliding the On/Off
switch 3 to the position „ON“.
• Slowly run the appliance through the fur against
the direction of hair growth. Hold the appliance
so that the trimming guide is as fl at as possible
against the animal.
•
Additionally, using the adjusting lever
4
,
the cutting depth of the cutting head
1
can
be adjusted stepwise (approx. 2 mm) without
changing the trimming guide.
To do this, press the adjusting lever
4
back-
wards to increase the cutting length in steps.
Through this, the cutting length of the respective
attached trimming guide will also be increased
by up to 2 mm.
Press the adjusting lever
4
forwards to reduce
the cutting length or to bring the trimming guide
back into its original position.
•
Through removal of the individual trimming
guide, i.e. using only the cutting head
1
itself,
you can cut clean contours.
•
After use, switch the appliance off by sliding the
On/Off switch
3
to the position „OFF“.
Cleaning and Care
Risk of electric shock
Before cleaning, remove the plug from the mains
power socket.
NEVER submerse the appliance in water or other
liquids.
• Take the respective trimming guide, if fi tted, off .
•
Using exclusively the cleaning brush ᕊ, remove
the hairs from the cutting head 1
. The cutting
head
1
may not be cleaned with water or
other liquids, except medical alcohol!
•
If in regular use, the cutting head 1
should be
oiled occasionally. For this, use the supplied
blade oil ᕋ
.
• Remove excess oil with a dry cloth.
• Clean the housing with a soft, dry lint-free cloth.
•
Store the appliance in a dry and dust free
location. When it is in storage, place the blade
guard
ᕉ
on the cutting head
1
.
IB_63807_ZTS10B1_LB6.indd Abs1:3IB_63807_ZTS10B1_LB6.indd Abs1:3 28.02.2011 16:27:56 Uhr28.02.2011 16:27:56 Uhr


