


SCANNER LEDs
When you first turn on the scanner, all three lights illuminate
momentarily and then flash as the scanner goes through a
series of self-tests.
Power (green): illuminates and stays on for power.
Ready (green):
• flashes when the lamps are warming up
• illuminates when the scanner is ready to scan
• off when the scanner is in Standby mode
Error (red): illuminates or flashes when there is an error
condition.
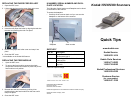
POWER SWITCH AND CONNECTORS
Power switch — turns the scanner on and off.
Power port — connects the power cord to the scanner.
SCSI ports — two 50-pin, high-density connectors provide
SCSI connections to the scanner.
NOTE: Kodak i80 Scanner: use the 50-pin Amphenol-
style connector. The DB25 connect is not
supported.
USB port* — connects the scanner to the PC.
Terminator switch — allows you to turn SCSI termination
on or off if the scanner is at the middle or the end of a SCSI
chain.
SCSI ID selector — allows you to assign a specific device
ID to the scanner.
* Not available on the Kodak i80 Scanner.
CLEANING AND MAINTENANCE
For detailed cleaning and replacement procedures, see the
Maintenance chapter in the User’s Guide.
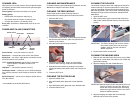
CLEANING THE FEED MODULE
Kodak Digital Science Roller Cleaning Pads are
recommended for cleaning the feed module and rollers.
1. Open the ADF cover.
2. To remove the feed module, squeeze the plastic clamps
that hold the feed module in place and pull the feed
module out of position.
3. Wipe the feed module from top to bottom.
4. Inspect the feed module. If worn or multi-feeding
continues after cleaning, replace the feed module.
5. Reinstall the feed module by pushing it into position,
aligning the feed module into the slots, until it snaps into
place.
6. Close the ADF cover.
CLEANING THE PLATEN GLASS
1. Open the flatbed cover.
2. Wipe the flatbed platen glass with a fresh Staticide
wipe.
3. Wipe the flatbed platen glass with a dry Staticide wipe.
4. Close the flatbed cover.
CLEANING THE ROLLERS
The scanner transport rollers and imaging area should be
cleaned routinely for optimum performance. Some paper
types and operating environments require cleaning more
often than specified in the User’s Guide. Whenever paper
feeding and image quality are less than desirable follow
these steps.
1. Open the ADF cover.
2. With a roller cleaning pad, wipe the feed rollers from
side to side. Rotate the feed rollers to clean the entire
surface.
IMPORTANT: The Roller Cleaning Pad contains sodium
lauryl ether sulfate which can cause eye
irritation. Refer to the User’s Guide for
MSDS acquisition.
3. Dry the rollers with a lint-free cloth.
CLEANING THE IMAGING AREA
1. Remove dust and debris from this area by using a Stati-
cide wipe or a small brush. Be careful not to scratch the
glass when cleaning.
2. Wipe the imaging area with a Staticide wipe.
IMPORTANT:Staticide wipes contain isopropanol which can
cause eye irritation and dry skin. Wash your
hands with soap and water after performing
maintenance procedures. Refer to the User’s
Guide for MSDS acquisition.
3. Wipe the imaging area again with an almost-dry
Staticide wipe to remove any streaks.
Power switch
Power port
USB port
SCSI ports
SCSI ID
selector
Terminator
switch