


3
Installation Instructions...
• As with all metal objects, follow proper handling techniques.
• The sink installation must comply with national and local
plumbing codes and ordinances
• This sink should be examined for damage prior to
installation. Do not install a damaged sink. Return the sink
to the dealer from whom you purchased it. Failure to do so
will void the warranty.
Clamp positions
All provided clamps have two positions.
The install position refers to the position of the hardware, as
it is attached or attaches to the sink, when the claw portion is
NOT pointed to the outer edges of the sink rim. This position
allows the sink to fit through the countertop opening.
The mount position refers to the hardware, as it is attached
or attaches to the sink, with the claw portion pointed toward
the outer edges of the sink rim. This position allows the sink
to be clamped to the countertop via the claws.
Installing in countertop
Prepare countertop:
1. Locate template in sink package (NOTE: If no template
is provided contact KitchenAid, see “Requesting
Assistance or Service” section). Set template on
countertop surface in desired position. Hold template
down firmly and trace around the template with a
pencil onto the countertop. Remove the template.
2.
Drill a 3/8” pilot hole on the inside edge of the line that
was traced onto the countertop. Set jigsaw blade into
the pilot hole and cut along the outline traced on the
countertop.
Prepare the sink:
3. Remove any protective film, plastic bag and/or tape
from the sink.
Install hardware:
4. Assemble clamps, attach the assembled clamps to the
sink in their install positions (claws resting against
sink or pointing away from the countertop).
Figure 1
Tighten clamps gradually, in a sequence similar to that
shown.
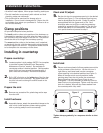
Check sink fit/adjust:
5. Set the sink into the countertop opening in the desired
position (see Figure 1). The countertop opening may
need to be adjusted for the sink. Proper fit may be
accomplished with the jigsaw and /or file. Care
should be taken not to chip or crack the countertop
material by aggressive filing or sawing. The sink rim
should rest evenly on the countertop. Remove sink,
turn upside down and proceed to step 6.
Sink
Countertop
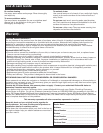
Install sink:
6. Place a continuous bead of silicone sealant around the
entire perimeter of the sink rim. Lift the sink, turn it
right side up, and lower back into the countertop
cutout opening in the desired position (see Figure 1).
Move all clamps to their mount positions (claws
pointing away from the sink under the countertop).
Begin tightening clips (see Figure 2) but do not
overtighten. It is only necessary to draw the sink rim
down firmly to the countertop. Tighten until the entire
sink rim is sealed. Wipe off any excess sealant from
the countertop with a dry cloth.
1
2
3456
87
Figure 2