


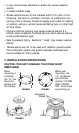


1.Remove the mounting plate from the back of the alarm by hold-
ing the mounting plate and twisting the alarm in the direction
indicated by the “OFF” arrow on the alarm cover.
2.To insure aesthetic alignment of the alarm with the hallway or
wall, the “A” line on the mounting plate should be parallel with
the hallway when ceiling mounting or horizontal when wall
mounting.
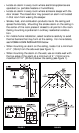
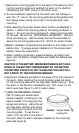
3.After selecting the proper smoke alarm location as described in
section 1, attach the mounting plate to the ceiling as shown in
figure 4. For wall mounting see figure 5. Place mounting plate
on the wall. Be sure the “UP FOR WALL MOUNTING “ text and
arrow are facing up. Use the screws and anchors provided to
secure the mounting plate (use 3/16” drill bit for anchor holes).
4.Battery installation instructions are provided on the inside of the
battery door. To ensure proper installation of the smoke alarm
battery, follow the instructions.
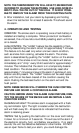
5.When installing the battery, press the battery reminder finger
down into the battery compartment and install the battery (see
figure 6).
CAUTION! IF THE BATTERY REMINDER FINGER IS NOT HELD
DOWN IN THE BATTERY COMPARTMENT BY THE BATTERY,
THE BATTERY DOOR WILL NOT CLOSE AND THE UNIT WILL
NOT ATTACH TO THE MOUNTING BRACKET.
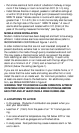
6.Alignment marks are provided on the edge of the trim plate and
the alarm. After installing the mounting plate, place the alarm
on the mounting plate with the alignment marks lined up. Twist
the alarm in the direction indicated by the “ON” arrow on the
alarm cover (see figure 7) until it locks in place.
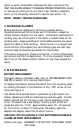
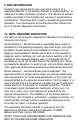
7.USING TAMPER RESIST LOCKING
PIN: To make your smoke alarm
tamper resistant, a locking pin has
been provided in the bag with the
screws and anchors. Using this pin
will help deter children and others
from removing the alarm from the
mounting plate. To use the pin,
insert it into the hole in the side of
the alarm after the alarm has been installed on the mounting
plate (see figure 8).
Tamper Resist
Locking Pin
FIGURE 8