


WHEN UNITS ARE INTERCONNECTED, only the red LED of the alarm which senses the smoke or is
being tested (the originating unit) will flash rapidly. All other units in the interconnect system will sound
an alarm but their red LED’s will NOT flash rapidly.
The green LED has two modes of operation.
Standby Condition The green LED will be steady on, indicating the presence of AC power.
Alarm Condition This smoke alarm is equipped with an alarm memory which provides a
visual indication when an alarm has been activated. A flashing green LED
indicates the memory condition. The memory will remain activated until it is
reset by pushing the test button.
In an interconnected installation only the memory of the originating alarm will be activated.
TESTING: Test by pushing the test button on the cover and hold it down for a minimum of 2 seconds.
This will sound the alarm if the electronic circuitry and horn are working. If no alarm sounds, check the
fuse or circuit breaker supplying power to the alarm circuit. If the alarm still does not sound, the unit
may have other failure. DO NOT use an open flame to test your alarm, you could damage the alarm or
ignite combustible materials and start a structure fire.
TEST THE ALARM WEEKLY TO ENSURE PROPER OPERATION. Erratic or low sound coming from
your alarm may indicate a defective alarm, and it should be returned for service (see Section 12).
5.NUISANCE ALARMS
Smoke alarms are designed to minimize nuisance alarms. Cigarette smoke will not normally set off the
alarm, unless the smoke is blown directly into the alarm. Combustion particles from cooking may set
off the alarm if the alarm is located close to the cooking area. Large quantities of combustible particles
are generated from spills or when broiling. Using the fan on a range hood which vents to the outside
(non-recirculating type) will also help remove these combustible products from the kitchen.
If the alarm does sound, check for fires first. If a fire is discovered, get out and call the fire department.
If no fire is present, check to see if one of the reasons listed in Section 2 may have caused the alarm.
6.MAINTENANCE
ALARM REMOVAL
IF TAMPER RESIST PIN HAS BEEN USED, REFER TO TAMPER RESIST LOCKING PIN IN
SECTION 3 FOR PIN REMOVAL INSTRUCTIONS.
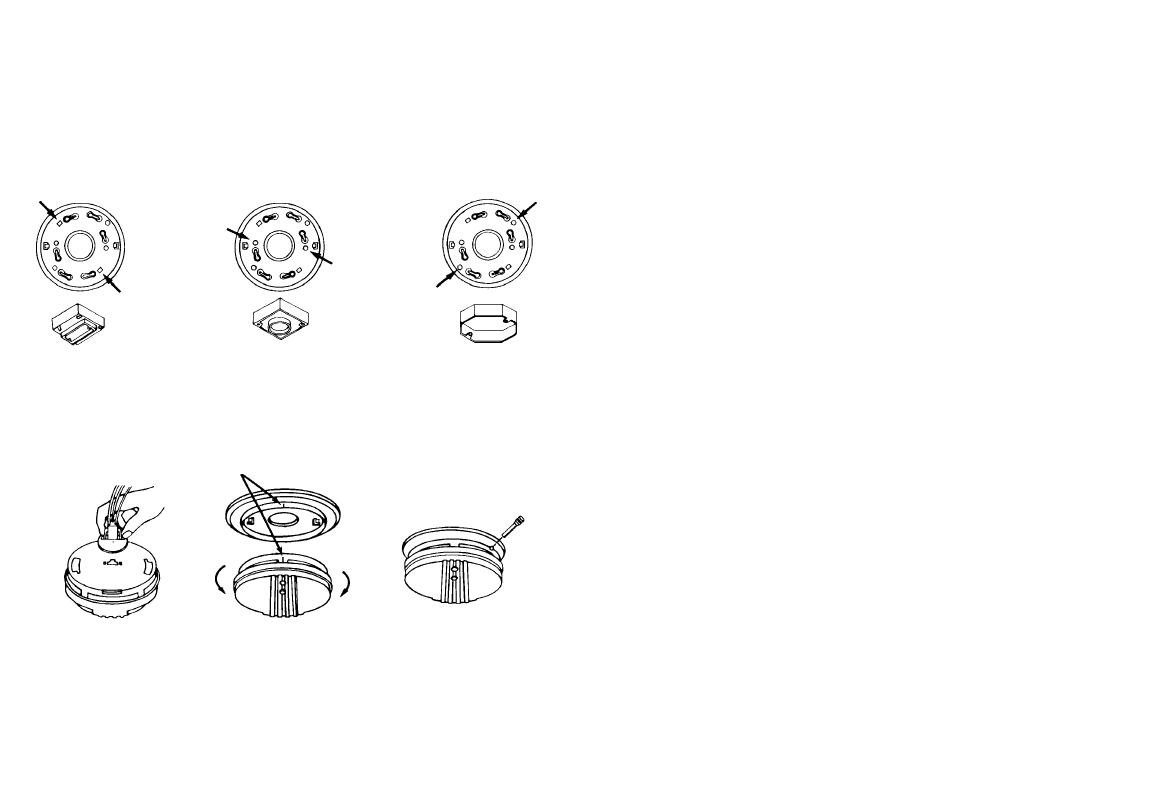
You can remove the alarm from the trim ring by rotating the alarm in the direction of the “OFF” arrow
on the cover (See Section 3. Figure 4).
To disconnect the A.C. power harness, squeeze the locking arms on the sides of the Quick Connector
while pulling the connector away from the bottom of the alarm (see Section 3, Figure 3).
CLEANING YOUR ALARM.
YOUR ALARM SHOULD BE CLEANED AT LEAST ONCE A YEAR.
To clean your alarm, remove it from the mounting bracket as outlined in the beginning of this section.
You can clean the interior of your alarm (sensing chamber) by using compressed air or a vacuum
cleaner hose and blowing or vacuuming through the openings around the perimeter of the alarm. The
outside of the alarm can be wiped with a damp cloth.
8. Turn on the A.C. power. The green A.C. Power On Indicator should be lit when the alarm is operat-
ing from A.C. power.
TAMPER RESIST LOCKING PIN: To make your smoke alarm somewhat tamper resistant, a locking
pin has been provided with your alarm. Using this pin will deter children and others from removing the
alarm from trim ring. To use the pin, insert it into the hole in the side of the alarm after the alarm has
been installed on the trim ring (see Figure 5). NOTE: The tamper resist pin will have to be removed in
order to remove the alarm. Use a long nose pliers to pull the pin out of the hole. It is now possible to
remove the alarm from the trim ring.
After installation, TEST your alarm by pressing and holding the test button for several seconds. This
should sound the alarm.
FIGURE 2. SELECT CORRECT MOUNTING HOLES ON TRIM RING
4.OPERATION AND TESTING
OPERATION: The smoke alarm is operating once A.C. power is applied and testing is complete. When
the smoke alarm ionization chamber senses products of combustion, the horn will sound a loud (85db)
temporal alarm until the sensing chamber is cleared of smoke particles.
LED INDICATORS: This smoke alarm is equipped with red and green LED indicators. The red LED is
located under the test button and has two modes of operation.
Standby Condition The red LED will flash every 30-40 seconds to indicate that the smoke
alarm is operating properly.
Alarm Condition When the alarm senses products of combustion and goes into alarm,
the red LED will flash rapidly (one flash per second). The rapid flashing
LED and temporal alarm will continue until the air is cleared.
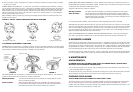
Rectangular Plaster Ring Circular Plaster Ring Octagonal Electrical Box
To remove A.C.
connector,
squeeze
locking arms
and pull
Alignment marks
Install Remove
Tamper resistant
locking pin
FIGURE 3. FIGURE 4. FIGURE 5.