


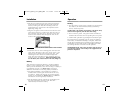

Testing
• Test the unit to ensure proper operation by pressing the
Test button. (All interconnected, battery backed-up
alarms, should respond).
CAUTION: Due to the loudness (85 decibels) of the alarm, always
stand an arms-length away from the unit when testing.
• Tu rn on the AC power. The green Power On Indicator
should be lit when the alarm is operating from AC power.
• C o n f i r m unit operation by pressing the Test button again.
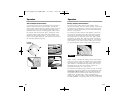
The smoke alarm is operating once AC power is applied, a
f r esh battery is installed and testing is complete. When the
smoke alarm ionization sensor chamber senses products of
combustion, the horn will sound a loud (85db) alarm until
the sensing chamber is cleared of smoke particles.
CONTRACTOR’S NOTE: Only remove the battery pull-tab once AC
is permanently applied. Unit will chirp if AC is applied and the
pull-tab is still present.
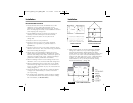
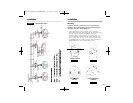
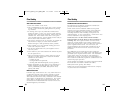
• Pull the AC Quick-Connect wire harness through the
center hole in the mounting bracket and secure the
bracket, making sure that the mounting screws are
positioned in the small ends of the keyholes before
tightening (Image 4B).
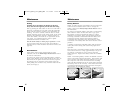
• Plug the AC Quick-Connect wire harness into the back
of the alarm (Image 5), making sure that the locks on
the connector snap into place. Push the excess wire
back into the electrical box through the hole in the
center of the mounting plate.
• Install the alarm on the mounting plate and rotate the
alarm in the direction of the “ON” arrow on the cover
until the alarm ratchets into place (Image 4D). This
ratcheting function allows for aesthetic alignment.
Note: The alarm will attach to the mounting plate in 4
positions (every 90 degrees). When wall mounting, make
sure the battery door is at the bottom of the unit (Image 4C).
Battery
This unit will not function without a properly installed
battery, and is equipped with a battery lockout feature
which prevents the battery door from closing if a battery is
not installed correctly. See Maintenance section for
additional information concerning battery installation.
• For initial installation a pre-installed 9 V battery is
included with a battery pull tab that allows for easy
connection. Simply pull the tab out, and the battery
backup is connected! See Maintenance for additional
information concerning battery installation.
• Pull the Battery Pull Tab (yellow tab protruding from
the unit) completely out of the unit. This will
automatically connect the battery.
I n s t a l l a t i o n
O p e r a t i o n
1211
ATTACHING THE AC QUICK-CONNECT WIRE HARNESS
IMAGE 5
820-0612_RevA_1276_MAN_ENG 11/17/03 9:44 AM Page 10