


WARNING: TEST YOUR SMOKE ALARM OPERATION AFTER R.V. OR MOBILE
HOME VEHICLE HAS BEEN IN STORAGE, BEFORE EACH TRIP AND AT LEAST
ONCE A WEEK DURING USE.
2.LOCATIONS TO AVOID
•In the garage. Products of combustion are present when you start your automobile.
• Less than 4” (10cm) from the peak of an “A” frame type ceiling.
•In an area where the temperature may fall below 40ºF or rise above 100ºF.
•In dusty areas. Dust particles may cause nuisance alarms or failure to alarm.
•In very humid areas. Moisture or steam can cause nuisance alarms.
• In insect-infested areas.
•Smoke alarms should not be installed within 3 ft (.9m) of the following: the door to
a kitchen, the door to a bathroom containing a tub or shower, forced air ducts used
for heating or cooling, ceiling or whole house ventilating fans, or other high air flow
areas.
•Kitchens. Normal cooking may cause nuisance alarms. If a kitchen alarm is desired,
it should have an alarm silence feature or be a photoelectric type.
• Near fluorescent lights. Electronic “noise” may cause nuisance alarms.
3.INSTALLATION INSTRUCTIONS
CAUTION: THIS UNIT IS SEALED. THE COVER IS NOT REMOVABLE!
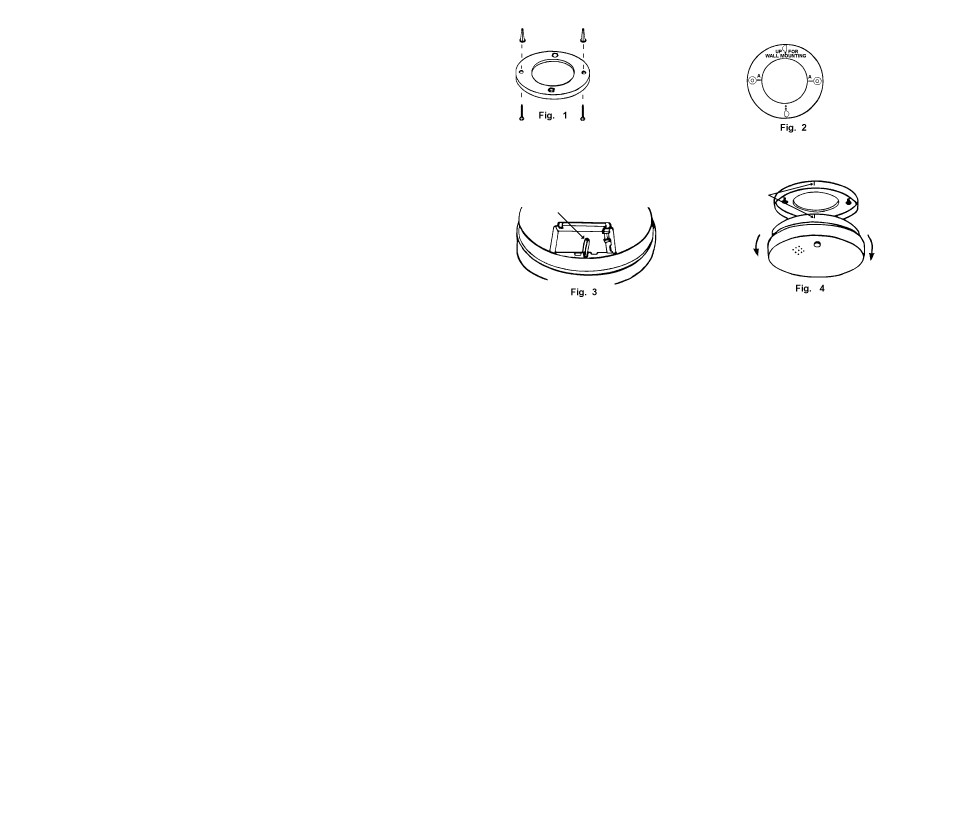
1. Remove the mounting plate from the back of the alarm by holding the mounting
plate and twisting the alarm in the direction indicated by the “OFF” arrow on the
alarm cover.
2. To insure aesthetic alignment of the alarm with the hallway or wall, the “A” line on
the mounting plate must be parallel with the hallway when ceiling mounting or
horizontal when wall mounting.
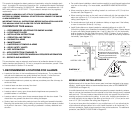
3. After selecting the proper smoke alarm location as described in Section 1, attach
the mounting plate to the ceiling as shown in Figure 1. For wall mounting see Figure
2. Place mounting plate on the wall. Be sure the “UP FOR WALL MOUNTING “ text
and arrow are facing up. Use the screws and anchors provided to secure the
mounting plate (use 3/16” drill bit for anchor holes).
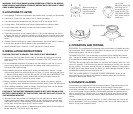
4. Battery installation instructions are provided on the inside of the battery compart-
ment. To ensure proper installation of the smoke alarm battery, follow the instructions.
5. When installing the battery, press the battery reminder finger down into the battery
compartment and install the battery (see Figure 3).
CAUTION! IF THE BATTERY REMINDER FINGER IS NOT HELD DOWN IN THE
BATTERY COMPARTMENT BY THE BATTERY, THE UNIT WILL NOT ATTACH TO
THE MOUNTING BRACKET.
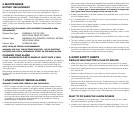
6. Alignment marks are provided on the edge of the trim plate and the alarm. After
installing the mounting plate, place the alarm on the mounting plate with the align-
ment marks lined up. Twist the alarm in the direction indicated by the “ON” arrow
on the alarm cover (see Figure 4) until it locks in place.
7. After installation, test your alarm by depressing and holding down the test button for
several seconds. This should sound the alarm.
4.OPERATION AND TESTING
OPERATION: The smoke alarm is operating once a fresh battery is installed and test-
ing is complete. When products of combustion are sensed, the unit sounds a loud
85db pulsating alarm until the air is cleared.
FLASHING LED LIGHT: This smoke alarm is equipped with a flashing red indicator
light. The light is located under the test button and will flash every 30 - 40 seconds
to indicate that the smoke alarm is receiving power.
TESTING: Test by pushing the test button on the cover and holding it down for a min-
imum of 2 seconds. This will sound the alarm if the electronic circuitry, horn, and bat-
tery are working. If no alarm sounds, the unit has defective batteries or other failure.
DO NOT use an open flame to test your alarm, you could damage the alarm or ignite
combustible materials and start a structure fire.
TEST THE ALARM WEEKLY TO ENSURE PROPER OPERATION. Erratic or low
sound coming from your alarm may indicate a defective alarm, and it should be
returned for service (see Section 12).
5.NUISANCE ALARMS
Smoke alarms are designed to minimize nuisance alarms. Cigarette smoke will not
normally set off the alarm, unless the smoke is blown directly into the alarm.
Combustion particles from cooking may set off the alarm if the alarm is located close
to the cooking area. Large quantities of combustible particles are generated from
spills or when broiling. Using the fan on a range hood which vents to the outside
(non-recirculating type) will also help remove these combustible products from the
kitchen.
If the alarm does sound, check for fires first. If a fire is discovered, get out and call
the fire department. If no fire is present, check to see if one of the reasons listed in
Section 2 may have caused the alarm.
When mounting in a
hallway, the “A” line
should be parallel
with the hallway.
Up for Wall
Mounting. When wall
mounting, the “A”
line should be hori-
zontal and the “UP
FOR WALL MOUNT-
ING” arrow must be
pointing up.
Alignment Marks
Remove
Install