


898147-UUM-B-0713
Johnson Controls Unitary Products 5
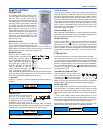
REMOTE CONTROL
OPERATION
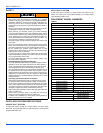
The wireless remote control gives the home-
owner the ability to operate their ductless sys-
tem at the touch of a button. The indoor unit
and remote control send information back and
forth continuously. The remote control must be
placed on a table or other surface in direct line
of sight with the indoor unit infrared receiver.
The remote control should not be placed in a
drawer. Make sure that there are no obstruc-
tions between the indoor unit receiver and the
remote control. Make sure you do not throw nor
drop the remote control. The remote should
never come in contact with liquids and should
not be left in direct contact with the sun or any
place that's very hot.
POWER BUTTON
When this button is pressed, the system will
turn on. When pressed the second time, the
system will turn off. When turning the system on or off, the Timer and
Sleep functions (if activated) will be canceled; however the clock time
will be continue to operate even when the system is off.
MODE BUTTON
Press this button to select system
operating modes. AUTO mode is the
default setting when the system is
turn on. As MODE button is pressed,
COOL, DRY, FAN and HEAT (for
heat pump only) modes can be
selected in this order. The selected
mode is displayed on both the
remote control and the indoor unit's
cover panel displays. When AUTO
mode is selected, the temperature will not be displayed. When in COOL
mode, the default setpoint temperature is 77°F (25°C). When in HEAT
mode, the default setpoint temperature is 69°F (21°C).
+/- BUTTONS
Use plus (+) and minus (-) buttons to adjust the temperature setting up
or down.
FAN BUTTON
Press FAN button to select fan speed.
AUTO fan is the default setting. In
AUTO fan mode, the indoor fan speed
is determined by the indoor ambient
temperature. Press FAN button to
select the desired fan setting in the following order AUTO, Low Speed,
Medium Speed and High Speed. The fan speed selection is displayed
at the top of the remote control display by one of these symbols.
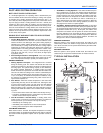
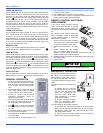
I FEEL BUTTON
Press the I FEEL button to activate the I FEEL feature. When the I
FEEL icon appears, the system will satisfy your cooling or heating (heat
pump only) setpoint temperatures where the remote control is located.
Press the I FEEL button again to deactivate. When I FEEL function is
deactivated, the system will satisfy the cooling and heating (heat pump
only) setpoint temperatures where the indoor unit is located. To use the
I FEEL mode, the remote control must be placed in direct line of sight
with the indoor unit infrared receiver. Make sure that there are no
obstructions between the indoor unit receiver and the remote control
when I FEEL feature is activated.
SWITCH FROM °C TO °F
With system OFF, press MODE and (-) buttons simultaneously to switch
from Centigrade to Fahrenheit. The current selection is displayed to the
right of the temperature display on the remote control.
CLOCK BUTTON
Press the CLOCK button to adjust the time displayed on the remote
control. The clock icon will flash. Press the (-) and + buttons to
adjust the time up or down in one minute increments. Press and hold
the button to adjust the time in 10 minute increments. Press the CLOCK
button again when correct time is displayed. If no button is pushed for 5
seconds while the display is still flashing, the timer setting will not be
saved.
X-FAN BUTTON
Press the X-FAN button once to initiate extended blower operation.
This function allows removal of excess moisture from the indoor unit
coil after in order to prevent possible mold or bacterial growth. When
the X-FAN function is activated, the indoor fan will continue to run at low
speed for 10 minutes after the unit is turned off using the POWER but-
ton. The extended fan operation icon is displayed when this feature
is turned on. To deactivate, press X-FAN button again and the indoor
unit fan will stop running.
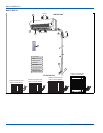
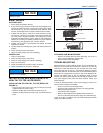
LOUVER SETTING BUTTON
Press this button to set the position of the
indoor unit swing louver. When this feature
is turned on, icon appears on the remote
control display. Continue to press the LOU-
VER icon to select the desired swing angle as shown in the following
sequence. When activated, the louver will start swinging right to left.
SLEEP BUTTON
Use the SLEEP button to activate or cancel the sleep function. To acti-
vate sleep function, press SLEEP button and the sleep icon should
appear on the remote control display. Press SLEEP button to cancel
sleep function and the sleep icon on the remote control should disap-
pear.
In cooling mode, SLEEP function increases temperature by 2°F per
hour over a two hour period from the time sleep function is activated. In
heating mode, SLEEP function decreases temperature (-2°F per hour)
over a two hour period from the time sleep function is activated.
Sleep function is defaulted to off when the system is turned on. If the
system is turned off the Sleep function is automatically disabled.
The temperature cannot be adjusted when the system is in AUTO
mode.
The fan speed is not adjustable in DRY mode operation. The low fan
speed is necessary to ensure optimal humidity control.
AUTO
COOL
DRY
FAN
HEAT
(Only for cooling and heating units)
NOTICE
AUTO
LOW FAN
HIGH FAN
MIDDLE FAN
NOTICE
The sleep function is not available in AUTO or FAN modes.
OFF
NOTICE