Jacuzzi Whirlpool Bath: Shower Towers Page 13 FZ71000C • 10/07
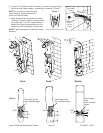
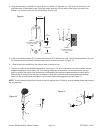
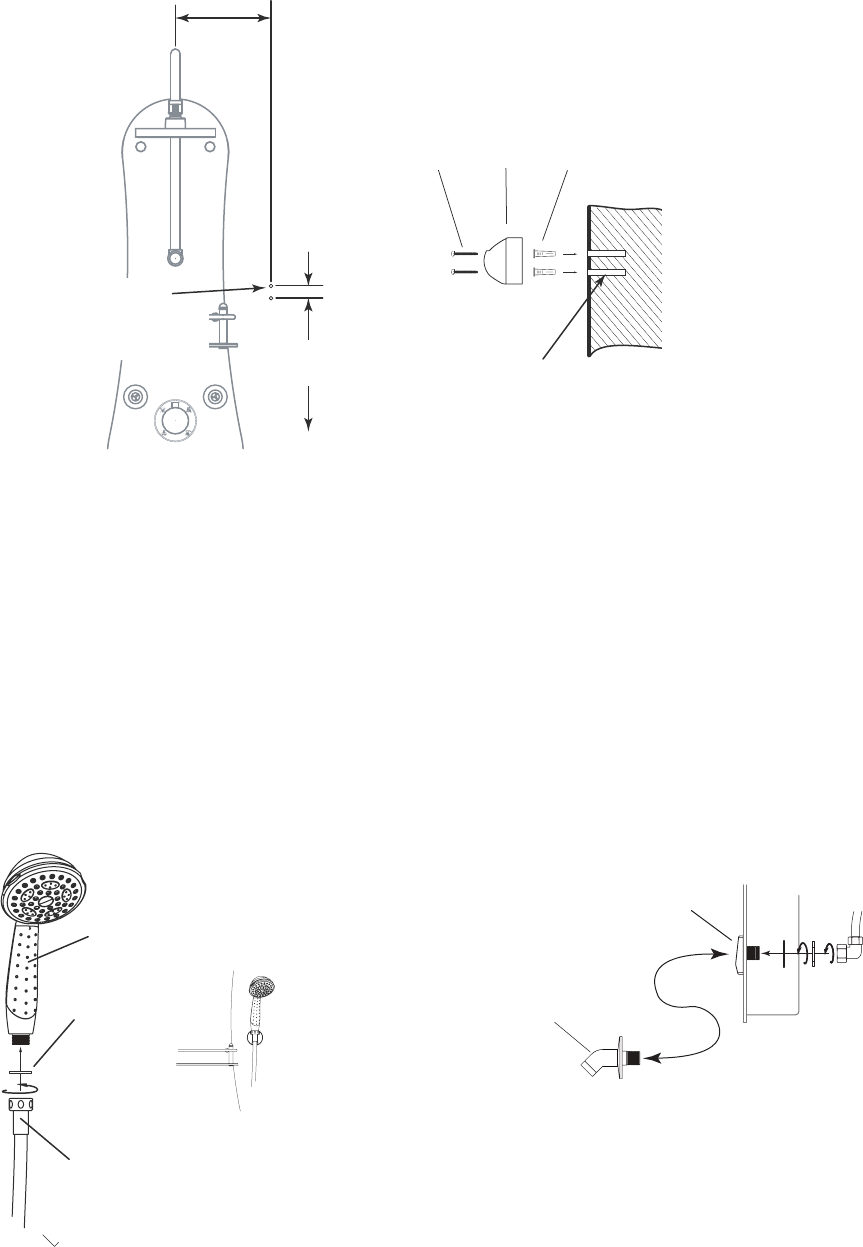
4. Using the dimensions indicated in Figure 9, drill two holes 1/4” diameter by 1-3/8” deep into the wall on the
right hand side of the shower tower. Insert the plastic anchors (18) into each of the holes, and mount the
bracket (17) onto the wall using the M3.5x25mm Screws (19).
5. Conrm the sealing washer (21) is inside the end of the S.S. exible hose (16). Attach the hand shower (15) onto
the hose by hand and place the hand shower into the bracket as shown in Figure 10.
6. After nishing the installation, the shower tower is ready for use.
7. There is an optional tube-shaped temperature check spout (13) as an alternative to the pre-installed square-
shaped temperature check spout (12). To exchange these two components, use a hand wrench (not sup-
plied) to remove the supply hose connecting nut attached to the square-shaped temperature check spout.
Remove the mounting nut of the spout to release it. After that, install the tube-shaped temperature check
spout into the mounting hole and tighten it, and mount it with the supplying hose, see Figure 11.
NOTE: To avoid scratching the front surface, do not turn square spout. Hold and remove washer rather than remove
the square spout.
2"
(23 mm)
9-7/8"
(250 mm)
63"
(1600 mm)
TO FLOOR
2 HOLES
1/4" DIA.(6,4 mm) x
1-3/8 " (35 mm)
DEEP
2 HOLES
1/4" DIA.(6,4 mm) x
1-3/8 " (35 mm)
DEEP
19
16
18
18
17
19
Figure 9
15
21
16
Figure 10
12
Figure 11
13
12


