


NP322L-X
2OF4
GENERAL DESCRIPTION
ARO systems are totally enclosed, sealing the material in the system
from air and moisture, preventing premature cure-out of the material.
This allows for either continuous or intermittent use of the system and
reduces the need for daily system clean-up.
The built-in liftcapability allows forquick drum changeoverand easy lift-
ing of pump assembly from the container.
INSTALLATION
TheNP322L( )()-( )Chop-CheckDispensing Systemcomescompletely
assembled. Remove unit from crate and place on a level surface. Install
material hose and dispensing device as required.
When the following instructions are observed, heavy paste materials
canbe pumpeddirectlyfromtheiroriginal5gallon drumwithoutairinclu-
sion, or excessive waste. The follower plate creates an air tight seal as
well as clean-wiping action in its progressive downward movement into
the drum.
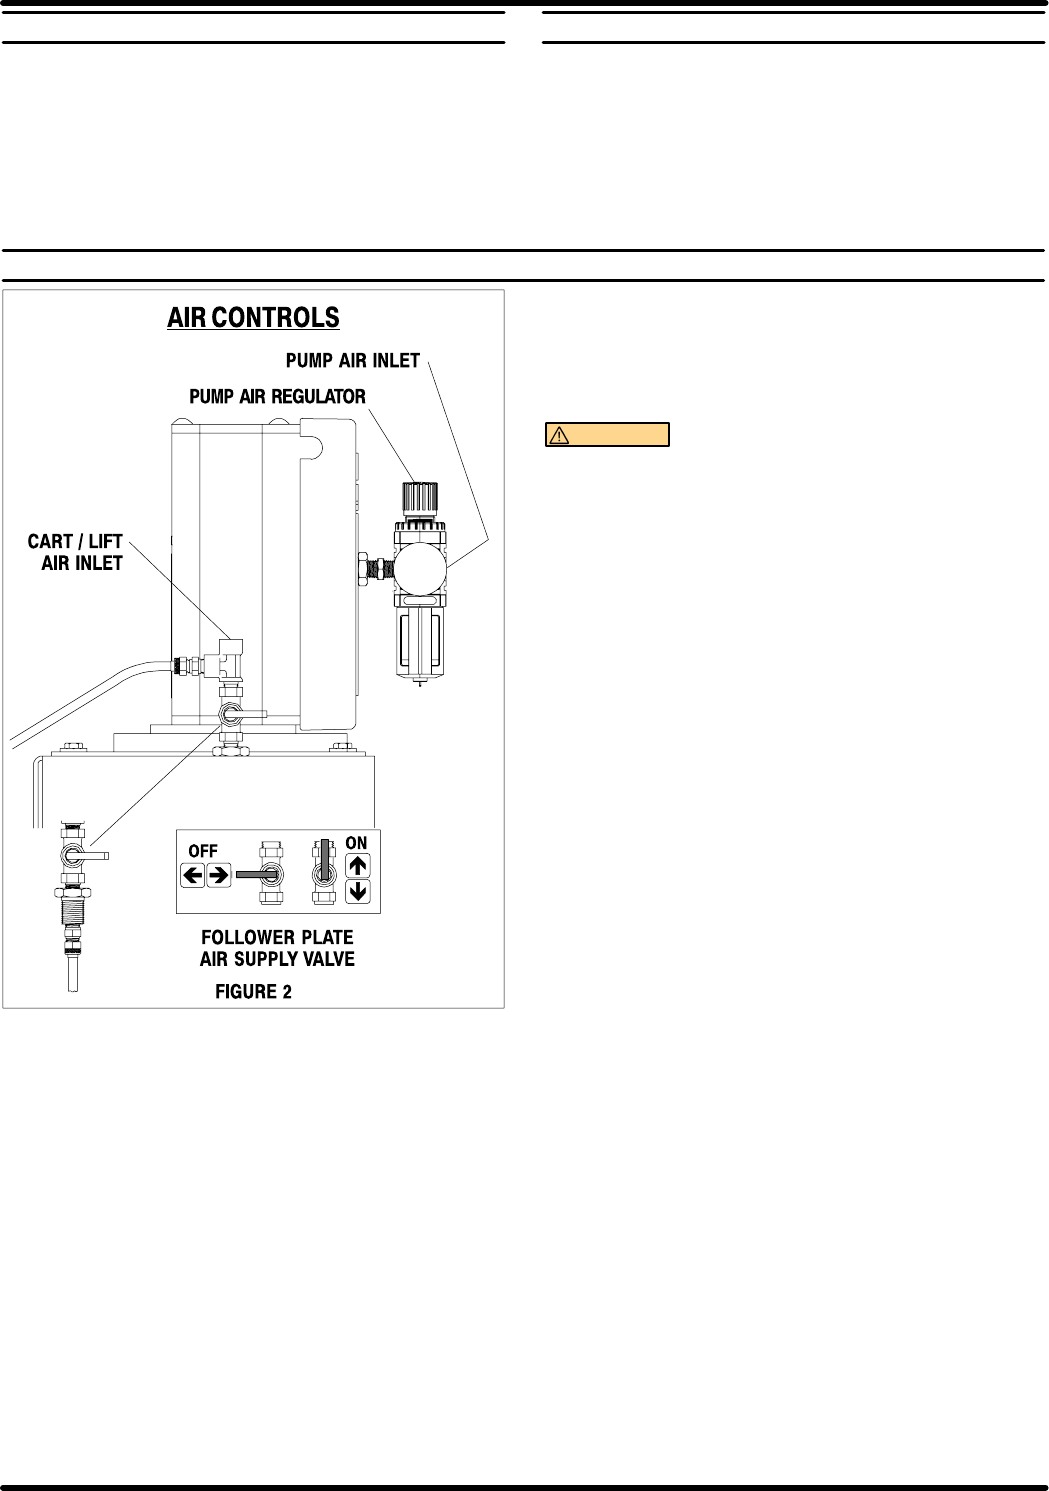
TO RAISE LIFT:
1. Adjust (turn needle valve knob counter-clockwise) air pressure to
lift. Connect the air supply (160 PSI MAX) to the air inlet.
2. Raise the lift high enough to clear the height of the drum. Stop the
lift’s upward travel by adjusting (turn needle valve clockwise until
tight) needle valve.
REFER TO PAGE 3:
1. Onceliftassemblyandpumpareinthe “UP”position,placeand cen-
ter an opened 5 gallon drum of material on the lift base. Use the
stops on the base to center the 5 gallon drum. Tighten thumb screw
to secure drum.
2. Lubricate lower follower wiper plate seal with grease. NOTE: Make
certain the grease is compatible with the material being dispensed.
Thisensures asmoothfitinto thepailaswellas preventscuringtype
compounds from bonding to seal.
3. Check vent plug on follower plate to be sure it easily threads in and
out. It is recommended to lubricate the threads of the plug to help
prevent possible set up of compound at this point. See 65184X-X
Follower Plate Operator’s Manual.
TO LOWER LIFT:
WARNING
PINCH HAZARD. Follower can descend quickly
causinginjury. Keephandsclear whenaligning withcontainer.
NOTE:BecertaintheFollowerPlateventplughasbeenremovedso
that the air trapped between the follower and the material is allowed to
escapefrom thisvent. Capturedairbetween thefollowerplateand drum
will escape.
NOTE:Theliftmay hesitatemomentarilybeforestarting downward.The
air pressure inside the post air chamber must decrease beforeit will be-
gin to descend.
1. Disconnect air line from the lift air inlet. Adjust (turn needle valve
knob counter-clockwise) needle valve to lower the pump end into
drum.
2. Replacetheventplugoncethematerialbeginsto oozefromthevent
opening.
3. Adjust (turn pump air regulator knob counter-clockwise to prevent
over pressurization of pump) knob on pump air regulator.
4. Connectairlinetopumpairregulator andadjust(turnpumpairregu-
lator clockwise) air until pump begins to cycle.
5. Trigger gun to prime pump with material.
TO RAISE LIFT, (NORMAL OPERATION):
1. Disconnect air line from pump air regulator and connect to lift air in-
let.Adjust thefollowerplateair valve pressureupto approximately 8
psig (.55 bar). DO NO OVERPRESSURIZE THE DRUM to avoid
damage.
NOTE:Airfromthisvalvewillonlypasswhentheunitisbeingraised.
2. Adjust (turn needle valve knob counter -clockwise) air pressure on
lift.
3. Raise the lift high enough to clear the height of the drum. Stop the
lift’s upward travel by adjusting needle valve knob counter-clock-
wise.
TO CHANGE DRUM:
NOTE: The needle valve knob should be turned clockwise to hold lift in
the “UP” Position.
1. Unscrew thumb screw and remove old 5 gallon drum.
2. Place and center a new drum into position. Remove cover. Tighten
thumb screw.
OPERATING INSTRUCTIONS