


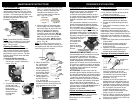
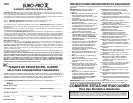
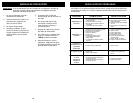

TROUBLESHOOTING
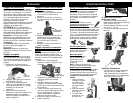
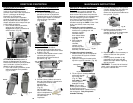
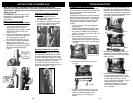
Fig. 3
13
Pressez
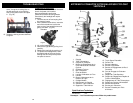
INSTRUCTIONS D’ASSEMBLAGE
Attacher le support du boyau
supérieur
1. Placez le support du boyau
supérieur dans la fente à l’arrière
de l’aspirateur. (Fig. 4)
2. En utilisant un tourne-vis Philips et
la vis fournie, attachez la pince du
boyau à l’aspirateur. (Fig. 5)
Fig. 4
Fig. 5
36
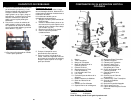
Fig. 2
Tige de
verrouillage
de la
poignée
Fig. 1
Ajustement
de la hauteur
du tube
télescopique
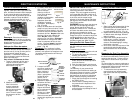
Enrouler & dérouler le cordon
d’alimentation
Cet aspirateur est équipé d’un espace
de rangement pratique pour le cordon.
Le cordon d’alimentation tourne autour
de deux supports de cordon sur le côté
de l’unité. Le support de cordon du haut
a un dégagement rapide de corde.
Tournez le crochet du cordon vers la
gauche ou vers la droite pour enlever le
cordon d’alimentation. (Fig. 6)
Fig. 6
Merci d’avoir acheté un aspirateur Infinity Pour vous assurer que votre
aspirateur ne perde pas de succion, vous devez effectuer des tâches d’entretien
régulièrement. Référez-vous à votre manuel d’utilisateur pour des instructions
étapes par étapes.
ATTENTION: Toujours retirer la fiche
électrique de la prise électrique avant
d’assembler ou d’enlever des
accessoires.
Insérer & enlever le tube
télescopique de l’unité principale
1. Insérez le tube télescopique dans
l’ouverture en haut de l’unité, en
vous assurant que le bouton
d’ajustement de la hauteur du tube
électrique fait face à l’arrière de
l’unité. (Fig. 1)
2. Insérez la poignée dans l’ouverture
supérieure du tube télescopique en
vous assurant que la tige de
verrouillage est en place. (Fig. 2)
3. Pour enlever le tube télescopique,
appuyez sur le bouton de
dégagement du tube télescopique
qui est situé à l’arrière de l’unité et
soulevez le tube télescopique.
(Fig. 3)
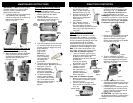
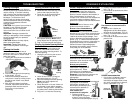
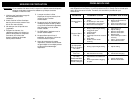
Cleaning & Changing the Belt
WARNING: To reduce the risk of electric
shock, the power cord must be disconnected
before performing maintenance/trouble
shooting checks.
Occasionally the power nozzle drive belt will
require changing, the frequency will depend
upon the amount of use your vacuum sees.
If the brush roll does not engage when the
carpet-to-floor selector is in the “Carpet”
position:
1. Turn the vacuum "Off" and unplug from
power supply.
2. Release the handle by pressing on the
handle release pedal and pull back until
the handle is released from its upright
position. Then turn the vacuum over and
place on the floor.
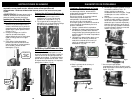
3. With a flathead screw driver or a coin,
rotate the three (3) locking screws on
the belt and brush roll cover in a counter
clockwise direction to the unlock position.
(Fig. 48)
6. To remove the worn or broken belt, lift
the brush roll and slide it out. Remove
the brush roll by grasping the left side of
the brush roll and pulling it upward and
out. Once the brush roll has been pulled
out slightly, slip the belt off of it.
(Fig. 50 & 51)
4. Remove the belt and brush roll cover.
(Fig. 49)
Fig. 49
Fig. 50
Fig. 51
7. Once having removed the brush roll
completely, you will be able to easily
remove the belt from the motor driven
shaft. (Fig. 52)
8. Slide one end of the new belt over
the drive shaft, and the other end of
the belt around the brush roll. Secure
the left side of the brush roll into
place, and then the right side. Check
to make sure that the belt is
completely centered on the motor
driven shaft and that the brush roll
turns smoothly.
Fig. 52
Fig. 48
5. Inspect the brush roll for any build-up
of hair or string. If present, remove by
carefully cutting with scissors. Be
careful not to cut or damage the
bristles.