


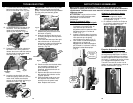

MAINTENANCE INSTRUCTIONS
Note: Occasionally the filter indicator
light will flash momentarily if the air path
is blocked when using the above floor
tools. This is normal.
Cleaning Pre-Motor Filters
Under normal use, the 2 filters in the
filter housing should be cleaned every
three (3) to five (5) months for optimal
performance of your vacuum. The filter
indicator light will flash when the filters
need cleaning.
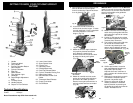
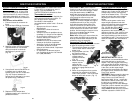
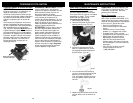
To remove the filter housing:
1. Hold the filter housing by the air
inlet and turn counter clockwise to
unlock. (Fig. 34)
Fig. 34
2. Turn the filter housing
upside down and
turn the filter housing
base counter
clockwise to open.
Remove the filter
housing base.
(Fig. 35)
Fig. 35
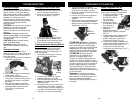
3. Inside the filter housing are two filters.
Filter 1 is a foam filter and Filter 2 is a
felt filter. Both are washable and
reusable for the lifetime of your
vacuum (under normal household
use). (Fig. 36, Fig. 37)
Fig. 36
Fig. 37
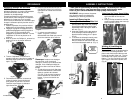
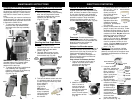
5. When the filters are
dry, replace them
into the dry filter
housing. Insert the
foam filter (filter 1)
first and then place
the felt filter (filter 2)
over the foam filter.
6. Replace the filter
housing base on to
the filter housing.
Align the arrows on the filter housing
with the arrows on the filter housing
base and turn clockwise to lock in
place. (Fig. 40)
Foam Filter
Felt Filter
Filter Indicator Light
9
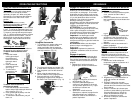
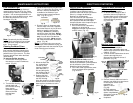
When the filter indicator light flashes, it
means that the dust cup is full, the filters
need cleaning or there is a blockage in the
air paths. You must empty the dust from
the dust cup, clean the debris screen, clean
the filters and check the unit for any
blockages. (Fig. 33)
Fig. 33
Fig. 38
Foam Filter
Felt Filter
Fig. 40
ALIGN HERE TO CLOSE
ALIGN HERE TO CLOSE
Fig. 39
Filter
Housing
Base
Felt
Filter
Foam
Filter
Filter
Housing
4. Rinse the filters in lukewarm water
until the water runs clear. Squeeze
and let the filters air dry for 24 hours
before re-installing into the filter
housing. Do not use a washing
machine to clean the filters. Do not
use a hair dryer to dry them. Air dry
only. You can also rinse the filter
housing if you wish. Never operate
the vacuum without ALL the filters in
place. (Fig. 38)
Note: To continue using your vacuum
while the pre-motor filters are drying, you
can replace them with the extra set of pre-
motor filters that are included.
Filter
Indicator
Light
DIRECTIVES D’ENTRETIEN
38
Séparer le bac à poussière du
collecteur cyclone
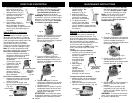
1. Enlever le bac à poussière
2. En tenant l’assemblage du bac à
poussière, tourner la poignée de
transport dans le sens contraire des
aiguilles pour séparer le collecteur
cyclone du bac à poussière.
(Fig. 22 et 23)
Fig. 22
Fig. 23
Fig. 25
Écran de débris
Fig. 26
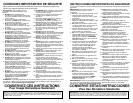
3. Enlevez l’écran à débris et rincez-le
dans de l’eau tiède en le tenant sous
le robinet pour enlever toute
poussière qui
adhère à l’écran.
(Fig. 26)
Ne PAS mettre au
lave-vaisselle. Laissez
sécher complètement
(24 heures) avant de
réinstaller dans
l’aspirateur.
Nettoyer le bac à poussière &
l’écran de débris
Pour enlever l’écran de débris:
1. Tenez le bac à poussière dans une
main et avec l’autre main tenez l’écran
à débris. (Fig. 24)
2. Tournez l’écran à débris dans le sens
contraire des aiguilles pour
déverrouiller et enlevez du bac à
poussière. (Fig. 25)
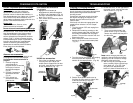
Enlever le bac à poussière
ATTENTION: Toujours débrancher
l’unité de la prise électrique avant
d’enlever et de vider le bac à poussière.
Sinon il y a danger de décharge
électrique ou de blessures.
Pour vous assurer que l’aspirateur
continue de nettoyer en profondeur, le
bac à poussière doit être vidé après
chaque utilisation et/ou chaque fois que
la ligne MAX est atteinte.
1. Pour enlever le bac à poussière,
appuyez sur le bouton de
dégagement du bac à poussière et
enlever le bac. (Fig. 19)
Fig. 19
PRESSER
ATTENTION: Ne PAS pousser le
bouton de dégagement de la porte
inférieure du collecteur cyclone pendant
que le collecteur cyclone est encore
attaché au bac de poussière.
2. Pour vider la bac à poussière, tenez
le bac au dessus d’une poubelle
(Fig. 20 et 21)
Fig. 20
Presser
Fig. 21
Fig. 24
Tenir par
le bas
Tenir &
Tourner