


8
Figure 9
Figure 8
Figure 10
Figure 11
Figure 12
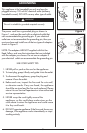
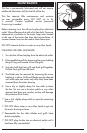
GRILL ASSEMBLY
Grill Lines
Grill
Mounting
Screw
Top Tabs
11a
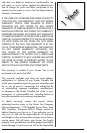
Motor
Notch
Fan Blade
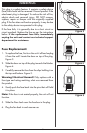
Note: The trim ring may be attached to the front and rear
grills for shipping purposes. If so, remove the trim ring by
loosening the trim ring screw.
1. Remove the four grill mounting screws from the
motor housing. Figure 8.
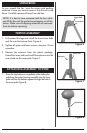
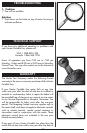
2. Make sure that the grill is positioned so that three
of the grill lines are completely between the top
tabs. Then place the Back Grill against the Motor
Housing, Figure 9., and line up the four tabs on the
back of the grill to the four screw holes on the front
of the motor.
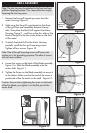
3. To attach the Back Grill to the Motor Housing
partially install the four grill mounting screws.
Tighten all four screws. Figure 10.
Note: One of the grill mounting screws will have a star
washer on it, for grounding purposes. The other 3 screws
will not have a washer.
4. Loosen the screw on the back of the Blade assembly.
Figure 11a. Slide the Blade assembly onto the
motor shaft. Figure 11.
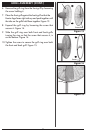
5. Tighten the Screw on the Blade assembly to secure it
to the Motor. Make sure that the end of the screw is
positioned within the notch on the shaft. Figure 12.
Caution: Ensure when tightening the screw on the back
of the fan blade, you tighten it on the flat part of the
motor shaft.
1
2
3