


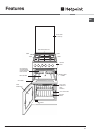

15
GB
PLEASE PHONE US TO REGISTER YOUR APPLIANCE AND ACTIVATE YOUR PARTS GUARANTEE ON 08448 24 24 24
Care and Cleaning
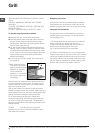
Grill
Remove the grill pan and the wire grid food support,
it is best to wash these items immediately after use to
prevent stains from being burnt on when used again.
Wipe out the Grill compartment, use a fine steel wool
soap pad to remove stubborn stains from the grill
runners and the floor of the compartment. Wipe over
the control panel with a damp cloth and polish with a
dry cloth.
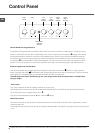
Control Panel
Do not use cream cleaners, oven cleaners or aerosols,
scouring pads or abrasive powder for cleaning the
plastic knobs as damage will occur.
Decorative Trims
It is advisable to clean the decorative trims regularly
to prevent any build up of soiling. The recommended
method of cleaning is to wipe over the trims with a soft
cloth wrung out in warm water or mild non-abrasive
cleaner. (If in doubt try the cleaner on a small area of
trim which is not noticeable in normal use). Then, after
wiping with a cloth wrung out in clear water, dry with a
soft clean cloth.
Doors
Wipe over the outer door glass panels with a cloth
wrung out in warm soapy water, then after wiping with
a cloth wrung out in clear water, dry with a soft clean
cloth. Ensure that glass doors are not subjected to any
sharp mechanical blows.
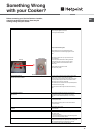
Glass Inner Door Panel (where fitted) *
Open the door fully
and unscrew the two screws
securing the glass panel,
taking care not to allow the
glass to fall. The glass panel may now be washed at
the sink. Stubborn stains can be removed by using
a fine steel wool soap pad. Ensure the glass panel is
not subjected to any sharp mechanical blows. Take
particular care not to damage the inner surface which
is coated with a heat reflective layer. After cleaning,
rinse and dry with a soft cloth. For slight soiling the
inner glass panel may be cleaned, while still warm,
without removing it from the door.
Warning: Oven must not be operated with inner door
glass removed.
Take care during cleaning not to damage or distort
the door seals. Do not lift the door seal from the oven
chassis, if necessary remove the seal by carefully
unhooking the corner clips.
Take care that the rating label edges are not lifted
during cleaning, and furthermore that the lettering is
not blurred or removed.
Top Cavity
Remove the rod shelves and grill pan. Use a fine steel
wool soap pad to remove stubborn stains from the rod
shelves, grill pan and the floor of the oven. Clean the
glass part of the oven door using a sponge and a non-
abrasive cleaning product, then dry thoroughly with a
soft cloth. Do not use rough abrasive material or sharp
metal scrapers as these could scratch the surface and
cause the glass to crack.
Main Oven Cleaning
Main oven is fitted with “Stay Clean” panel.
‚Stay Clean’ panels are covered with a special enamel
which absorbs cooking soils. At higher temperatures
the soiling is slowly destroyed. In most cases normal
cooking at higher temperatures will permit this cleaning
to take place automatically. However, if higher cooking
temperatures are not used regularly then it may be
necessary, in order to prevent heavy soiling, to run
the oven at maximum temperature for at least two
hours, from time to time. The ‚Stay Clean’ panel can
be washed in warm soapy water followed by rinsing in
clear water. Dry well with a soft cloth.
NOTE: Do not use enzyme washing powder, harsh
abrasives or chemical oven cleaners of any kind.
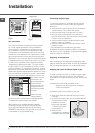
Oven Shelf Supports
The shelf supports are removable and dishwasher
safe.
To remove hold the support at the front and pull away
from the oven side, this can then be cleaned in a sink
or a dishwasher. When removed it allows access to
the oven side, which can be cleaned with warm soapy
water.
To refit the support, insert the longer leg into the rear
fixing hole and push in the front leg.
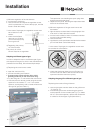
Replacing the Battery
The battery is not covered bye the guarantee. Use an
alkaline AA battery. The battery holder is located in the
plinth panel below the oven door. Open the oven door
fully. Press the tag on the left hand side of the battery
holder/cover and withdraw it just enough to get access
to the battery. Fit the new battery with the end marked
“+” on the same side of the battery holder as the red
lead. Replace the battery holder by pushing it firmly
into the hole in the plinth.
* (only available on certain models)