


3
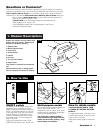
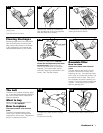
Unpack the cleaner from the carton and
identify the parts shown. Remove and
dispose of cardboard packing.
1. Bottom plate
2. Multi-purpose nozzle
3. Front cover
4. On/Off switch
5. Handle
6. Dirt cup
7. Dirt cup latch button
8. Nozzle latch
This cleaner is intended for household
use.
Operate cleaner only at voltage speci-
fied on data plate on bottom of cleaner.
1. Cleaner Descriptions
1-1
Questions or Concerns?
The Hoover Company wants to quickly resolve any concerns about your cleaner or
questions regarding its use. Look on the list provided with the product for your local
Hoover Factory Service Center or in the Yellow Pages under “Vacuum Cleaners –
Household” for the nearest Authorized Hoover Warranty Service Dealer (depot) or:
Visit us online at www.hoover.com to find the service outlet nearest you
(click on the “Service” button or call:
1-800-944-9200 for an automated referral of authorized service
outlet locations (U.S. only) or call:
1-330-499-9499 to speak with a representative in the Hoover
Consumer Response Center.
1
2
3
4
5
6
7
8
ON
OFF
2-1
2-2
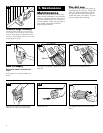
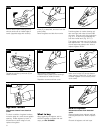
ON/OFF switch
To reduce of risk of electric shock, this
appliance has a polarized plug (one
blade is wider than the other). This plug
will fit in a polarized outlet only one way.
If the plug does not fit fully in the outlet,
reverse the plug. If it still does not fit,
contact a qualified electrician to install
the proper outlet. Do not change the
plug in any way.
Plug cord into electrical outlet. Slide
ON/OFF switch back to turn cleaner off.
2. How to Use
Multi-purpose nozzle
The multi-purpose nozzle has been built
into the front of the cleaner. It is
designed for use on carpet, rugs, uphol-
stered furniture, mattresses, automobile
interiors and carpeted stairs.
The nozzle has a rotating agitator
which should be kept away from hair,
hands, feet and loose clothing. Keep
cleaner away from children.
2-3
How to rotate nozzle
CAUTION: MOVING PARTS. TURN
CLEANER OFF BEFORE ROTATING
NOZZLE.
To rotate nozzle either vertically or hori-
zontally, place thumb on latch (A) with
finger on front of nozzle.
Press latch toward edge of nozzle and
rotate.
A
Continued
➜