


3 69-0509—2
NOTE: The heat anticipator may require further adjust-
ment for best performance. To lengthen burner-on
time, move the indicator in the direction of the longer
arrows—not more than one-half scale marking at a
time. To shorten burner-on time, move indicator in
opposite direction.
Checkout
CAUTION
Do not check thermostat operation by shorting
across system control terminals. This damages the
thermostat heat anticipator.
1. Move temperature setting lever about 10° F [6° C]
above room temperature:
• Gas or oil heating systems: Heating starts immedi-
ately. Fan starts after short delay.
• Electric heating systems: Heating and fan start
immediately.
2. Move temperature setting lever about 10° F [6° C]
below room temperature:
• Gas or oil heating systems: Heating stops immedi-
ately. Fan stops after a short delay.
• Electric heating systems: Heating and fan stop
immediately.
RECALIBRATION
These thermostats are calibrated at the factory and should
not need recalibration. If the thermostat seems out of ad-
justment, first check for accurate leveling. To check cali-
bration, proceed as follows:
1. Move the temperature setting lever to the low end of
the temperature scale.
2. Remove the thermostat cover. Move the setting lever
until the switch just makes contact. The mercury in the
switch will drop to the contact end of the tube.
3. Replace the cover and wait five minutes for the
cover and the thermostat to lose the heat it has gained
from your hands. If the thermometer pointer and the setting
lever indicator read approximately the same, no recalibration
is needed.
If recalibration appears necessary, proceed as follows:
1. Place the temperature setting lever at the same setting
as the thermometer. Remove cover.
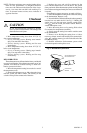
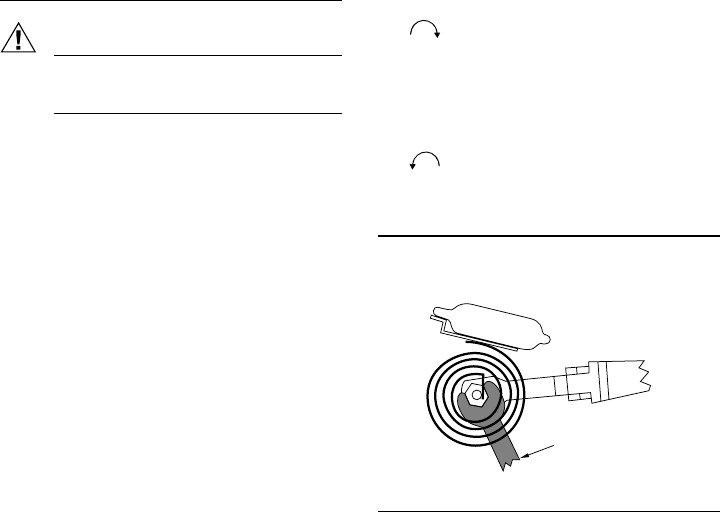
2. Insert 104994A Calibration Wrench (order separately)
onto the hex nut under the foil. See Fig. 5. Holding the
setting lever so it does not move, turn the wrench clock-
wise until the switch just breaks contact. Remove
wrench and replace cover.
3. Move the setting lever to a low setting. Wait at least
five minutes for temperature to stabilize.
4. Slowly move the setting lever until it reads the same
as the thermometer.
5. Remove cover. Holding the setting lever so it does
not move, reinsert wrench and carefully turn counterclock-
wise until the mercury just rolls to the left end of the
tube, but no farther.
6. Recheck calibration. Set thermostat system switch
for desired operation and replace cover.
Fig. 5—Recalibration procedure.
CALIBRATION
WRENCH
COIL SHOWN WITHOUT
HEAT ANTICIPATOR
M2044