69-0931—3
5
Q7100A,C,D THERMOSTAT SUBBASES
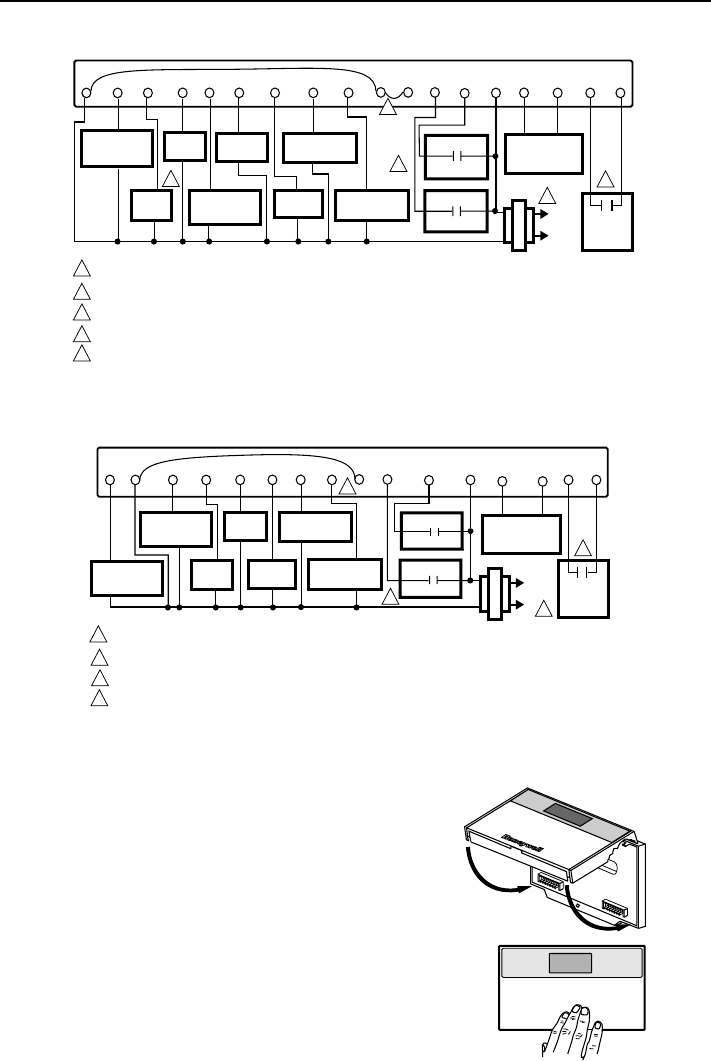
Fig. 14. Typical hookup of Q7100C1008 in a two-stage heat and two-stage cool heat pump system.
Includes remote temperature sensor and remote setback timer.
L1
(HOT)
L2
M4835A
FAN
RELAY
D
OE BW2 Y2
COOL
CHANGEOVER
VALVE
SUBBASE
2
X
HEAT
RELAY 1
G
EM. HT.
RELAY
R
TD
REMOTE
TEMPERATURE
SENSOR
HEAT
RELAY 2
W1 Y1
T
COMPRESSOR
CONTACTOR 2
HEAT
CHANGEOVER
VALVE
CAUTION: EQUIPMENT DAMAGE WILL OCCUR IF POWER IS CONNECTED TO THE D TERMINALS.
POWER SUPPLY. PROVIDE DISCONNECT MEANS AND OVERLOAD PROTECTION AS REQUIRED.
EM. HEAT RELAY DOES NOT CYCLE. TO TURN OFF THE EM. HEAT, GO TO SYSTEM SELECTION AND CHOOSE HEAT.
SELECT MODELS HAVE LEDS.
X2 AND X4 NEED TO BE JUMPERED TO TERMINAL X.
1
2
REMOTE
SETBACK
TIMER
1
3
3
COMPRESSOR
CONTACTOR 1
X3
EQUIPMENT
MONITOR 2
EQUIPMENT
MONITOR 1
X1X2 X4
4
5
5
4
Fig. 15. Typical hookup of Q7100C1073 in a three-stage heat and one-stage cool heat pump system.
Includes remote temperature sensor and remote setback timer.
L1
(HOT)
L2
M4834B
FAN
RELAY
D
OE W3Y2
COOL
CHANGEOVER
VALVE
SUBBASE
2
XB G
EM. HT.
RELAY
R
T
D
REMOTE
TEMPERATURE
SENSOR
AUX. HT.
RELAY
Y1
T
COMPRESSOR
CONTACTOR 2
CAUTION: EQUIPMENT DAMAGE WILL OCCUR IF POWER IS CONNECTED TO THE D TERMINALS.
POWER SUPPLY. PROVIDE DISCONNECT MEANS AND OVERLOAD PROTECTION AS REQUIRED.
SELECT MODELS HAVE LEDS.
X4 NEEDS TO BE JUMPERED TO TERMINAL X.
1
2
REMOTE
SETBACK
TIMER
1
3
COMPRESSOR
CONTACTOR 1
X3
EQUIPMENT
MONITOR 2
EQUIPMENT
MONITOR 1
X1X4
4
3
4
HEAT
CHANGEOVER
VALVE
Mounting Thermostat on Subbase
Mount the thermostat on the subbase after the subbase
is installed.
1. Engage tabs at the top of thermostat and subbase.
See Fig. 16.
2. Press lower edge of case to close and latch.
NOTE: To remove the thermostat from the wall, first pull
out at the bottom of the thermostat; remove top
last.
IMPORTANT
Refer to the thermostat installation instructions
for Installer Setup, Settings, Installer Self-Test
and Troubleshooting information.
Fig. 16. Mounting thermostat on subbase.
M6799A
B. PRESS LOWER
EDGE OF CASE
TO LATCH.
A. ENGAGE TABS AT TOP OF
THERMOSTAT AND SUBBASE.


