


CAUTION: DISCONNECT FROM POWER SUPPLY BEFORE SERVICING
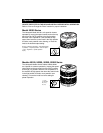
Do not attempt to wash either the carbon pre-filter or the HEPA filter. They are
not washable and washing will damage the filters.
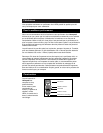
The only two parts requiring any service are the carbon pre-filter and the HEPA filter.
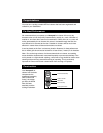
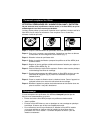
No tools are needed. To change either filter, disassemble the unit as shown below:
Step 1: Turn the air cleaner off and unplug from the wall outlet.
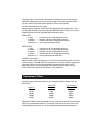
Step 2: To open, gently place the air cleaner on its side and unscrew the locking
mechanism located under the base assembly (Fig. 1).
Step 3: Remove the base assembly from the air cleaner.
Step 4: Remove the filter assembly (consisting of the HEPA filter and pre-filter) from the
internal chamber.
Step 5: Locate the seam of the pre-filter and carefully separate the fastener to remove
the pre-filter from the HEPA filter (Fig. 2).
Step 6: Discard used filter(s) being replaced. Remove any packaging and plastic
from the replacement filter(s).
Step 7: Carefully wrap the pre-filter around the HEPA filter so that the ends meet
(Fig. 3). Fasten the ends together with the fastener provided.
Step 8: Place the whole filter assembly into the internal chamber. Close the product
by replacing the base and tightening the locking mechanism.
Step 9: Turn the air cleaner into an upright position, plug into a wall outlet and it is
ready for operation.
How to Change the Filters
Fig. 1 Fig. 3Fig. 2
If you store your Honeywell HEPA air cleaner for more than 30 days, we recommend:
• Removing both the primary HEPA filter and the carbon pre-filter from the unit.
• Discarding the pre-filter.
• Wrapping the HEPA filter in an air-tight plastic bag or plastic wrap. Be sure that
the filter is totally sealed.
• To restore the air cleaner to service, unwrap the HEPA filter, install a new carbon
pre-filter, and reinstall both filters in the air cleaner. See “How to Change the
Filters” section for proper installation.
Storage