3 Operation continued
D Signal and Setpoints
The voltage between TP Gnd and TP Sig indicates
the current signal received from the sensor. The
normal range is 0.4 volts to 2.0 volts, which
corresponds with 4/20 mA. This manual will use the
voltage at TP Sig to describe the input signal. When
this signal exceeds the voltage at TP Warning or TP
Alarm, the warning or alarm function will take place.
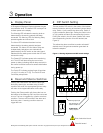
The warning setpoint is user adjustable by looking at
the voltage on TP Warning and adjusting the warning
adjust pot until the desired setpoint is reached (see
Figure 3). The alarm adjust pot and TP Alarm function
the same way.
The warning and alarm setpoints are factory adjusted
as indicated on the data sheet included with your
GM-1. Never adjust these setpoints outside the range
of 0.4 to 2.0 volts. Contact Honeywell Analytics if you
have any questions or want help in determining
setpoints for your particular sensor and application.
After setpoint adjustment always expose sensor to
the gas being monitored and verify that the warning
and alarm lights trigger at the desired concentration
as displayed by the bargraph.
E Start-Up Procedures
Before applying power, make a final check of all
wiring for continuity, shorts, grounds, etc. It is usually
best to disconnect external alarms and other
equipment from the unit until the initial start-up
procedures are completed.
After power-up, allow 24 hours for the system to
stabilize before testing the sensor. Because sensors
are normally located at a distance from the
monitoring unit, the test time required and accuracy
of the response checks will be improved if two
people perform the start-up procedures and use
radio contact.
Start-Up Test: One person exposes the sensor to a
small amount of the gas that is being monitored. The
second person stays at the monitoring unit to
determine that the sensor, when exposed to the
target gas, is connected to the proper input,
responds, and causes appropriate alarm functions.
F Troubleshooting
The Fault Light and Fault Relay always latch when a
fault condition is detected. After the condition is
corrected the Reset switch must be pressed to clear
the Fault Light and Fault relay.
The unit will indicate a fault if the signal is less than
0.14 volts at TP Sig.
Some Manning sensors are configured to send a
signal of 0.05 volts at TP Sig if a sensor fault exists. If
TP Sig = 0.05 volts, this indicates a properly wired
sensor is in a fault condition. Proceed to investigate
the sensor.
If TP Sig = 0.00 volts, this indicates no signal from the
sensor. Check for correct wiring or loose connections
between the sensor and monitoring unit.
Each relay has a green LED in series with its coil. If
this LED is on, this indicates that the relay is
energized and contacts will be in the normal position.
If this LED is off, the contacts will be in the tripped
condition.
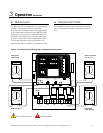
Power supply voltages should be checked at
TP +20V on the display board and at +24 on
the sensor input terminal block (see Figure 4).
Both points should be DC Volts as labeled.
The total sensor current draw can be checked by
looking at the voltage between the two TP Current
Draw test points. 1.0mV corresponds to 10 mA, and
50.0mV corresponds to 500mA, etc. Compare this
reading with the current draw expected for the
sensor you are using (see appropriate sensor
manual).
If questions arise, call Honeywell Analytics.
Manning GM-1 Gas Monitoring Alarm System 19546 GM1 07/09 REVD Copyright © 2009 Honeywell Analytics. All Rights Reserved. 11


