


CAUTION CONTINUED
• The electrical cord of this product cannot be replaced. If it sustains
damage, you must stop using this product immediately and return
it to the HoMedics Service Center for repair. (See the warranty
section for HoMedics address.)
• Disconnect the appliance from outlet before putting hands
into water.
Assembly and Instructions for Use
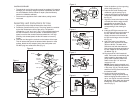
1. Unpack the product. Wipe off dust with a damp cloth.
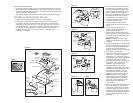
2. Familiarize yourself with the pump. The pump speed is controlled
by the dial located at the front of the pump. The speed is
indicated by a “min” and “max” (Fig 1). At its highest speed level,
the dial will cease to move any further. To decrease the pump
speed, move the dial counter-clockwise toward the “min”sign.
Similarly, at its lowest speed, the dial will cease to move any
further.
3. Lead the cord through the cord slot on the bottom of the base.
This will ensure that the unit is balanced when placed on a flat
surface. Attach the A/C adaptor jack to the base power cord.
DO NOT plug into outlet at this time (Fig. 2).
4 5
4. Place the platform on the supporting
poles of the base (Fig. 2).
5. Insert the PVC tube located under
middle tier into the pump (Fig. 2).
6. Insert the LED light cord through the
small hole located under the middle
tier (Fig. 2).
7. Align the cut-out at the bottom edge
of middle tier with the edge of base
so it sits flat on the base (Fig. 3).
NOTE: Pump position should be
corresponding to the drawing on
base.
8. Insert the LED light connector into
the LED light socket on the bottom of
top tier, and then insert the water
supply connector on the bottom of
top tier into the larger hole of middle
tier (Fig. 4).
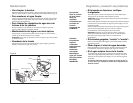
9. Add clean water into middle tier
(Approx. 10oz), and then into base
(Approx. 56.5oz). The water level
should be even with thewatermark.
Next, arrange the stones provided on
top tier, middle tier and the platform
as desired (Fig. 5).
10. Plug the cord into 120V household
outlet. The fountain is controlled by the
switch located on the power cord. If
pump doesn’t operate, rotate in-line
switch once to turn “on” and once
more to turn “off”.
NOTE: Ensure that the electrical cord
loops below the electrical outlet to form
a ‘Drip Loop’ (Fig. 6). This will prevent
water from running down the cord into
the electrical outlet.
11. As this product has two flowing
directions, unplug the power source
before changing fountain position. To
do so, turn top tier counter clockwise
90 degrees. When water has stopped
flowing from it, switch the fountain
back on (Fig. 7).
PUMP
Figure 5
Figure 2
Figure 6
Figure 1
PUMP
Figure 3
Figure 4
PUMP
Figure 7
Drip Loop
Top Tier
Stones
Water Supply
Connector
Cut-Out
Stones
PVC
Tube
Pump
Watermark
Base
LED Light
Connector
Outlet
Middle Tier
Cut-Out
Platform
Adaptor
Switch
Base Power
Cord
Supporting
Poles
Base
Edge
Drawing on Base
Base Edge
Cut-Out
LED Light Socket
Top Tier
LED Light
Connector
Larger Hole
Water Supply Connector
Middle
Tier
Stones
Water
Watermark
LED Light Cord