


PLEASE READ AND SAVE THESE
IMPORTANT SAFETY INSTRUCTIONS
FEATURES - OPERATIONS
FEATURES - OPERATIONS
When using electrical appliances, basic safety precautions
should always be taken including the following:
1. Read all instructions before using this appliance.
2. Use fan only for purposes described in the instruction
manual.
3. To protect against electrical shock do not immerse
unit, plug or cord in water or spray with liquids and
plug the appliance directly into a 120V AC electrical
outlet.
4. Close supervision is necessary when any appliance is
used by or near children.
5. Unplug from outlet when not in use, when moving
fan from one location to another, before putting on
or taking off parts and before cleaning.
6. Avoid contact with moving parts.
7. Do not operate in the presence of explosive and/or
flammable fumes.
8. To avoid fire hazard, NEVER place the cord under
rugs or any parts near an open flame, cooking or
other heating appliance.
9. Do not operate any appliance with a damaged cord
or plug after the appliance malfunctions, or has been
dropped/damaged in any manner. Discard fan or
return to an authorized service facility for
examination and/or repair.
10. Do not run cord under carpeting. Do not cover cord
with throw rugs, runner, or similar coverings. Do not
route cord under furniture or appliances. Arrange
cord away from traffic area and where it will not be
tripped over.
11. The use of attachments not recommended or sold by
the appliance manufacturer may cause hazards.
12. Do not let the cord hang over the edge of a table,
counter or come in contact with hot surfaces or leave
exposed to high traffic areas.
13. Do not use outdoors.
14. To disconnect, grip plug and pull from wall outlet.
Never yank on cord.
15. Always use on a dry, level surface.
16. Do not operate fan until fully assembled with all
parts properly in place.
17. This product is intended for household use ONLY and
not for commercial or industrial applications.
18. WARNING: To reduce the risk of electrical shock
and injury to persons, do not use in window.
19. WARNING: To reduce the risk of fire or electric
shock, do not use this fan with any solid-state speed
control device.
20. This product employs overload protection (fuse). A
blown fuse indicates an overload or short-circuit
situation. If the fuse blows, unplug the product from
the outlet. Replace the fuse as per the user servicing
instructions (follow product marking for proper fuse
rating) and check the product. If the replacement fuse
blows, a short circuit may be present and the product
should be discarded or returned to an authorized
service facility for examination and/or repair.
PLEASE READ AND SAVE
THESE IMPORTANT
SAFETY INSTRUCTIONS
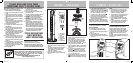
ASSEMBLY INSTRUCTIONS: (SEE FIGURE 1 & 2)
Estimated assembly time: 5-10 minutes
Tools required: Screwdriver (4 screws included)
NOTE: MAKE SURE YOU REMOVE ALL CONTENTS FROM
THE PACKAGE. PLEASE CHECK PACKAGING MATERIALS FOR
PARTS THAT COULD BE REQUIRED TO OPERATE YOUR FAN.
1. Assemble base halves around power cord. To secure
the base halves together, slide the posts of one base
half into the slots of the second base half. Refer to
Figure 2.
2. Line up the screws holes of the base halves with the
holes located on the bottom of the fan housing.
Secure with the four screws included with the
product. Refer to Figure 2.
3. Secure power cord as shown in Figure 2.
4. Turn fan right side up and place on a dry and level
surface.
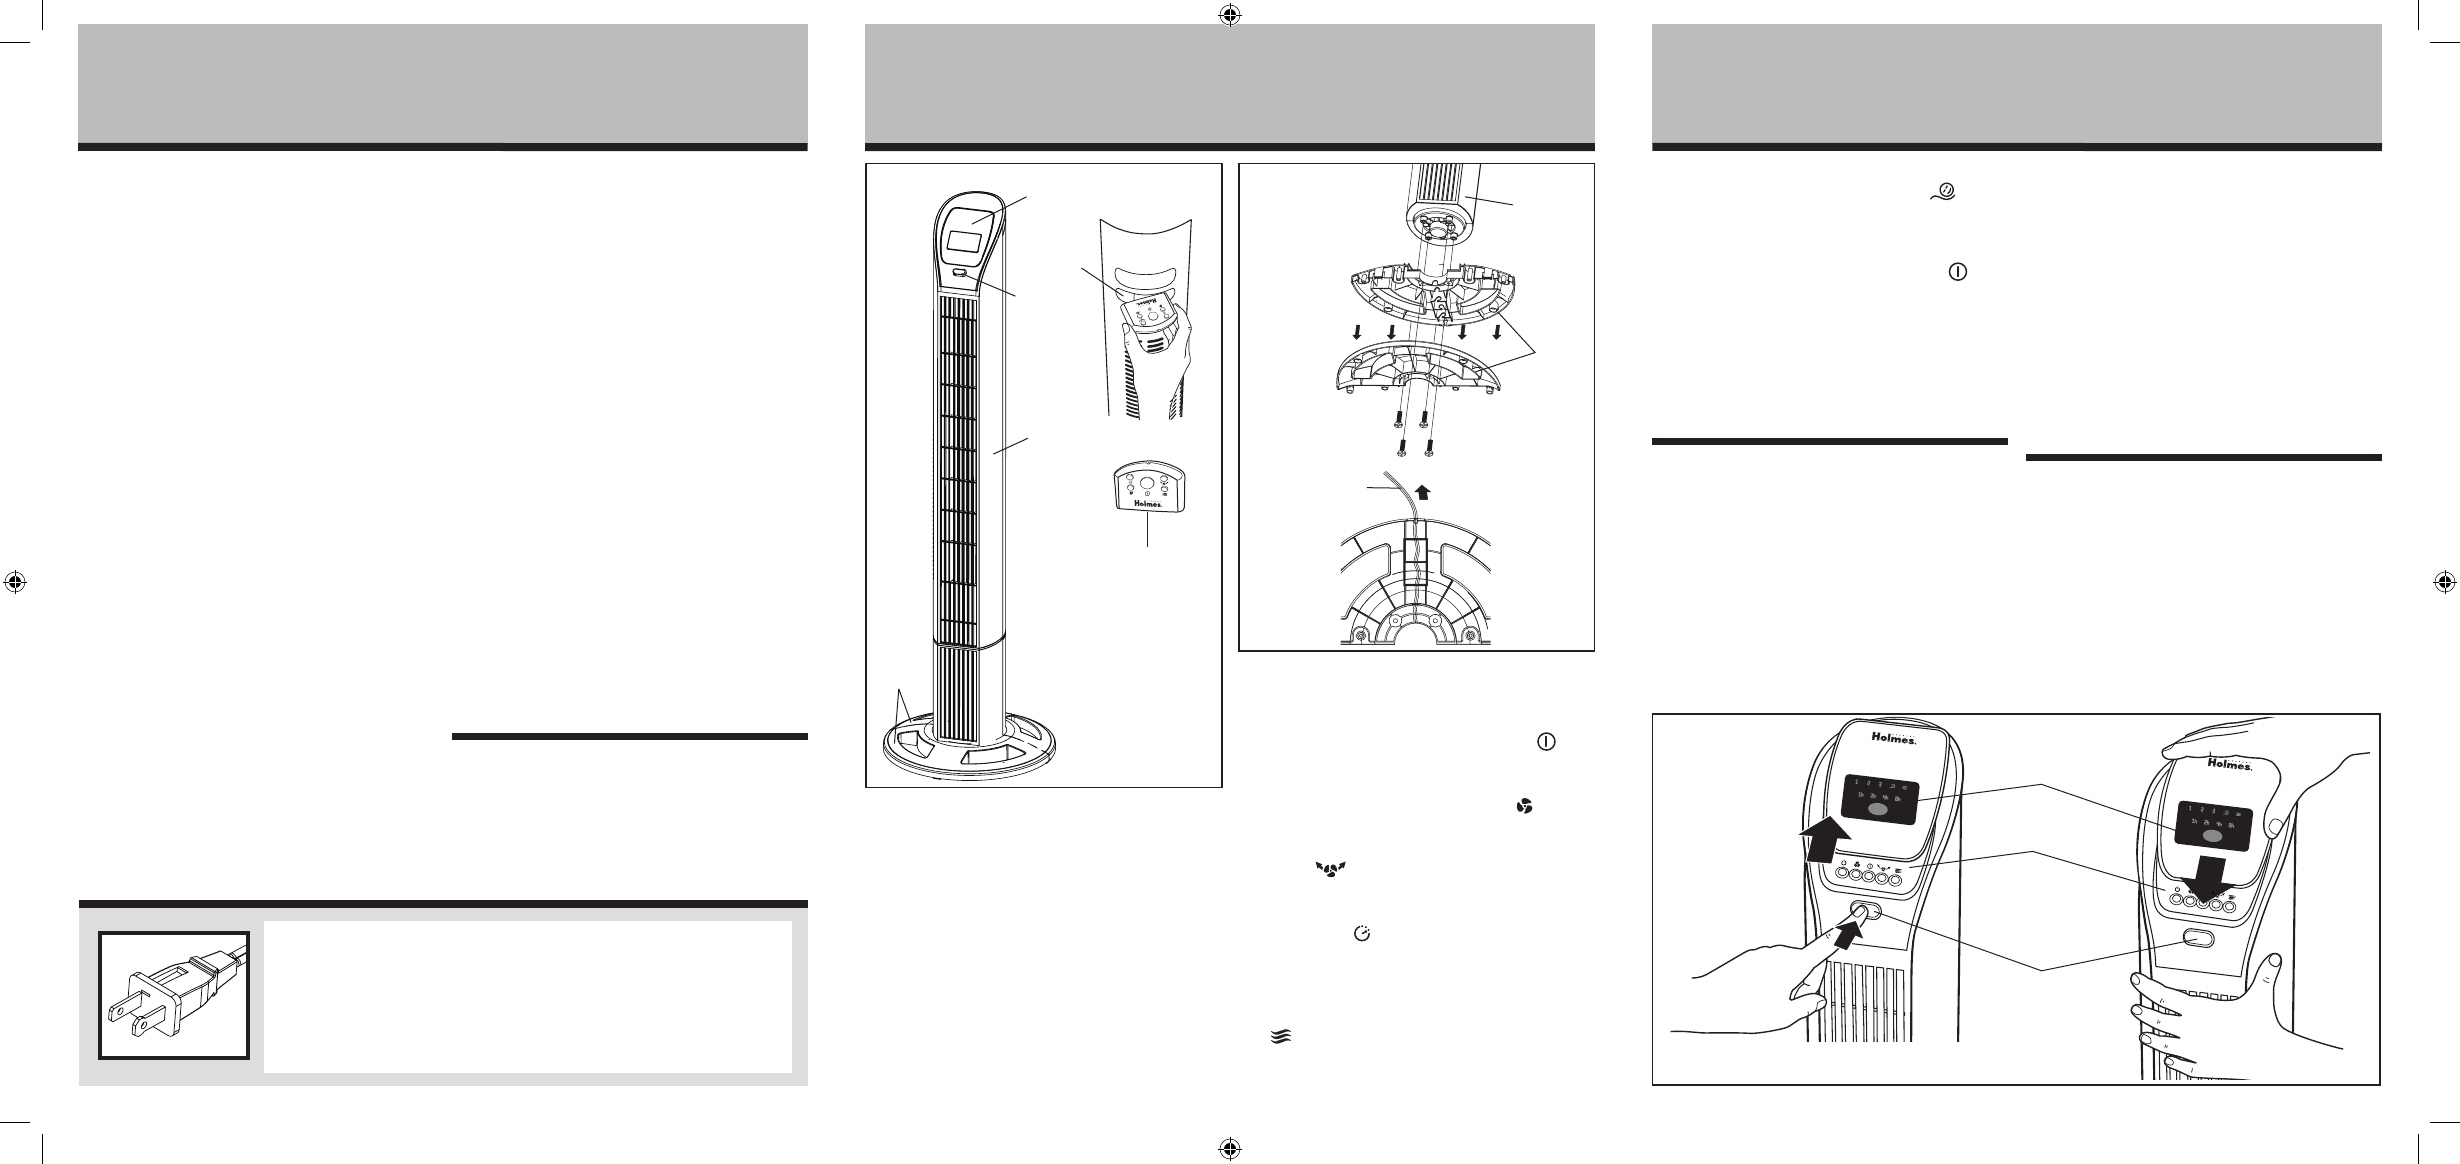
OPERATING INSTRUCTIONS: (SEE FIGURE 3)
1. Press the Cover Release Button to access the Control
panel (see Figure 3).
2. To turn the fan on, press the power button ( )
located on the control panel or remote control.
3. To cycle through high, medium, and low speed
settings (3-2-1) press the speed button ( ) located
on the control panel or remote control.
4. To turn the oscillation on and off, press the oscillation
button ( ) located on the control panel or remote
control.
5. To set your fan to automatically shut off, press the
timer button ( ) located on the control panel or
the remote control. When set, the fan will run and
automatically shut off after the set duration of time
(1, 2, 4, or 8 hours) has expired.
6. To activate the breeze mode, press the breeze button
( ) located on the control panel or remote control.
When turned on, the fan will randomly cycle through
the three speeds settings recreating a natural
outdoor breeze. To activate sleep mode ( ), press
the breeze button again. This function slows the fan
speed down, and when used in conjunction with the
timer settings, will ultimately turn the fan off.
7. To turn the fan off press the power button ( )
located on the control panel or remote control.
8. To close the cover, use one hand to hold the fan
housing and the other hand to slide down the cover
until it fits into place (see Figure 3).
NOTE: Your fan features a LED display panel. When a
specific feature is activated on your fan, the LED panel
will light up showing which features have been activated.
REMOTE CONTROL HANDSET:
This unit requires 2 AAA batteries, 1.5V (included).
Battery Replacement
a) Remove battery cover from remote control.
b) Remove old batteries from the remote control.
c) Insert two new batteries, pressing them firmly into
their slot.
d) Replace the battery cover.
e) For your convenience, a remote control storage
holder is integrated into the back of the fan housing
(see Figure 1).
NOTES:
• Replace all batteries of a set at the same time.
• Being careful not to bend or damage the contact
spring, clean the battery contacts and devices'
contacts prior to installing the batteries.
• Remove the batteries from the equipment when it is
not being used for an extended period of time.
• Remove the used batteries promptly.
• Do not mix old and new batteries. Do not mix
alkaline, standard (carbon-zinc), or rechargeable
batteries.
• Do not discard used batteries into household trash
containers. Contact your local government for
disposal or recycling practices in your area.
FCC STATEMENT
Potential for Radio/Television interference
This device complies with Part 15 of the FCC Rules.
Operation is subject to the following two conditions:
(1) This device may not cause harmful interference, and
(2) this device must accept any interference received,
including interference that may cause undesired
operation.
This product has been tested and found to comply with
the limits for a Class B digital device, pursuant to part 15
of the FCC rules.
THIS APPLIANCE HAS A POLARIZED PLUG (one blade is wider than the
other). To reduce the risk of electric shock, this plug is intended to fit in
a polarized outlet only one way. If the plug does not fit fully in the
outlet, reverse the plug. If it still does not fit, contact a qualified
electrician to install the proper outlet.
DO NOT ATTEMPT TO MODIFY THIS PLUG OR DEFEAT THIS
SAFETY FEATURE IN ANY WAY.
A. Control Panel
B. Cover Release
Button
C. Fan Housing
D. Base Halves
E. Remote Control
Storage
F. Remote Control
Figure 1
A
C
D
F
E
A. LED Display Panel B. Control Panel C. Cover Release Button
Figure 3
A
C
B
B
Figure 2
D
C
Power Cord
HT43R-U_12EM1.indd 2 11/14/12 4:30 PM