


PLEASE READ AND SAVE THESE
IMPORTANT SAFETY INSTRUCTIONS
FEATURES - OPERATIONS
NOTE:Whenthepresettemperatureisreachedorwhenthe
heaterisshutoff,thefanwillrunfor10secondswithout
heat.Thiscooldownprocessensuresanaccurateand
consistent temperature reading.
NOTE:Toshuttheheateroffatanytime,pressthePower
( )Button.Thedigitalthermostathasmemory,itwill
rememberthelasttemperaturesettingbeforetheheateris
turnedoff.However,iftheheaterisunplugged,thedigital
thermostatwillnolongerremembertheprevious
temperature setting, you have to reset the digital thermostat
followingtheaboveinstructions.
Clock - Set current Time
1. ToprogramtheheatertoturnONatapresettime,you
mustsetthecurrenttimefirst,pressandholdtheClock
Button( )for3seconds.
2. ThehourdigitsonLCDDisplaywillblink.Turnthe
ThermostatControltoadjustfrom12 to 1, and
switchingbetweenAM and PM.
3. Press the ClockButton( )againuntiltheminute
digitsblink.TurntheThermostatControltoadjustfrom
00 to 59.
4. Press the ClockButton( )againtoconfirmthe
current time is set on heater.
Start Time - Set Timer to turn heater ON
1. The Start Timebuttonallowsusertoprogramthe
heatertoturnONatapresettime.Theunitturnsonin
the "Stay On"settingandcannotbechangedwithout
poweringtheunitoff.TheheaterwillturnOFF
automaticallyafter30minutes.
NOTE:Timercanbesetinanymodebutwillnot
engageiftheunitisinanactivemode(fan,stayon,
therm).
2. To preset time, press and hold the Start Time Button
( )for3seconds.
3. ThehourdigitsonLCDDisplaywillblink.Turnthe
ThermostatControltoadjustfrom12 to 1, and
switchingbetweenAM and PM.
4. PresstheStartTimeButtonuntiltheminutedigitsblink.
TurntheThermostatControltoadjustfrom00 to 59.
5. Press the Start Time( )Buttonagaintosetthe
preset time.
6. Press and hold the Start TimeButton( )toactivate
theTimerfeature.Theicon( )andthecurrentclock
timewillappearontheLCDDisplaytoconfirmtheTimer
featurebeingactivated.
7. ToturnofftheTimerfeature,pressandholdtheStart
TimeButton( )againuntiltheicon( )goesoff.
NOTE:Modescannotbechangedwithoutpowering
downtheunitoncethetimerhasbeenengaged.
NOTE: The Timer has memory to store the preset time, but
youmustre-activatetheStartTimefeatureagaintoprogram
theheaterrepeatedlyatyourpresettime.Forexample,if
youwantyourheatertopre-heattheroomatapresettime
every morning, you must press and activate the Start Time
buttoneverynightbeforeyougotosleep.
CLEANING/MAINTENANCE
Alwaysunplugtheheaterbeforecleaningandallowthe
heatertocooldown.
1. Cleantheunitwithasoftclothmoistenedwithamild
soap solution.
2. NEVERuseabrasiveorflammablesolventstocleanthe
unit.
3. Aftercleaning,besuretocompletelydrytheunitwitha
clothortowel.
4. Store heater in a cool, dry location.
5. It is recommended that you store the unit in its original
carton.
AUTO SAFETY SHUT-OFF
Thisheaterisequippedwithapatented,technologically
advanced,safetysystemthatrequirestheusertoresetthe
heaterifthereisapotentialoverheatsituation.Whena
potentialoverheattemperatureisreached,thesystemwill
automaticallyshuttheheateroff.Itcanonlyresume
operationwhentheuserresetstheunit.
RESET INSTRUCTIONS
Ifyourheatershutsdown:
1) Unplugtheunitandwait30minutes.
2) Pluginandoperatenormally.
TECHNICAL SPECIFICATIONS
• Amps:12.5
• Wattage:1500W(+5%–10%)
• Workingvoltage:120VAC/60Hz
WALL MOUNT INSTALLATION
INSTRUCTIONS
Yourheatercomesfullyassembledandreadyforimmediate
use.ThisheateralsocomeswithaWallMountBracketwhich
allowsyoutomounttheheateronwall(Notoverthetub/
shower).
Wall Mount Installation:
1. CarefullyremoveyourheaterandtheWallMount
Bracketfromthebox.
2. Securethemountingbrackettothewallasshown.(See
Figure1)
3. Turnheatersidewaysandpositionthemountingtabon
thebackoftheheatersoitlinesupwiththemounting
bracket.
4. Placemountingtabintothemountingbracketandrotate
heaterintotheuprightpositiontolockitinplace.
5. Toreducetheriskofelectricshock,donotimmerse,
remove,modifyorreplacethispluganddonotplace
yourheaterwhereitmayeasilyfallintowater.
Please Note:Duetothemultitudeofpotentialmounting
surfaces,mountingscrewsarenotincludedwiththisproduct.
Pleasevisityourlocalhardwarestoretodeterminewhich
typeofscrewisbestforyourparticularwall.
OPERATING INSTRUCTIONS
1. Placeheateronfirmlevelsurface.
2. Avoid overloading your circuit by not using other high
wattageappliancesinthesameoutlet.
Yourheaterisequippedwithadigitalthermostatthatallows
youtosetyourheatertoyourprecisecomfortlevel:
Power On/Off
NOTE:Oncethetimeisset;thepowerringistheonly
indicatorthattheunitisoffandthatthemodebuttonwillnot
function.
Press the Power Button to turn on the heater. LCD Display
andPowerLightRingwillilluminate.TheLCDDisplaywill
showthecurrentclocktimeandtheThermostaticon( ).
Mode Settings
Press the Mode Button to select your desired settings, the
LCDDisplaywillcyclethroughtoshowthebelowsettingsin
sequence:
1. Thermostat:
TheThermostaticon( )andthecurrentclocktimewill
appear on the LCD Display. Turn the Thermostat Control
toadjustthetemperaturelevelrangingfrom85˚F to
65˚F. When the preset temperature is reached, the
heaterwillshutoffuntiltheroomtemperaturedrops
belowthepresettemperature,theheaterwillbe
switchedonagaintomaintaintheroomatthepreset
temperature level.
2. FanOnlySetting:
TheFanicon( )andthecurrentclocktimewillappear
ontheLCDDisplay.Theheaterwillruncontinuously
withoutheatoutput.
3. Stay On Setting:
"Stay On"andthecurrentclocktimewillappearon
theLCDDisplay.Theheaterwillruncontinuouslyat
1500W.Toshutofftheheater,youmustpressthePower
Button( )toturnthePowerLightRingoff.
NOTE:Itisnormalfortheheatertocycleonandoffasto
maintainthepresettemperature.Topreventtheheaterfrom
cycling, you need to raise the thermostat setting.
Whenusingelectricalappliances,basicsafetyprecautionsshould
alwaysbefollowedtoreducetheriskoffire,electricshock,and
injurytopersons,includingthefollowing:
1. Readallinstructionsbeforeusingthisheater.
2. Thisheaterishotwheninuse.Toavoidburns,donotlet
bareskintouchhotsurfaces.Ifprovided,usehandles
whenmovingthisheater.Keepcombustiblematerials,
suchasfurniture,pillows,bedding,papers,clothes,and
curtainsatleast3feet(0.9m)fromthefrontofthe
heaterandkeepthemawayfromthesidesandrear.
3. Extremecautionisnecessarywhenanyheaterisusedby
ornearchildrenorinvalidsandwhenevertheheateris
leftoperatingandunattended.
4. Donotoperateanyheaterwithadamagedcordorplug
oraftertheheatermalfunctions,hasbeendroppedor
damaged in any manner. Discard heater, or return to
authorizedservicefacilityforexaminationand/or
repair.
5. Do not use outdoors.
6. Donotruncordundercarpeting.Donotcovercordwith
throwrugs,runners,orsimilarcoverings.Donotroute
cordunderfurnitureorappliances.Arrangecordaway
fromtrafficareaandwhereitwillnotbetrippedover.
7. Todisconnectheater,turncontrolstooff,thenremove
plugfromoutlet.
8. Donotinsertorallowforeignobjectstoenterany
ventilationorexhaustopeningasthismaycausean
electricshockorfire,ordamagetheheater.
9. Topreventapossiblefire,donotblockairintakesor
exhaustinanymanner.Donotuseonsoftsurfaces,like
abed,whereopeningsmaybecomeblocked.
10.Aheaterhashotandarcingorsparkingpartsinside.Do
notuseitinareaswheregasoline,paint,orflammable
liquidsareusedorstored.
11.Usethisheateronlyasdescribedinthismanual.Any
otherusenotrecommendedbythemanufacturermay
causefire,electricshock,orinjurytopersons.
12.Alwaysplugheatersdirectlyintoawalloutlet/
receptacle.Neverusewithanextensioncordor
relocatablepowertap(outlet/powerstrip).
13. When unplugging, be sure to pull by the plug and not
the cord.
14.Iftheheaterwillnotoperate,seespecificinstructionson
AutoSafetyShut-off.
15.DONOTattempttorepairoradjustanyelectricalor
mechanicalfunctionsonthisunit.Doingsowillvoidyour
warranty.Theinsideoftheunitcontainsnouser
serviceableparts.Allservicingshouldbeperformedby
qualifiedpersonnelonly.
16.Discontinueuseifplugoroutletishot.Itis
recommendedthattheoutletbereplacedifplugor
outlet is hot to touch.
17.Theheatermustnotbelocatedimmediatelybelowa
socket-outlet.Donotusethisheaterintheimmediate
surroundingsofabath,ashoweroraswimmingpool.
18.Toreducetheriskofelectricshock,donotimmerse,
remove,modifyorreplacethispluganddonotplace
yourheaterwhereitmayeasilyfallintowater.
SAVE THESE
INSTRUCTIONS
FEATURES - OPERATIONS
CLEANING / MAINTENANCE
AUTO SAFETY SHUT OFF
LEA Y CONSERVE ESTAS IMPORTANTES
INSTRUCCIONES DE SEGURIDAD
Parareducirelriesgodeincendios,descargaseléctricas
ylesionespersonalesalutilizarelectrodomésticos,siga
siemprelasprecaucionesbásicasdeseguridad,incluyendolas
quesemencionanacontinuación:
1. Leatodaslasinstruccionesantesdeusarestecalefactor.
2. El calefactor se calienta al usarlo. Para evitar
quemaduras,NOtoquelassuperficiescalientesconla
piel.Siexisten,utilicelasmanijasparamoverlaunidad.
Mantenga los materiales combustibles, como muebles,
almohadones,sábanas,papeles,ropaycortinasaporlo
menos3pies(0,9m)delapartedelanteradelcalefactor
ymanténgalosalejadosdeloscostadosydelapartede
atrás.
3. Debetenermuchocuidadocuandoelcalefactores
utilizadopor,ocercadeniñosoinválidos,ysiempreque
sedejeelcalefactorprendidoydesatendido.
4. NOutiliceelcalefactorsielcableoelenchufeestán
dañadosoluegodeunafalla,sehayacaídoohaya
sufridocualquiertipodedaño.Desecheelcalefactoro
devuélvaloalcentrodeservicioautorizadoparasu
revisióny/oreparación.
5. NOutilizarenelexterior.
6. Nocoloqueelcabledebajodelaalfombra.Nocubrael
cableconalfombras,tapetesoartículossimilares.No
paseelcablepordebajodemueblesoelectrodomésticos.
Coloqueelcablelejosdeláreadetráficoydondenose
tropiececonél.
7. Paradesconectarlo,gireelcontrolalaposiciónOFF,
luegoquiteelenchufedeltomacorriente.
8. Noinsertenipermitaqueobjetosextrañospenetrenen
laventilaciónosalidadeaireyaqueestopuedecausar
unchoqueeléctricooincendio,odañarelcalefactor.
9. Paraevitarunposibleincendio,nobloqueelasentradas
deaireoescapedeningunamanera.Nolouseen
superficiesblandas,comounacama,dondelasaberturas
sepuedenbloquear.
10.Uncalefactortienepartescalientesyquepueden
producirchispasensuinterior.NOloutiliceenáreas
dondeseutilizaoseguardagasolina,pinturaolíquidos
inflamables.
11.Utiliceestecalefactorsólocomosedescribeeneste
manual.Cualquierotrousonorecomendadoporel
fabricantepuedeprovocarincendios,descargaseléctricas
o lesiones a personas.
12.Siempreconecteelcalefactordirectamenteaun
tomacorrientedepared.Nuncalouseconuncablede
extensiónoconuntomacorrientemúltiple.
13.Aldesenchufarlo,asegúresedetirardelenchufeynodel
cable.
14.Sielcalefactornofunciona,vealasinstrucciones
específicasdelapagadoautomáticodeseguridad.
15.NOintenterepararoajustarningunafuncióneléctricao
mecánicadeestaunidad.Elhacerloinvalidarála
garantía.Launidadnocontienepartesreparablesporel
usuario.Todareparacióndebeserrealizadaúnicamente
porpersonalcalificado.
16.Dejedeusarlosielcableoelenchufesecalienta.Se
recomiendaquereemplaceeltomacorrientesiel
enchufeoeltomacorrientesecalienta.
17.Elcalefactornosedebelocalizarinmediatamentedebajo
deuntomacorriente.Nouseestecalefactorenáreas
cercanasaunbaño,unaduchaounapiscina.
18.Parareducirelriesgodechoqueeléctrico,nosumerja,
quite,modifiqueosustituyaelenchufeynocoloqueel
calefactorendondepuedacaersefácilmenteenelagua.
CARACTERISTICAS Y FUNCIONAMIENTO
CONSERVE ESTAS
INSTRUCCIONES
ESPECIFICACIONES TECNICAS
• Amperes:12,5
• Potencia:1500W(+5%–10%)
• Voltajedefuncionamiento:120vCA/60Hz
INSTRUCCIONES PARA INSTALARLO EN
LA PARED
Sibienelcalefactorvienecompletamentearmadoylisto
parautilizarseinmediatamente,incluyeademásunsoporte
paramontajeenpared(Nosobrelabañera/ducha).
Instalación del soporte para montaje en pared:
1. Abralacajaysaqueelcalefactoryelsoportepara
montaje en pared con cuidado.
2. Asegure la consola bien en la apred tal como se muestra.
(VéaseFigura1)
3. Coloqueelcalefactordecostadoyubiquelapestañade
montajeenlapartetraseradelmismo,demodoque
quedealineadaconelsoportedemontaje.
4. Coloquelapestañademontajedentrodelsoporte
correspondienteygireelcalefactorhastaquequede
derechoysefijeensulugar.
5. Parareducirelriesgodechoqueeléctrico,nosumerja,
quite,modifiqueosustituyaelenchufeynocoloqueel
calefactorendondepuedacaersefácilmenteenelagua.
Por favor:tengaencuentaquedebidoalagranvariedad
deposiblessuperficiesdeinstalación,noseincluyenlos
tornillosparainstalarlo.Porfavor,vayaalaferreteríalocal
paradeterminarquétipodetornilloseselmejorparasu
pared en particular.
INSTRUCCIONES DE USO
1. Coloqueelcalefactorsobreunasuperficiefirmey
nivelada.
2. Evitesobrecargarelcircuitoeléctricoevitandoutilizar
otro aparato de alta potencia en el mismo tomacorriente.
Sucalefactorvieneconuntermostatodigitalquelepermite
regularloconprecisiónaunniveldetemperatura
confortable:
Encendido/Apagado
NOTA:Unavezqueseestablecelahora,elcírculode
encendidoeselúnicoqueindicaquelaunidadestáapagada
yqueelbotóndeModonofuncionará.
PulseelbotóndeEncendidoparaencenderelcalefactor.Se
iluminaránlapantallaLCDyelCírculoluminosode
encendido.EnlapantallaLCD,apareceráeliconode
Termostato( )ylahoraactual.
Configuración de modo
PulseelbotóndeModoparaseleccionarlaconfiguración
deseada;lapantallaLCDmostrarálassiguientesopciones
consecutivamente:
1. Termostato:
EnlapantallaLCD,apareceráeliconodeTermostato
( )ylahoraactual.Gireelcontroldeltermostato
para ajustar el nivel de temperatura entre 85°F y
65°F. Cuando se alcance la temperatura preestablecida,
elcalefactorseapagaráhastaquelatemperaturadela
habitacióndesciendapordebajodichatemperaturayse
volveráaencenderparamantenerlahabitaciónenel
nivel de temperatura preestablecido.
CARACTERISTICAS Y FUNCIONAMIENTO
LIMPIEZA Y MANTENIMIENTO
APAGADO AUTOMATICO DE SEGURIDAD
2. ConfiguraciónSólo ventilador:
EnlapantallaLCD,apareceráeliconodeVentilador
( )ylahoraactual.Elcalefactorfuncionará
continuamente sin salida de calor.
3. ConfiguraciónPermanecer encendido:
“Permanecer encendido” y la hora actual
apareceránenlapantallaLCD.Elcalefactorfuncionará
continuamentea1500W.Paraapagarelcalefactor,debe
pulsarelbotóndeEncendido( )hastaqueseapague
elcírculoluminosodeencendido.
NOTA:Esnormalqueelcalefactorseenciendayseapague
para mantener la temperatura preestablecida. Para evitar
queelcalefactorseenciendayseapague,debeaumentarel
valor del termostato.
NOTA: Cuando se alcance la temperatura preestablecida o
cuandoelcalefactorseapague,elventiladorfuncionará
durante10segundossincalor.Esteprocesodeenfriamiento
garantizaunalecturadetemperaturaprecisayconstante.
NOTA:Paraapagarelcalefactorcuandolodesee,pulseel
botóndeEncendido( )Eltermostatodigitaltiene
memoria,porloquerecordaráelúltimovalorde
temperaturaantesdeapagarse.Sinembargo,sielcalefactor
sedesenchufa,eltermostatodigitalyanorecordaráelvalor
detemperaturaanteriorydeberárestablecerlosiguiendolas
instrucciones anteriores.
Reloj - Establecer la hora actual
1. Paraprogramarelcalefactorafindequeseenciendaa
una hora preestablecida, debe establecer primero la
horaactual,ademásdepulsarymantenerpulsadoel
botóndeReloj( )durante3segundos.
2. LosdígitosdelahoraparpadearánenlapantallaLCD.
Gire el control del termostato para ajustarlo de 12 a 1,
y cambiar de AM a PM.
3. PulseelbotóndeReloj( )nuevamentehastaque
parpadeenlosdígitosdelosminutos.Gireelcontroldel
termostato para ajustar de 00 a 59.
4. PulseelbotóndeReloj( )nuevamentepara
confirmarquesehayaestablecidolahoraactualenel
calefactor.
Hora de inicio - Activar la función
1. ElbotóndeHora de inicio le permite al usuario
programarelcalefactorparaencenderseaunahora
preestablecida. La unidad se enciende en la
configuración“Permanecer encendido” y no es
posiblemodificarlasinapagarlaunidad.Elcalefactorse
apagaráautomáticamentedespuésde30minutos.
NOTA:Eltemporizadorsepuedeconfiguraren
cualquiermodo,peronofuncionarásilaunidadse
encuentraenmodoactivo(ventilador,permanecer
encendido,termostato).
2. Para preestablecer la hora, pulse y mantenga pulsado el
botóndeHora de inicio( )durante3segundos.
3. LosdígitosdelahoraparpadearánenlapantallaLCD.
Gire el control del termostato para ajustarlo de 12 a 1,
y cambiar de AM a PM.
4. PulseelbotóndeHoradeiniciohastaqueparpadeenlos
dígitosdelosminutos.Gireelcontroldeltermostato
para ajustar de 00 a 59.
5. PulseelbotóndeHora de inicio( )nuevamente
para determinar la hora preestablecida.
6. PulseymantengaapretadoelbotónHora de inicio
( )paraactivarlafunciónTemporizador.Paraactivar
lafunciónTemporizadorencualquierconfiguraciónde
Modo,pulseelbotóndeHora de inicio( )y
manténgalopulsado.Elicono( )ylahoraactual
apareceránenlapantallaLCDparaconfirmarla
activacióndelafunciónTemporizador.
7. ParadesactivarlafunciónTemporizador,pulseelbotón
de Hora de inicio( )nuevamenteymanténgalo
pulsadohastaqueelícono( )desaparezca.
NOTA: Los modos no se pueden cambiar sin apagar la
unidad,unavezqueeltemporizadorsehaactivado.
NOTA:Eltemporizadortienememoriaparaguardarlahora
preestablecida,perodebevolveraactivarlafunciónHorade
inicioparaprogramarelcalefactorrepetidamentealahora
preestablecida.Porejemplo,sideseaqueelcalefactor
precalefaccionelahabitaciónaunahorapreestablecidacada
mañana,debepulsaryactivarelbotóndeHoradeinicio
cada noche antes de irse a dormir.
LIMPIEZA / MANTENIMIENTO
Siempredesenchufeelcalefactorydejequeseenfríeantes
de limpiarlo.
1. Limpielaunidadconunpañosuavehumedecidoenuna
solucióndejabónsuave.
2. NUNCAutilicesolventesabrasivosoinflamablespara
limpiar la unidad.
3. Luegodelimpiarla,asegúresedesecarcompletamente
la unidad con un trapo o toalla.
4. Guardeelcalefactorenunlugarfríoyseco.
5. Elfabricanterecomiendaguardarlaunidadensucaja
original.
APAGADO AUTOMATICO DE SEGURIDAD
Estecalefactorestáequipadoconunsistemadeseguridad
patentado,detecnologíaavanzadaquerequierequeel
usuarioreinicieelcalefactorencasodeun
sobrecalentamientopotencial.Cuandosealcanzauna
temperatura de recalentamiento potencial, el sistema
apagaráautomáticamenteelcalefactor.Volveráafuncionar
únicamenteluegodequeelusuarioreinicielaunidad.
INSTRUCCIONES VOLVER A ENCENDER
Silaunidadseapaga:
1) Desenchufelaunidadyespere30minutos.
2) Enchufelayvuélvalaaoperarnormalmente.
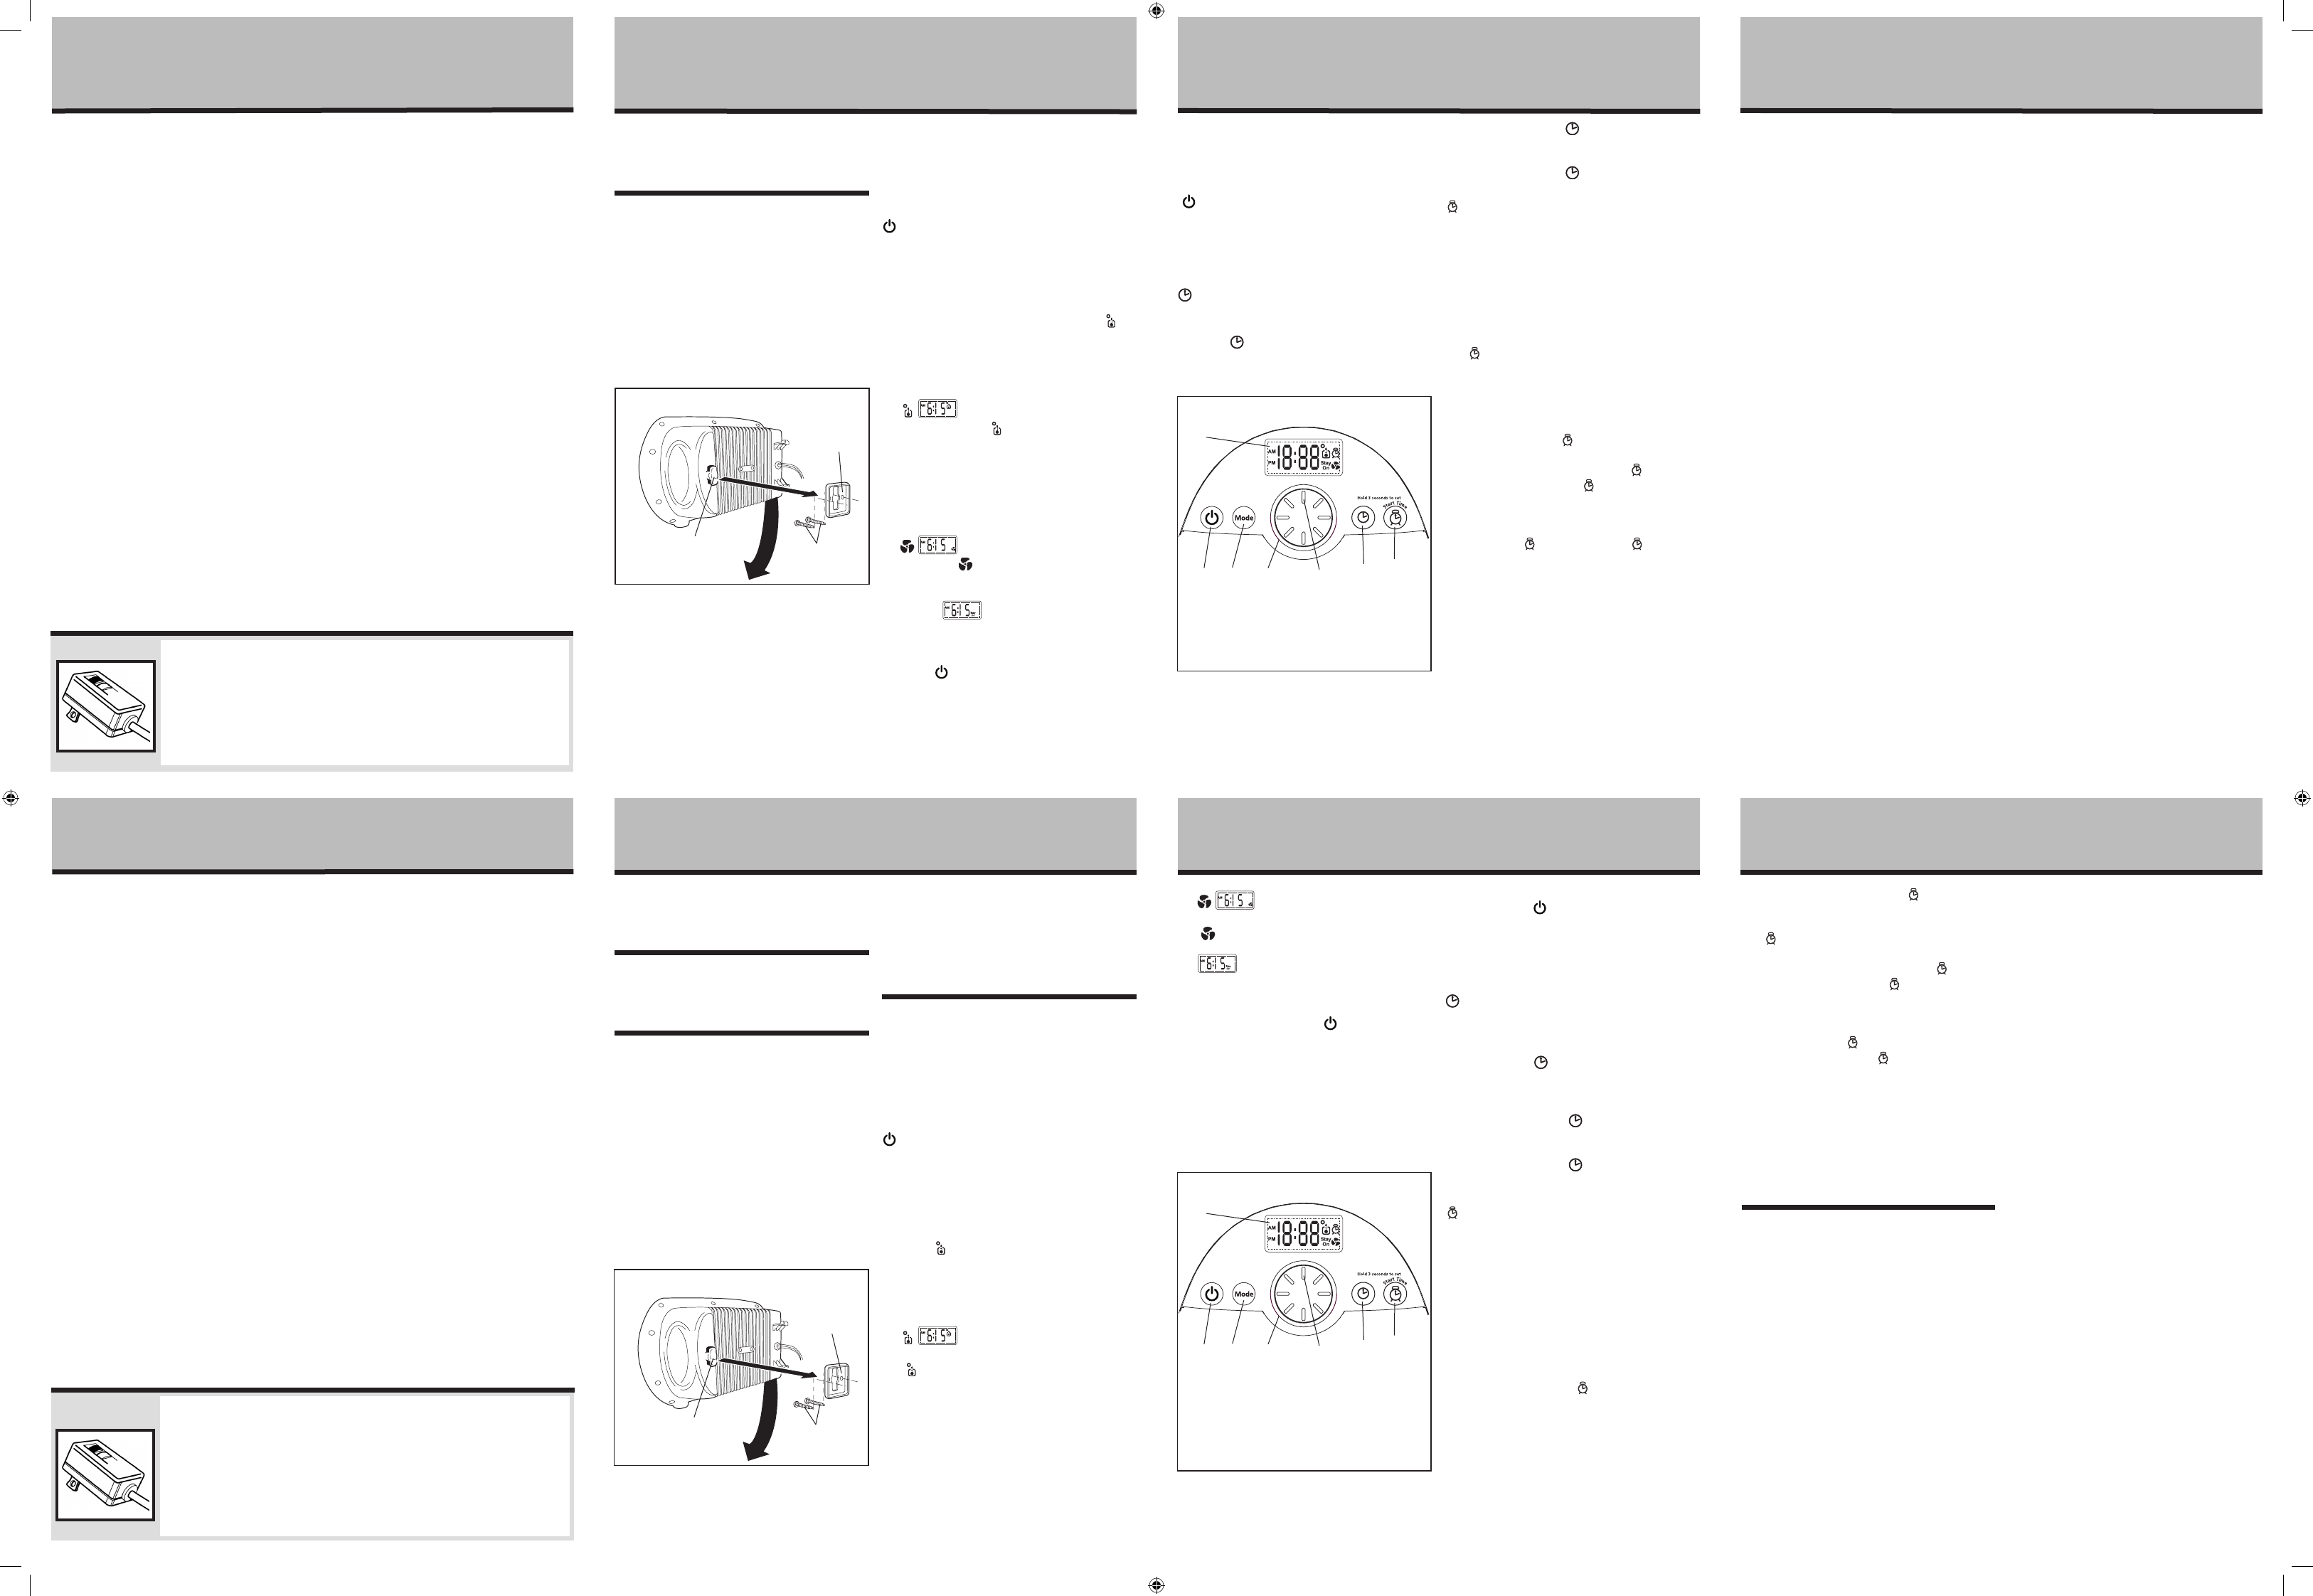
Figure 1
Mounting
Bracket
Mounting Tab
MountingScrews
(notincluded)
Figura 1
Soporte para
montaje en
pared
Lengüeta de montaje
Tornillos de montaje
(noincluidos)
CONTROL PANEL
A. LCD Display
B. PowerButton
C. Mode Button
D. PowerLightRing
E. Thermostat Control
F. ClockButton
G. Start Time Button
Figure 2
E
B
C D
F G
A
PANEL DE CONTROL
A. Pantalla de LCD
B. Botónde
Encendido
C. BotónModalidad
D. Círculoluminoso
de encendido
E. Control del
Termostato
F. BotóndeReloj
G. BotóndeHorade
inicio
Figura 2
E
B
C D
F G
A
ALCI(ApplianceLeakageCurrentInterrupter)SAFETYDEVICE:Thisdeviceprovidesprotection
againstelectricshockduetogroundfaultcurrentsbyautomaticallyshuttingoffthepower.Totest
theoperationoftheALCISafetyDevice,switchtheheaterON.PresstheTESTbuttonontheALCI
deviceattachedtotheplugendofthelinecord.Theheaterandfanshouldstopoperatingandthe
Powerlightshouldbeextinguished.PresstheRESETbuttonontheALCIdevicetoresumenormal
operationoftheheater.ThisdeviceshouldnotbeusedonON/OFFoperationswitch.
CAUTION:ALTHOUGHTHISDEVICEISPROVIDEDWITHPROTECTIONWHICHREDUCESTHE
RISKOFELECTRICSHOCK,THISPRODUCTSHOULDNEVERBEUSEDNEARWATER.
DISPOSITIVODESEGURIDADALCI(Interruptordecorrientedepérdidaparaelectrodomésticos):
Estedispositivoproporcionaproteccióncontradescargaseléctricascausadasporcorrientesdefalla
atierradesconectandoautomáticamentelaalimentación.Paraverificarelfuncionamientodel
dispositivoALCIdeSeguridad,enciendaelcalefactor.PresioneelbotóndeTESTdeldispositivoALCI
enelextremodelcabledealimentacióndondeestáelenchufe.Elcalefactoryelventiladordeben
apagarse,juntoconlaluzdeencendido.PresioneelbotónRESETdeldispositivoALCIparavolvera
usarnormalmenteelcalefactor.Estedispositivonosedebeusarcomollavedeencendido.
CUIDADO:APESARDEQUEESTEDISPOSITIVOESTÁEQUIPADOCONUNAPROTECCIÓNQUE
REDUCEELRIESGODEDESCARGASELÉCTRICAS,ESTEPRODUCTONUNCADEBEUSARSECERCADEL
AGUA.
HFH436WGL-TG_13ESM1.indd 2 1/16/13 3:15 PM