


PRE-INSTALLATION INSTRUCTIONS:
Carefully unpack all contents of carton.
• The window fan comes fully assembled and is ready for immediate
installation.
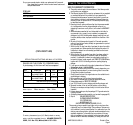
• Before installation, familiarize yourself with the built-in 7”extender
on the right side of the fan, and the two additional 3.” extenders
which attach to the left side of the fan housing (see figure #1.) The
extra extenders are packed in styrofoam at each end of the box.
WE RECOMMENDED KEEPING YOUR WINDOW SCREEN IN PLACE
INSTALLATION INSTRUCTIONS:
This window fan has been designed to fit double-hung, slider and case-
ment windows with minimum openings of 24.” wide and 13” high. For
casement windows, please see page 3 for information on available
bracket. This fan is designed and recommended for used with your win-
dow screen in place.
For double-hung and slider windows:
NOTE: On SLIDER WINDOWS the bottom section must be the side you
add extenders to (left side). The controls should be facing toward the
window.
1. With the window open, take an accurate measurement of the open-
ing where the unit will be placed.
2. Match your window measurement with the installation guide (see fig-
ure #2 text); adding the appropriate extender panel(s) to the left side,
while using the built-in extender on the right side.
3. Once you have added extender panel(s) if necessary, set the fan in
the window, and complete the
installation process using the built-in extender. Pull out for a snug, safe
fit (see step 5)
4. Carefully close the window onto the top of the fan so that the bottom
edge of the window rests behind top line of fan housing. This is impor-
tant as it aides in keeping the fan in place.
5. Lastly, pull out the built-in extender on right side to fill in the remaining
space. To pull out, simply pop up the extender locks on the top and bot-
tom of the fan housing next to the built-in extender, and set to the
desired length. To secure in place, push the extender locks back down.
Casement Windows:
For a safe, secure fit in your casement window, you will need a special
bracket system. For easier installation in a casement window, we
provide you with two brackets and screws at no additional cost. Please
keep in mind, your window must to be at least 24” high and 13” wide
to use this window fan/bracket combination. Please call our customer
service department, 1-800-5-HOLMES, for further assistance.
INSTALLATION GUIDE:
For 24” to 27”:Use up to 3” of right side, pull out extender.
For 28” to 34”:Use one 3” extender panel on the left side. Adjust
the pull out extender on the right side for a tight fit (from .5” to 7”).
For 35” to 37”:Use two 3” extender panels on the left side. Adjust
the pull out extender on the right for a tight fit (to 5” to 7”).
Larger than 37”:Additional extender panels will be required.
To order additional extenders, see mail order offer or call 1-800-5-HOLMES
OPERATING INSTRUCTIONS:
• Make sure the rotary switch is in the OFF position.
• Plug into 120V AC electric outlet.
• Set the individual fan motors on either INTAKE, EXHAUST or AIR
EXCHANGE using the control lever.
• To start unit, select either Manualor Automatic.
In Manualmode turn the rotary switch to the desired speed
(HI,MED,LO) for standard operation.
In Automaticmode, you must set desired temperature using the
following Accutemp™ instructions.
Page2
Figure 1
PULLS OUT UP TO 7.0”
LEFT
Extra Extender Panels
RIGHT
Built-In, Pull Out Extender
UNIT’S LENGTH
24”
FRONT VIEW
Two 3.0” extenders, (Included in your box packed at both ends)
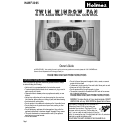
A
B
C
D
E
F
G
FIGURE 2
A. Left Fan Intake-Exhaust/Air Exchange
B. Fan Speed Control
C. Manual/Automatic Setting
D. LCD Display
E. Temp. Set
F. Right Fan Intake-Exhaust/Air Exchange
G. Extender Locks