


COMFORT CONTROL THERMOSTAT
INSTRUCTIONS
Your window fan is equipped with a Comfort Control
Thermostat that automatically turns the fan on and off
depending on your preset comfort level.
• For the fan to turn on, the thermostat must be set at
a temperature higher than the
current room temperature. If the
fan power is on but the fan
blade(s) aren't moving, turn the
Comfort Control Thermostat dial
to the right until the fan blade(s)
spin.
• To set your desired comfort level, run the fan until
the temperature in your room is comfortable. Slowly
turn the Comfort Control Thermostat dial to the left
until the fan blades turn off. This is the temperature
your fan will maintain.
IMPORTANT: If you desire continuous running of
the fan, the Comfort Control Thermostat dial should
be turned all the way to the right to the largest dot.
• WARNING: BE SURE FAN IS SECURELY INSTALLED IN
YOUR WINDOW AT ALL TIMES. DO NOT LEAN OR
PUSH ON FAN WHILE IT IS IN THE WINDOW.
CLEANING/MAINTENANCE
INSTRUCTIONS
Follow these instructions to correctly and safely care for
your Holmes window fan.
Please remember:
• Always unplug the fan before cleaning or
disassembling.
• Do not allow water to drip on or enter into the fan
housing.
• Be sure to use a soft cloth moistened with mild soap
solution.
• Do not use gasoline, thinner or benzene as a cleaner.
Fan Blade and Front Grill Cleaning
1. Using a phillips head screwdriver, remove the screws
that hold the front and rear grills together. Do not
completely detach the grills as this may damage the
extender clips. Separate only enough to gain access
to the blades with one hand.
2. Clean blades and grills with a soft, moist cloth (see
above).
3. Securely fasten the grills together.
FAN STORAGE
For all window fans, and fans that come already
assembled.
• It is important to keep it in a safe, dry location.
• We recommend using the original (or appropriately
sized) box.
• Please remember to protect the fan from dust or
moisture.
WINDOW FAN ACCESSORIES
Panel (H) until the fan sits safely in your window.
4. If the fan still does not fit snugly attach the Slider
Safe
®
Extender Panel located in the polyfoam
packaging in the original box. Align the slot in the
Slider Safe
®
Extender Panel along the tab located on
the left side of your Window Fan (G). Slide the Slider
Safe
®
Extender Panel completely down the tab until it
is flush on both the top and bottom of the Window
Fan.
5. To keep the fan in place, carefully close the window
so that the bottom edge of the window rests on the
flat area on the top of the fan.
For Slider Windows
1. Set the Fan vertically in your window opening with
the left side of the fan situated on the bottom and
the Built-In Extender Panel on top.
2. Set the fan into your window opening (note that in
most cases the window screen does not have to be
removed or left open).
3. If the fan does not fit snugly to the top and bottom
of the window casing, attach the Slider Safe
®
Extender Panel and adjust the built-in extender
screen until the fan fits securely in your window.
OPERATING INSTRUCTIONS
• Make sure rotary switches are in the OFF position.
• Plug into 120V AC electric outlet.
• Set the individual fan motors on either INTAKE,
EXHAUST or AIR EXCHANGE using the control level.
• To start the unit, turn the Left/Right Fan Speed
Controls to desired speed (HI,MED,LO). Note: If unit
will not start, please check that Comfort Control
Thermostat is set to HI/largest dot.
• When operating both fans on EXHAUST, set the
Comfort Control Thermostat all the way to high by
turning the dial CLOCKWISE (to the right) toward the
largest dot.
PLEASE READ AND SAVE THESE
IMPORTANT SAFETY INSTRUCTIONS
FEATURES - OPERATIONS
When using electrical appliances, basic safety precautions
should always be taken including the following:
1. Read all instructions before using this appliance.
2. Use fan only for purposes described in the instruction
manual.
3. To protect against electrical shock do not immerse
unit, plug or cord in water or spray with liquids. Plug
the appliance directly into a 120V AC electrical outlet.
4. WARNING: To reduce the risk of fire or electrical
shock, DO NOT use this fan with any solid-state speed
control device.
5. Close supervision is necessary when any appliance is
used by or near children.
6. Unplug from outlet when not in use, when moving
fan from one location to another, before putting on
or taking off parts and before cleaning.
7. Avoid contact with moving parts.
8. DO NOT operate in the presence of explosives and/or
flammable fumes.
9. To avoid fire hazard, NEVER place the cord under
rugs or any parts near an open flame, cooking or
other heating appliance.
10. DO NOT operate any appliance with a damaged cord
or plug after the appliance malfunctions, or has been
dropped/damaged in any manner.
11. The use of attachments not recommended or sold by
the appliance manufacturer may cause hazards.
12. DO NOT use outdoors.
13. DO NOT let the cord hang over the edge of a table,
counter or come in contact with hot surfaces or leave
exposed to high traffic areas.
14. To disconnect, grip plug and pull from wall outlet.
Never yank on cord.
15. Always use on a dry, level surface.
16. DO NOT operate fan until fully assembled with all
parts properly in place.
17. This product is intended for household use only and
not for commercial or industrial applications.
PLEASE READ AND SAVE
THESE IMPORTANT SAFETY
INSTRUCTIONS
INSTALLATION INSTRUCTIONS
NOTE: MAKE SURE YOU REMOVE ALL CONTENTS OF THE
PACKAGE. PLEASE CHECK PACKAGING MATERIALS FOR
PARTS THAT COULD BE REQUIRED TO OPERATE YOUR FAN.
The window fan comes fully assembled and is ready for
immediate installation.
This window fan has been designed to fit double-hung
windows with minimum openings of 25 inches (63 cm)
wide and 10 inches (25 cm) high.
NOTE: THIS FAN IS DESIGNED AND RECOMMENDED FOR
USE WITH A SCREEN IN THE WINDOW.
Window Fan Installation
1. Align the Window Fan horizontally in the window
with the controls facing you and the Built-In Extender
Panel to the right.
2. Set the fan into your window opening (note that in
most cases the window screen does not have to be
removed or left open).
3. If the fan does not fit snugly to the left and right of
the window casing, pull out the Built-In Extender
CLEANING/MAINTENANCE
INSTRUCTIONS
This appliance has a polarized plug (one blade is wider than the other).
To reduce the risk of electric shock, this plug is intended to fit in a
polarized outlet only one way. If the plug does not fit fully in the outlet,
reverse the plug. If it still does not fit, contact a qualified electrician to
install the proper outlet.
DO NOT ATTEMPT TO MODIFY THIS PLUG OR DEFEAT THIS
SAFETY FEATURE IN ANY WAY.
Intake
Intake
Exhaust
Exhaust
O
f
f
High
Medium
Low
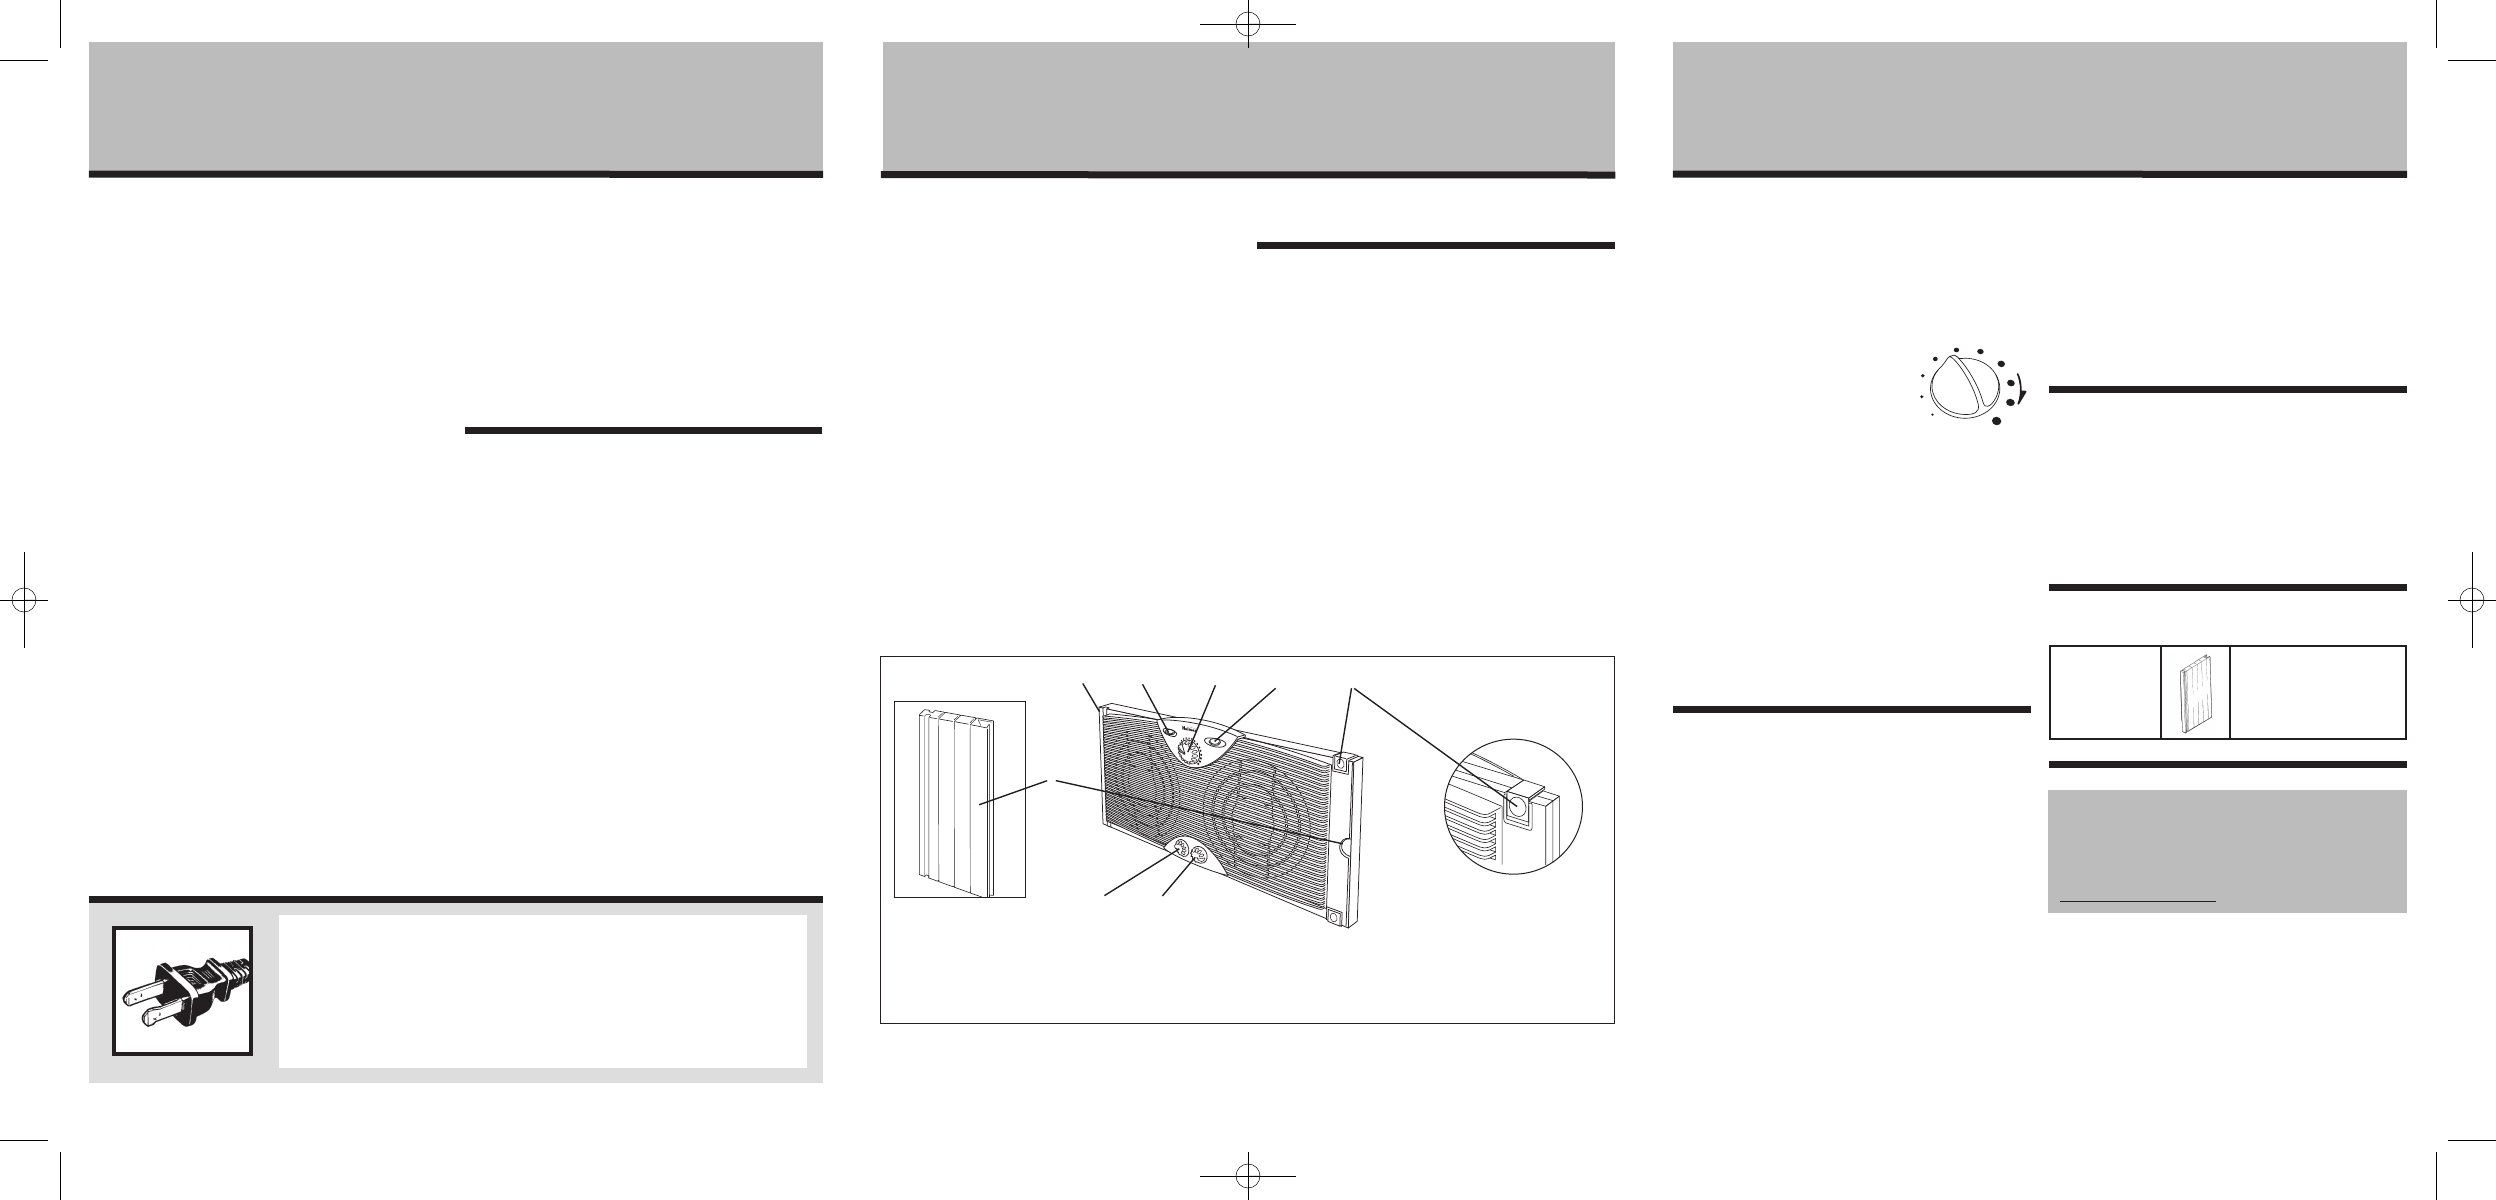
A. Left Fan Speed Control
B. Left Fan Exhaust Switch
C. Comfort Control Thermostat Knob
D. Right Fan Exhaust Switch
E. Right Fan Speed Control
F. Locking Tabs
G. Slider Safe
®
Extender Tab
H. Built-In Extender Panel
FIGURE 1
A
B
C
H
FD
E
G
COMFORT CONTROL
If you have any questions regarding your product or
would like to learn more about other Holmes
®
products, please contact our Consumer Service
Department at 1-800-546-5637 or visit our website at
www.holmesproducts.com.
Window Fan
Extender Panel
To order please go to
www.holmesproducts.com
or call 1-800-546-5637
HAWF2041_09EM1.qxd:HAWF2041_07EM1.qxd 12/19/08 3:59 PM Page 2