


PLEASE READ AND SAVE
THESE IMPORTANT
SAFETY INSTRUCTIONS
When using electrical appliances, basic safety precautions should
always be followed to reduce the risk of fire, electric shock, and injury
to persons, including the following:
1) Read all instructions before using the appliance.
2) To avoid fire or shock hazard, plug the appliance directly into a
120 V AC electrical outlet.
3) Keep the cord out of heavy traffic areas. DO NOT let the cord
hang over the edge of a table or counter. To avoid fire hazard,
NEVER put the cord under rugs, near heat registers, radiator,
stoves, or heaters.
4) To protect against electrical hazards, DO NOT immerse in water or
other liquids. Do not use near water.
5) Close supervision is necessary when any appliance is used by or
near children, or by disabled people.
6) Always unplug the fan before moving it, putting on or taking off
parts, cleaning, or whenever the fan is not is use. Be sure to pull
by the plug and not the cord.
7) Avoid contact with moving parts. DO NOT operate without fan
grills properly in place.
8) DO NOT operate any appliance with a damaged cord or plug, if
motor fan fails to rotate, after the appliance malfunctions, or if it
has been dropped or damaged in any manner. Return appliance
to manufacturer for examination, electrical or mechanical
adjustment, or repair.
9) DO NOT operate in the presence of explosive and/or flammable
fumes.
10) Use appliance only for intended household use as described in this
manual. Any other use not recommended by the manufacturer
may cause fire, electric shock, or injury to persons. The use of
attachments not recommended or sold by The Holmes Group (or
Bionaire) may cause hazards.
11) DO NOT use outdoors.
12) Always use on a dry, level surface.
13) Keep unit away from heated surfaces and open flames.
14) WARNING: To reduce the risk of fire or electric shock, DO NOT use
this fan with any solid-state speed control device.
15) DO NOT attempt to repair or adjust any electrical or mechanical
functions on this unit. Doing so will void your warranty. The
inside of the unit contains no user serviceable parts. All servicing
should be performed by qualified personnel only.
PLEASE READ AND SAVE
THESE IMPORTANT
SAFETY INSTRUCTIONS
HACP 9 fan 9/00
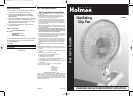
A
B
C
D
E
F
IMPORTANT INSTRUCTIONS
THE HACP9 OSCILLATING CLIP FAN COMES FULLY ASSEMBLED
AND IS READY FOR IMMEDIATE USE.
THIS PRODUCT IS EQUIPPED WITH A POLARIZED AC
(Alternating Current)PLUG (a plug having one blade wider
than the other). This plug will fit into the power outlet
only one way. If the plug does not fit fully into the outlet,
reverse the plug. If it still does not fit, contact qualified
personnel to install the proper outlet.
DO NOT DEFEAT THE SAFETY PURPOSE OF THIS
POLARIZED PLUG IN ANY WAY.
OPERATING INSTRUCTIONS
Step 1: Clip fan onto a dry, level surface
Step 2: Please make sure the On/Speed switch is in the "Off"
position. Plug the cord into any standard 120-volt A/C
outlet.
Step 3: The SPEED is adjusted by moving the switch left or right to
the desired setting.
Step 4: The OSCILLATION control knob is located on the top of the
fan motor housing. To start oscillation, push control knob
down. To stop oscillation, pull control knob up
ADJUSTMENT INSTRUCTIONS
Vertical Angle Adjustment
Step 1: To change the tilting angle of the fan head, simply loosen
the tilt adjustment knob.
Step 2: Move the fan head to the desired angle, then firmly
tighten the knob to lock the fan head in place.
Horizontal Angle Adjustment
Turn the motor housing to the desired direction.
WARNING: MAKE SURE TO SUPPORT THE FAN HEAD ASSEMBLY WHEN
LOOSENING THE ADJUSTABLE HEIGHT NUT, AS THE
WEIGHT OF THE FAN HEAD MAY CAUSE THE EXTENSION
POLE TO COLLAPSE.
ILLUSTRATION
CLEANING/MAINTENANCE
Follow these instructions to correctly and safely care for
your Holmes oscillating clip fan. Please remember:
• Always unplug the fan before cleaning or disassembling.
• Do not allow water to drip on or into the fan motor housing.
• Do not use any of the following as a cleaner: gasoline, thinner,
benzine
Step 1: To access the fan blade, remove the front grill by pressing
the tabs on the grill ring away from the fan.
Step 2: Clean the fan blade, both front and rear grills with a soft
cloth moistened with a mild soap solution.
NOTE: FAN BLADE SHOULD NOT BE REMOVED
Step 3: Replace the front grill by snapping back into rear grill.
Fan Head and Clip Cleaning
Using a soft, moist cloth, with or without a mild soap solution,
carefully clean the fan head. Please use caution around the motor
housing area. Do not allow the motor or other electrical components
to be exposed to water.
A. Front Grill
B. Fan Blade
C. Power Cord
D. Key Slots (underside of clip)
E. Pivot Caps (2)
F. Clip
G. Clamp Pivot
H. Pivot Bracket
I. Motor Housing
J. Oscillation Knob
K. Rear Grill
L. Tilt Adjustment Knob
G
H
I
J
K
WALL MOUNTING INSTRUCTIONS
NOTE: On the underside of the fan’s clip there are
“KEY SLOTS” (2).
Select a suitable spot on a wall (away from curtains, draperies, or
heat sources) where you want to mount the fan. Use a No. 10 pan
head wood screw (1
1/4
” length) and thread into a 2x4 wood stud
behind the dry wall. Please refer to the warning below if you are
unable to locate a wood stud in the wall.
When threading the screw into the wall, leave approximately 1/4”
clearance between the screw and wall. This will allow the clip’s “KEY
SLOTS” to fit easily and securely over the screws. If necessary, the
screw may be tightened further to ensure the fan is firmly attached
to the wall.
WARNING: WHEN MOUNTING THE FAN TO PLASTER, DRYWALL OR
SHEETROCK, YOU MUST USE A MOLLY BOLT, OR SIMILAR FASTENER.
DOING SO WILL PREVENT THE FAN FROM BECOMING DISLODGED
WHILE IN OPERATION.
FAN STORAGE
In the off-season:
• IMPORTANT: Keep your fan in a safe dry location, where the fan
is not likely to fall or be crushed.
• Your fan should be stored fully assembled.
• Remember to protect the fan head from dust or moisture.
L
HACP901UM1.qxd 10/3/01 9:38 AM Page 2