


© 2008 HeathCo LLC 598-1289-04
1. Select a location on a fl at wall with structurally sound wood and
from 10 to 25 feet from the ground. The wood should be at least
one inch thick to safely secure the fi xture.
2. Attach the cover plate using two large machine screws.
3. Using the mounting bracket as a template. Hold it at the desired
mounting location (making sure the bottom is level), and mark
four mounting holes. We suggest drilling 3/16" pilot holes for
the lag screws.
4. Put the two top lag screws through their holes in the mounting
bracket and hold them in place while you push the gasket onto
these lag screws. Start these two screws into the two top pilot
holes.
5. Start the other two lag screws, and then tighten all four
screws.
6. Hang the fi xture on the mounting bracket using the slot in the
cover plate.
7. Twist the fi xture wires to the supply wires (black to black,
white to white, and the bare fi xture wire to the supply ground
wire).
8. Make sure the wires do not get pinched, and swing the fi xture up
so the base fi ts tightly against the gasket. Push the pin through
the hole at the top near the gasket, and into the mating loop in
the mounting bracket. You may need to tap the pin to seat it all
the way down.
9. Secure the fi xture with the small machine screw going through
the cover plate and into the mounting bracket.
10. Install bulb. Bulb rating must match the rating of the fi xture.
Model 9272: 150 Watt high pressure sodium type S55 bulb.
Model 9274: 100 Watt metal halide type M90/O open rated
bulb.
11. Hold the lens and wire cage up to the fi xture and align the clips
on the wire cage with the protrusions in the housing. Hook the
clips over these protrusions and snap the clips closed to hold
the lens and wire cage in place.
12. Loosen the screw in the center of the photocontrol socket two
turns. Twist the socket so that the arrow points north. Note: There
is a stop to prevent the socket from turning all the way around.
If you have trouble turning the socket, try turning it the other
direction. Retighten the screw in the center of the socket.
13. Align the photocontrol (it will only plug-in one way). Plug it in
and twist clockwise until it stops.
14. Caulk fi xture mounting surface with silicone weather sealant
To test operation during the daytime, cover the photocontrol with
a small box or rag. Turn the power on. Light should turn on and
reach full brightness within ten minutes. Remove the box or rag to
expose the photocontrol to daylight. Light should turn off within
two minutes. With the photocontrol exposed, the light will operate
automatically – on at dusk and off at dawn.
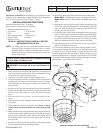
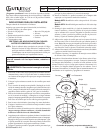
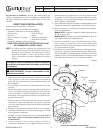
Lag Screw
(4)
Mounting
Bracket
Photocontrol
Gasket
Cover
Plate
Lens
Pin
Bulb
Housing
Questions or problems? Before returning to your retailer, call our
technical service department at 1-800-858-8501 (English speaking
only), 7:30 am to 4:30 pm, CST, Monday – Friday.
INSTALLATION INSTRUCTIONS
Estimated Installation Time: 45 minutes
Items needed for installation (not included):
• Phillips and fl athead screwdrivers
• 3/8" Socket • 3/16" Drill bit
• Drill • Pliers
• Wire strippers/cutters • Safety glasses
• Silicone caulk • Ladder
• Small box or rag
READ ALL INSTRUCTIONS CAREFULLY BEFORE
BEGINNING INSTALLATION.
NOTE: All wiring must be run in accordance with the National
Electrical Code (Canadian Electrical Code in Canada)
through conduit or another acceptable means. Contact a
qualifi ed electrician if there is any question as to the suit-
ability of the system.
WARNING: Turn power off at the circuit breaker or
fuse.
Items Models Product Description
247592 UT-9272-BZ 150 Watt High Pressure Sodium Security Light
247595 UT-9274-BZ 100 Watt Metal Halide Security Light
Package Contents and Fixture Assembly
Lamp in Fixture Contains Mercury. Dispose According
to Local, State, or Federal Laws.