


MGD Series Gas Furnace Installation Instructions
Heat Controller, Inc. Jackson, MI 49203 MGD Installation Instructions 8
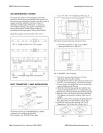
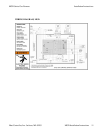
CUTTING ROOF JACK OPENING
A proper installation of the roof jack requires that
openings in roof and ceiling be on the same vertical
centerline as the furnace flue collar. See FIG. 1
Mark the center point on the ceiling and scribe a 4” radius
(8” diameter) around this mark. If furnace is in place
during this step, cover the furnace and flue opening to
prevent debris from entering flue.
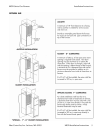
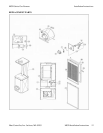
INSTALLING ROOF JACK
The roof jack body should be secured to the furnace
before the roof flashing is secured to the roof.
1. Insert roof jack body into opening in the roof.
2. From above, canter the roof jack body aligning with
the furnace collar.
3. From inside the home, pull down 4-3/16” D flue pipe
seating the pipe fully and firmly over the furnace flue
collar.
4. Next pull down the 7” D combustion air pipe seating
it over the mating furnace collar. Rotate the
combustion air pipe lining up to the screw hole on the
7” collar.
5. Check and make sure the combustion air pipe is fully
seated. Then drive a # 10 sheet metal screw, attaching
pipe firmly to furnace collar.
6. Install optional ceiling trim ring, 90-TRM-RNG
.
7. On the roof, caulk liberally under the roof jack
flashing.
8. Drive nails or screws through the flashing onto the
roof surface about 1 – 11/2” apart. Caulk again to
ensure a leak tight joint.
9. Install roof jack crown and fasten to roof jack body
with three (3) screws (provided) using pre-punched
holes.
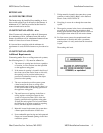
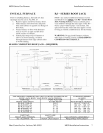
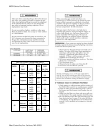
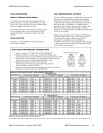
INSTALLATION IN SNOW REGIONS
When the combustion air inlet to the roof jack is
blocked with snow, the furnace will not operate
properly due to the depleted combustion air supply.
Therefore, if the furnace will be located in regions where
snow accumulation on the roof exceeds 7” or in H.U.D.
Snow Load Zones, a roof jack extension – Part5 No. 90-
OUTXT16-AL is recommended.
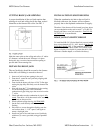
ROOF JACK ON HI-PITCH ROOF
To install the RJS (3/12) Series Roof Jack on roofs which
have a slope between 4.5/12 – 6/12, install a Part No. 90-
RJS56 Roof Saddle, FIG. J. The combined assembly of
the RJS Roof Jack and Roof Saddle will conform to the
higher roof pitch. If roof pitch is greater than 6/12, field
fabricate a suitable adapter, or consult with factory.