


HDG Series Air Handler INSTALLATION INSTRUCTIONS Heat Controller, Inc.
19
• The drain line should be insulated where necessary to prevent sweating and damage due to conden-
sate forming on the outside surface of the line.
• Make provisions for disconnecting and cleaning of the primary drain line should it become neces-
sary. Install a 3 inch trap in the primary drain line as close to the unit as possible. Make sure that the
top of the trap is below connection to the drain pan to allow complete drainage of pan (See Fig. 5).
• Auxiliary drain line should be run to a place where it will be noticeable if it becomes operational.
Homeowner should be warned that a problem exists if water should begin running from the auxiliary
drain line.
• Plug the unused drain connection with the plugs provided in the parts bag, using a thin layer of tef-
lon paste, silicone or teon tape to form a water tight seal.
• Test condensate drain pan and drain line after installation is complete. Pour water into drain pan,
enough to ll drain trap and line. Check to make sure drain pan is draining completely, no leaks are
found in drain line ttings, and water is draining from the termination of the primary drain line.
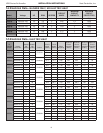
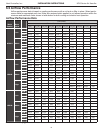
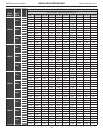
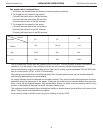
In most applications, there is no need to change the piston (orice). However, in some applications,
changing the piston size is required. If the application requires a different piston/owrator, change the
piston in the distributor of indoor coil before installing the coil. See Table 1 for orice size.
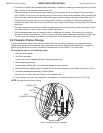
To change the piston, use following steps:
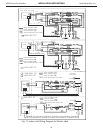
1. Remove cover panel.
2. Use Two wrenches.
Loosen one turn to release pressure. (High pressure gas)
3. After releasing pressure.
Loosen and carefully pull a part the two ttings to expose piston.
4. Remove factory installed piston and replace with recommended piston from Table 1 as shown in Fig.7.
5. Carefully reassemble assembly. (Hand tighten)
Be sure to use teon tape on thread for a complete seal.
6. Hand tighten and make sure assembly is properly connected and then torque to 10-30 ft/lb.
NOTE: Be careful not to bend tubing
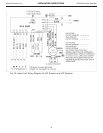
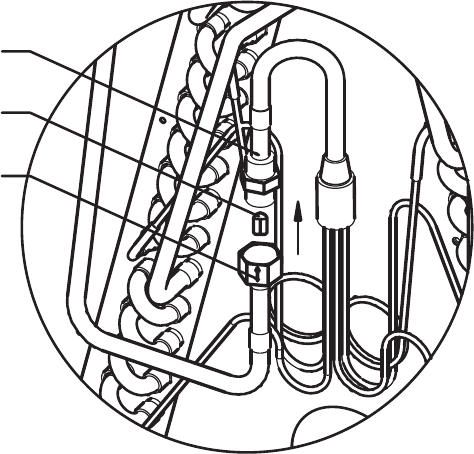
8.2 Flowrator Piston Change
NUT
(MOMENT:15±2N.m)
PISTON
LIQUID LINE
Fig. 6: Flowrator Piston Change