


Heat Controller, Inc. INSTALLATION INSTRUCTIONS Cased/Uncased Coils
10
6.0 Refrigerant Connections
To prevent refrigerant leak, use proper tools to ensure clean, burr-free cut.
Use brazing shield when welding close to the cabinet surface and wet rag to protect rubber grommet.
Brazing alloy should be at least 5% silver content.
6.1 Flowrator Piston Change
In most applications, there is no need to change the piston (orice). However, in some applications,
changing the piston size is required. If the application requires a different piston/owrator, change the
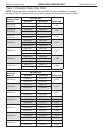
piston in the distributor of indoor coil before installing the coil. See Table 1 for orice size.
To change the piston, use following steps:
1. Remove cover panel.
2. Use Two wrenches.
Loosen one turn to release pressure. (High pressure gas)
3. After releasing pressure.
Loosen and carefully pull a part the two ttings to expose piston.
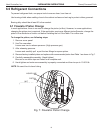
4. Remove factory installed piston and replace with recommended piston from Table 1 as shown in Fig.7.
5. Carefully reassemble assembly. (Hand tighten)
Be sure to use teon tape on thread for a complete seal.
6. Hand tighten and make sure assembly is properly connected and then torque to 10-30 ft/lb.
NOTE: Be careful not to bend tubing
NUT
(MOMENT:15±2N.m)
PISTON
LIQUID LINE
Fig. 7: Flowrator Piston Change