


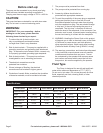

Page 3For technical questions, please call 1-800-444-3353.SKU 68372 - 68396
Save This Manual
Keep this manual for the safety warnings and precautions,
assembly, operating, inspection, maintenance and
cleaning procedures. Write the product’s serial
number in the back of the manual near the assembly
diagram (or month and year of purchase if product
has no number). Keep this manual and the receipt
in a safe and dry place for future reference.
Installation
Please note!
1. The pump is designed to be used in
aquariums/water features.
2. The pump must be placed on the bottom of the
aquarium/water feature. To ensure that the pump
works properly, keep the bottom of the aquarium/
water feature free from sludge and dirt of all kinds.
3. For proper cooling, only operate pump when it is
completely submerged. See the Specications
Chart for the maximum lift for your particular pump.
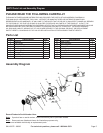
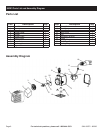
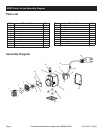
4. NOTE: Pumps models 68393 and 68395 each come
with their own extension set. To attached entension
to the pump, thread selected extension outlet to top
of extension. Then thread bottom of extension to
extension valve. Use adapter to connect assembled
extension to water outlet at top of pump housing.
Power Supply
1. The pump is equipped with a shock-proof
plug according to regulations.
The pump is designed to be connected to
120 V~, 60 Hz GFCI-protected safety socket.
2. Make sure that the socket is sufciently
secured and is in excellent condition.
3. When the plug is inserted into the
socket the pump will operate.
WARNING! If the power cord or plug is damaged,
do not use the pump. The power cord or plug
may only be repaired by a certied electrician.
Operation
1. Set the pump on a level spot in the aquarium/water
feature. The suction cups must be in contact with the
aquarium/fountain oor or a smooth platform.
NOTE: Do not plug in pump yet.
CAUTION: Verify pump is adequately
supported. If you use an additional hose and
in-line lter (not included), do not use it or the
connecting tube to support the pump.
2. Once the pump is fully submerged and adequately
supported, shift the regulator to adjust ow rate.
3. NOTE: After reading these instructions, consider
the following points before starting the pump:
a. Verify that the pump rests on the oor of the
shaft, if it is not suspended by the power cord.
b. Verify that the delivery pipe is properly connected.
c. Verify that the electrical connection is 120 V~, 60 Hz.
d. Verify that the electrical socket is in good condition.
e. Verify that water and moisture cannot
get near the power supply socket.
f. Verify that the pump is installed so
as to prevent running dry.
4. Once you’ve veried that the pump has a proper
setup, dry your hands and plug the power cord into
the electrical outlet to begin pump operation.