


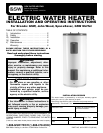

Temperature Limit Control
For safety, a non-adjustable high limit temperature switch will shut off
the power when excessive water temperatures are reached. This switch
must be re-set manually. See 'Trouble-Shooting' section.
WARNING! BEFORE ATTEMPTING ANY ELECTRICAL
REPAIRS OR REPLACEMENTS, TURN OFF POWER TO THE
WATER HEATER. CHECK WITH A VOLTAGE TESTER AT TER-
MINAL 1 AND 3 OF THE LIMIT CONTROL THAT POWER IS
INDEED OFF. FAILURE TO DO SO MAY RESULT IN ELECTRIC
SHOCK AND/OR ELECTROCUTION OF THE PERSON DOING
THE WORK.
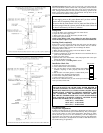
If water temperature adjustment is required:
1. Turn the electrical supply to the water heater "OFF".
2. Remove the access door(s), and turn back insulation.
3. Adjust the thermostat(s) to the water temperature desired (if a two
thermostat system exists, set both thermostats at the same tempera-
ture).
4. Repack the insulation and replace access door(s).
5. Turn the electrical supply to the water heater "ON".
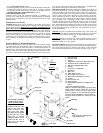
V) MAINTENANCE
Temperature & Pressure Relief Valve
Inspect the relief valve annually to ensure proper operation. This involves
opening the valve to check that water is able to flow freely, and that there
are no blockages. Warning: THE WATER WILL BE HOT and its flow
can be forceful. Provide a bucket or drainage for the expelled water. Lift
the lever and let it snap shut. The water should stop immediately. If the
valve does not function properly, it MUST be replaced. In systems where
the relief valve discharges periodically, this may be due to thermal expan-
sion causing pressure build up. See 'Pressure Build-Up (Thermal
Expansion' section.
Element Replacement
1. See 'Draining Tank' section to remove water from the heater.
2. Turn the electrical supply to the water heater "OFF".
3. Remove the access door(s), and turn back insulation.
4. Disconnect wires from heating element terminals.
5. Unscrew the element using a 1½" socket wrench or tool number
S1008, available from your water heater distributor.
6. Replace element with new one, taking care that sealing gasket is in the
groove of element flange.
7. Re-connect wiring, and replace Di-Electric shields.
8. Repack insulation over thermostat(s), and replace access door(s).
9. Fill tank with water BEFORE turning ELECTRICITY on. See
'Filling Tank' section.
Thermostat Replacement
1. Turn the electrical supply to the water heater "OFF".
2. Remove the access door(s), and turn back insulation.
3. Disconnect wires from thermostat(s).
4. Lift prongs off bracket and slide thermostat up and out.
5. Replace in reverse order, taking care that thermostat(s) is flush against
the tank.
6. Repack insulation over thermostat(s), and replace access door(s).
7. Turn the electrical supply to the water heater "ON".
Cathodic Protection: Anode Maintenance
Your water heater has been supplied with an anode rod that protects the
tank from corrosion. As the rod works, it slowly dissolves over time and
must be replaced. If the anode is less than 3/8" diameter, or any exposed
bare core, replace. Depending on water conditions, an anode can last
from one to ten years. Many localities treat their water, which can have
significant effect on the life of your heater. Water conditioning such as
over softening can accelerate the rate at which the anode rod is con-
sumed. Rapid depletion can leave a heater unprotected causing a prema-
ture failure. As with any water heater, it is good practice to check the
anode annually to see if it needs replacing.
Anode Inspection/Change
1. Turn the electrical supply to the water heater "OFF".
2. Close the cold inlet supply valve.
3. Open a hot water tap supplied by the heater. (CAUTION: Water will
be hot).
4. See 'Draining Tank' section to remove enough water to empty the pip-
ing system.
5. Using a 1 1/16" socket, remove anode and inspect or replace as
required.
6. To refill the heater, see 'Filling Tank' section.
Operating a water heater without an actively working anode rod will
void the warranty.
Tank Clean-Out
1. A clean-out opening is provided on certain models for periodic clean-
ing of the tank. Power supply must be shut off and the heater drained
before opening the clean-out.
2. To clean heater through the clean-out opening, proceed as follows:
a) Remove outer door from side of the casing.
b) Peel back the insulation covering the clean-out flange.
c) Remove the six (6) hex head screws securing the tank clean-out
plate and remove the plate.
d) Remove lime, scale or sediment using care not to damage the glass
lining of the tank.
e) Inspect the clean-out gasket, if it shows signs of wear, a new gasket
is required.
f) Install the clean-out plate. Be sure to draw plate up tight by tight-
ening screws securely.
g) Position the insulation, and replace the door.
Trouble-Shooting
Follow the preceding instructions carefully and your heater should pro-
vide long and trouble free service. If problems do arise however, the fol-
lowing will be of assistance.
Not Enough Or No Hot Water
1. Make sure the electrical supply to the water heater is "ON".
2. Check for loose or blown fuses and loose connections in the water
heater circuit.
3. If the water was too hot and is now cold, the high limit temperature
switch may have operated. To reset this, proceed as follows:
a) Turn the electrical supply to the water heater "OFF".
b) Remove the access door then turn back the insulation.
c) Reset the control by pushing in the red button marked 'RESET'.
d) Repack the insulation then replace access door.
e) Turn the electrical supply to the water heater "ON".
4. The capacity of the tank may have been exceeded by large demands of
hot water. Wait at least one hour then check for hot water at normal hot
water faucet.
5. The incoming cold water may be colder because it is winter. If so, it
will take longer to heat the water.
6. If none of the above result in adequate hot water, call a service person.
7. If there is no HOT water, check the upper element.
8. If there is limited HOT water, check the lower element.
9. If water is LUKEWARM check for proper incoming voltage.
Water Leakage Is Suspected
1. Check all pipes and fittings for leaks, including the drain valve, ele-
ment(s) and relief valve.
2. See if the apparent leakage might be condensation. In warm or humid
locations, condensation can accumulate and run from the heater and
piping.
3. If leakage is from the relief valve discharge pipe, it may represent a
normal condition. Call a service person to check the valve carefully.
4. If you cannot identify or correct the source of leakage:
a) Turn off electrical supply to he heater.
b) Close the cold water inlet valve to the heater.
c) Open a hot water faucet.
d) Contact a qualified plumber or service person.
Water Is Too Hot
Adjust the thermostats to a lower setting. See 'Temperature
Adjustment' section. It is imperative that the thermostat is flush against
the tank. See 'Thermostat Replacement' section.
Hot Water Odour
On occasion, and depending on your location, hot water may develop a
strong odour. This can be especially problematic in regions where the
water contains some sulphur, which results in hot water having a "rotten
egg" smell. If this occurs, drain the system completely, flush thoroughly
and refill. If the problem persists, the anode rod may need to be changed
from magnesium to one made of aluminum. In certain cases chlorinating
and flushing of the water heater may be required. Contact your dealer or
water supplier.
Discoloured Water
· Water rich in iron or other minerals can produce red or brown staining.
Heating water generally worsens this situation.
· Black water can be an indication of organic contaminates in the water
supply. This can be problematic in areas where the water is obtained
from surface or contaminated sources. Organic particles can develop
bacterial growth, causing potential health hazards. Contact your water
supplier for proper filtration or water conditioning equipment. For bac-
terial problems contact your local health authority.
4