


-2-
T10667/T10668 Floating Reamer Holder
7. Turn the lathe ON and slowly apply pressure,
using the tailstock quill handwheel (after
tailstock has been locked onto the bed).
8. Feed the reamer into the barrel bore and
make cuts in short increments, stopping
frequently to remove chips from inside the
flutes.
We highly recommend that you remove the
reamer every 0.020" to 0.050" and clean off
the chips from both the reamer as well as the
bore and re-oil before continuing.
Note: Galling in the chamber from chips
packing in the flutes can tear the metal sur-
face in the bore and create grooves in the
chamber.
9. While stopping the lathe, slightly relieve the
tailstock pressure. DO NOT pull the ream-
er back before the spindle has completely
stopped, as this could scar the chamber.
10. Continue repeating Steps 3–9 until the ream-
ing process is finished. For precise results,
decrease cutting increments as you near the
end of the chamber.
3. Insert the round-nose dead center into your
tailstock.
4. Apply an ample amount of cutting oil inside
the barrel and on the cutting end of the ream-
er.
Note: You will need to continue to provide
enough cutting oil throughout the reaming
process to ensure a clean cut and tool lon-
gevity.
5. Carefully insert the reamer bushing into the
bore while supporting the reamer holder in
your hand, so the bushing does not bind.
Note: If the bushing binds, it might leave
marks inside the barrel, so it is important that
you carefully support the weight of the reamer
in your hand while inserting the length of the
bushing into the bore.
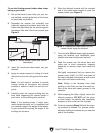
Figure 3. Inserting the dead center into the
reamer holder using the tailstock.
To use the floating reamer holder when cham-
bering a gun barrel:
1. Set up the barrel in your lathe, per your nor-
mal method, centering the bore of the barrel
as accurately as possible.
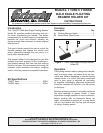
2. Assemble the reamer (not included) and
holder by inserting the reamer shank into the
holder and tightening the set screws against
the reamer flats with a 3mm hex wrench (see
Figure 2).
Holder
Figure 2. Floating reamer holder and reamer
assembled.
Flats
Bushing
Reamer
Set Screws
6. Move the tailstock forward until the rounded
end of the dead center begins to enter the
reamer holder (see Figure 3).