


TIPS FOR THE ASSEMBLY OF YOUR NEW MANTEL
• Beforeyoubeginassembly,locatetheinstructionsandhardware.Takeoutallthepartsand
comparethemtothediagramsbelow.Besureyouhaveallthepartsandcanidentifythem.
• Ahelpinghandisalwaysgood.Assembleyourmantelwithanadultassistantifpossible.Somepiecesareheavy
andwillneedtobeheldbyahelper.Assemblytimewilltakeapproximately30-60minutes.
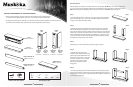
TOP 1PC
CHERRY: ZZ.2808CHG.08
BASE 1PC
CHERRY: ZZ.2808CHG.01
UPPER FACinG PAnEL 1PC
CHERRY: ZZ.2808CHG.06
AnTi-TiP DEViCE 2 SETSWinGnUT AnD LOCK WASHER
2PCS 2PCS 4PCS 4PCS
17PCS 17PCS
4PCS
FiREBOX SHELF 1PC
CHERRY: ZZ.2808CHG.09
LOWER FACinG PAnEL 1PC
CHERRY: ZZ.2808CHG.07
LEFT FROnT
PAnEL 1PC
CHERRY:
ZZ.2808CHG.05
inSiDE
ViEW
OUTSiDE
ViEW
LEFT SiDE
PAnEL 1PC
CHERRY:
ZZ.2808CHG.03
RiGHT FROnT
PAnEL 1PC
CHERRY:
ZZ.2808CHG.04
RiGHT SiDE
PAnEL 1PC
CHERRY:
ZZ.2808CHG.02
Get Ready to Start
Beforeassembly,usescissorstounwrapthepartsfromthepackaging.DO NOTuseaboxcutterorexacto-knife
asyoumaycutintothemantelpiecesinsidetheboxanddamagethenish.Checkforthehardwarebagwhichis
REDandlocatedinsidethepackaging,tapedtothetopbox.BesureyouDO NOTdiscardanypieces.
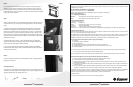
Step 1
Locatethebaseandplaceitontheoor.Donotputitupagainstthewallatthis
pointintheassembly,asyouneedtogetinbehindthemanteltoinsertseveral
wingnuts,lockwashersandreboxscrews.
Step 2
Locatetheleftsidepanelandtheleftfrontpanel.Facingthefrontofthebase,
taketheleftsidepanel,positioningitsotheholesintheblocksonthebottom
lineupwiththeholesonthebase.Positiontheleftfrontpanelnexttotheleftside
panel,lininguptheholesintheblockswiththeholesonthebase.Attachtheleft
frontandsidepaneltothebasebyinsertingandtightening1wingnutand1lock
washertoeachpiece.Attachtheleftsideandfrontpanelstogetherbyinserting
andtightening2wingnutsand2lockwashers.
Step 3
RepeatStep2,butwiththerightsidepanelandtherightfrontpanel.
Step 4
Locatethelowerfacingpaneland
thereboxshelf.Attachthelowerfacing
panelbyplacingthenishedsidetothe
frontthenlineuptheholesoneachside
andinsert1wingnutand1lockwasher
intoeach.Placethereboxshelfin
behind,rightupagainstthelower
facingpanel.
Step 5
Locatetheupperfacingpanelthatwillbeattachedtotheleftandrightlegsand
willsitabovetherebox.Positionthispanelwiththenishedsidefacingthefront
ofthemantel.Lineuptheholesoneachsideandinsertandtighten1wingnutand
1lockwasheroneachside.
Step 1
Step 2
Step 4
Step 5
21