


GET READY TO START
Beforeassembly,usescissorstounwrapthepartsfromthepackaging.DONOTuseaboxcutterorexacto-knifeas
youmaycutintothemantelpiecesinsidetheboxanddamagethenish.CheckforthehardwarebagwhichisREDand
locatedinsidethepackaging,tapedtothetopbox.BesureyouDONOTdiscardanypieces.
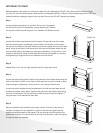
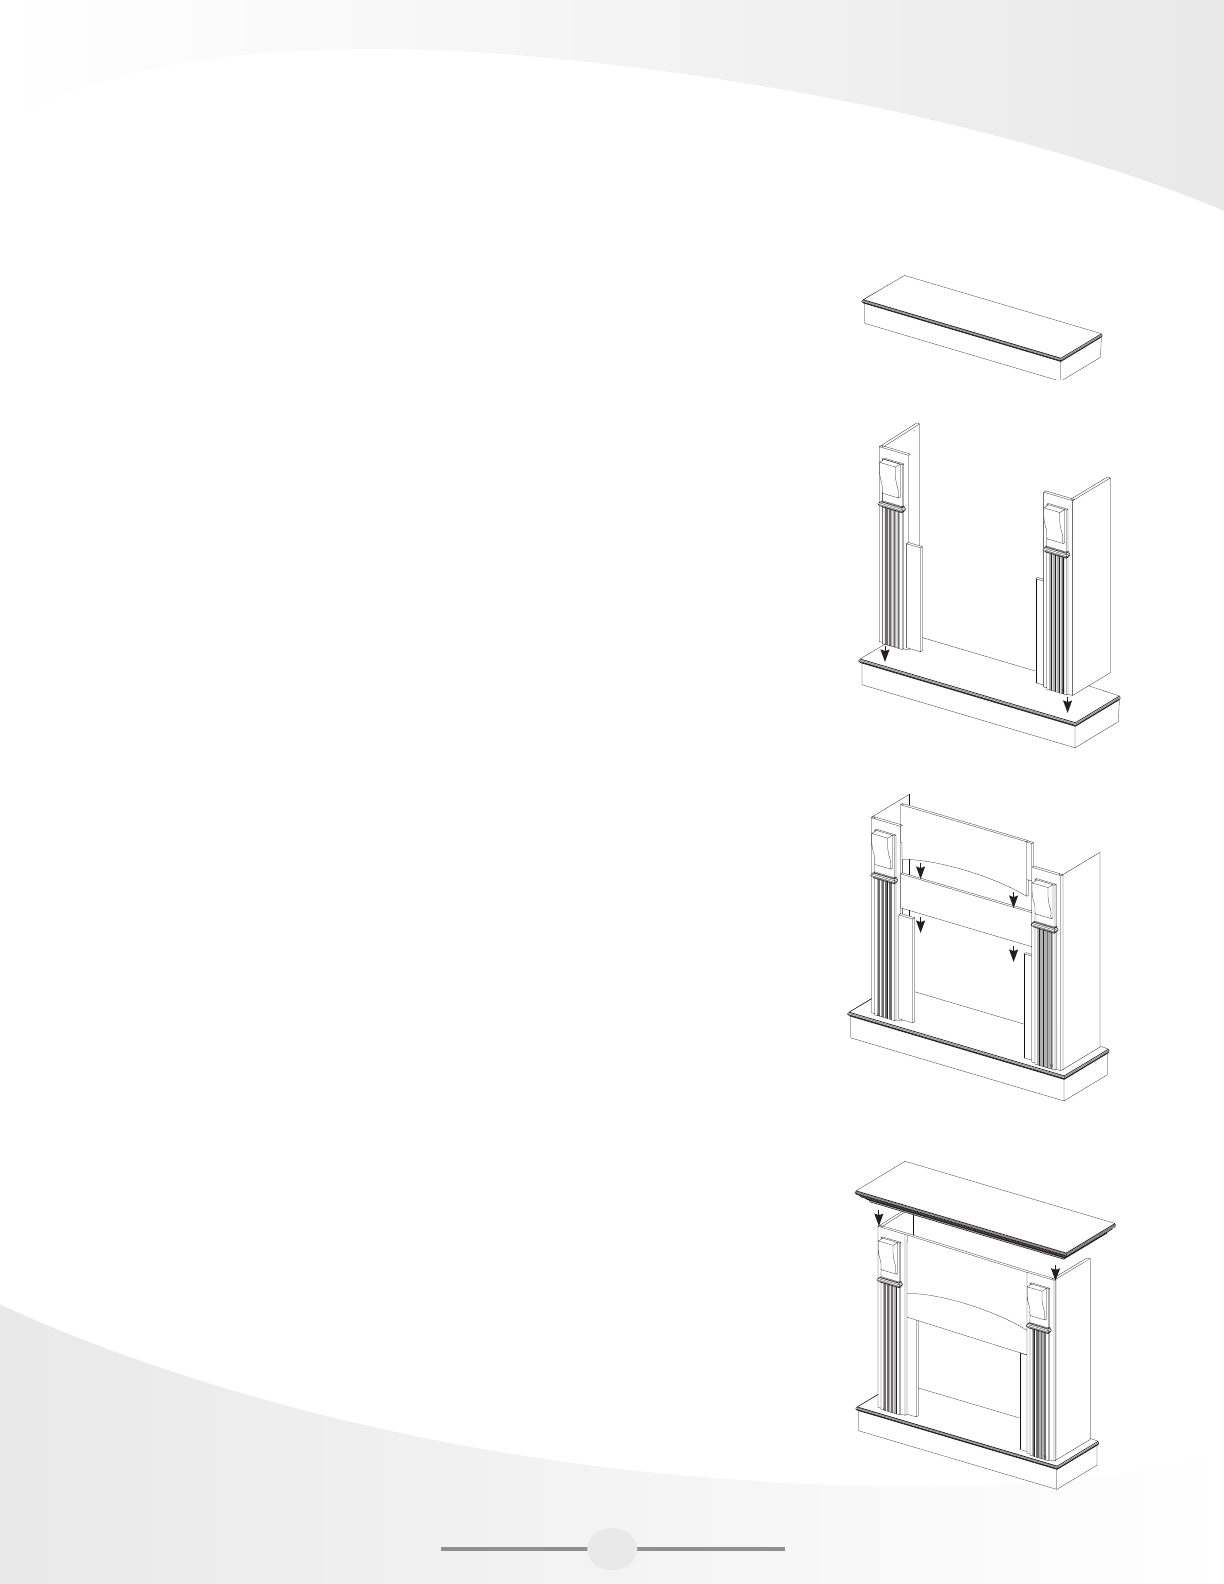
Step 1
Locatethebaseandplaceitontheoor.Donotputitupagainst
thewallatthispointintheassembly,asyouneedtogetinbehind
themanteltoinsertseveralwingnuts,lockwashersandreboxscrews.
Step 2
Locatetheleftsidepanelandtheleftfrontpanel.Facingthefrontofthebase,
taketheleftsidepanel,positioningitsotheholesintheblocksonthebottom
lineupwiththeholesonthebase.Positiontheleftfrontpanelnexttotheleftside
panel,lininguptheholesintheblockswiththeholesonthebase.Attachtheleft
frontandsidepaneltothebasebyinsertingandtightening1wingnutand1lock
washertoeachpiece.Attachtheleftsideandfrontpanelstogetherbyinserting
andtightening3wingnutsand3lockwashersontotheblocks.
Step 3
RepeatStep2,butwiththerightsidepanelandtherightfrontpanel.
Step 4
Locatetheupperfacingpanel.Positionthepanelwiththenishedsidefacingthe
frontofthemantel.Attachtotherightandleftlegsbylininguptheholesoneach
sideinsertingandtightening1wingnutand1lockwasheroneachside.
Locatethecentralheaderthatwillbeattachedtotheleftandrightlegsandwill
sitabovetheupperfacingpanel.Positionthispanelwiththenishedsidefacing
thefrontofthemantel.Lineuptheholesoneachsideandinsertandtighten2
wingnutsand2lockwashersoneachside.
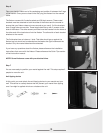
Step 5
Getyourassistantandlocatethetopofyourmantel.Thistopisveryheavy.It
willtake2peopletoliftandpositionitinplace.Ensurethetopgoesoverthe
positioningguidelocatedontheheader.Thetopmustgooverthisguidetobe
positionedcorrectly.Lineuptheholesonthetopofthemantel,insertandtighten
5wingnutsandlockwashers.
381
118
1016
320
1
2
3
4
5
6
1
1
1
1
1
1
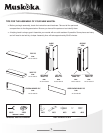
MEF2511OK
MODEL
ITEM NAME
PART NO.
MANTEL
PART NAME
QTY.
7
1
UPPER FACING
8
1
1143
638
471
1092
60
RIGHT SIDE PANEL
BASE
CENTRAL HEADER
RIGHT FRONT PANEL
LEFT SIDE PANEL
LEFT FRONT PANEL
TOP
RIGHT SIDE PANEL
BASE
CENTRAL HEADER
RIGHT FRONT PANEL
LEFT SIDE PANEL
LEFT FRONT PANEL
TOP
2PC
2PC
4PCS
FLAT HEAD SCREW(4*30mm)4PCS
FLAT HEAD SCREW(4*16mm)4PCS
WING NUT(5*28) 23PCS
SPRING LOCK 23PCS
MEF2511OK
UPPER FACING
381
118
1016
320
1
2
3
4
5
6
1
1
1
1
1
1
MEF2511OK
MODEL
ITEM NAME
PART NO.
MANTEL
PART NAME
QTY.
7
1
UPPER FACING
8
1
1143
638
471
1092
60
RIGHT SIDE PANEL
BASE
CENTRAL HEADER
RIGHT FRONT PANEL
LEFT SIDE PANEL
LEFT FRONT PANEL
TOP
RIGHT SIDE PANEL
BASE
CENTRAL HEADER
RIGHT FRONT PANEL
LEFT SIDE PANEL
LEFT FRONT PANEL
TOP
2PC
2PC
4PCS
FLAT HEAD SCREW(4*30mm)4PCS
FLAT HEAD SCREW(4*16mm)4PCS
WING NUT(5*28) 23PCS
SPRING LOCK 23PCS
MEF2511OK
UPPER FACING
Step1
Step4
Step5
381
118
1016
320
1
2
3
4
5
6
1
1
1
1
1
1
MEF2511OK
MODEL
ITEM NAME
PART NO.
MANTEL
PART NAME
QTY.
7
1
UPPER FACING
8
1
1143
638
471
1092
60
RIGHT SIDE PANEL
BASE
CENTRAL HEADER
RIGHT FRONT PANEL
LEFT SIDE PANEL
LEFT FRONT PANEL
TOP
RIGHT SIDE PANEL
BASE
CENTRAL HEADER
RIGHT FRONT PANEL
LEFT SIDE PANEL
LEFT FRONT PANEL
TOP
2PC
2PC
4PCS
FLAT HEAD SCREW(4*30mm)4PCS
FLAT HEAD SCREW(4*16mm)4PCS
WING NUT(5*28) 23PCS
SPRING LOCK 23PCS
MEF2511OK
UPPER FACING
Step2&3
2