


Greenheck warrants this equipment to be free from defects in material and workmanship for a period
of one year from the purchase date. Any units or parts which prove defective during the warranty
period will be replaced at our option when returned to our factory, transportation prepaid. Motors are
warranted by the motor manufacturer for a period of one year. Should motors furnished by Greenheck
prove defective during this period, they should be returned to the nearest authorized motor service
station. Greenheck will not be responsible for any removal or installation costs.
As a result of our commitment to continuous improvement, Greenheck reserves the right to change
specifications without notice.
P.O. Box 410 • Schofield, WI 54476-0410 • Phone (715) 359-6171 • greenheck.com
Building Value in Air
Our Warranty
Prepared to Support
Green Building Efforts
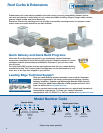
Greenheck delivers value
to mechanical engineers by
helping them solve virtually
any air quality challenges
their clients face with a
comprehensive selection of
top quality, innovative air-
related equipment. We offer
extra value to contractors
by providing easy-to-install,
competitively priced, reliable
products that arrive on time.
And building owners and
occupants value the energy
efficiency, low maintenance
and quiet dependable operation
they experience long after the
construction project ends.
Roof Curbs Rev. 4 August 2008 RG
Copyright © 2008 Greenheck Fan Corp.
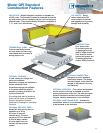
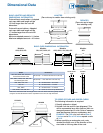
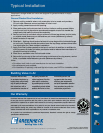
Typical Installation
Greenheck's straight-sided roof curbs are designed for general exhaust or supply
applications.
General Flashed Roof Installation:
1. Remove roofing material where roof penetration is to be made and provide a
10-inch wide clearance around perimeter of hole in roof.
2. Apply roofing cement around roof opening.
3. Place and center roof curb over hole in roof so it sits on roofing cement. Make
sure the roof curb is placed over an adequate support structure to handle the
weight and wind load of curb and fan assembly.
4. Secure roof curb to roof deck using a minimum of three lag screws, anchor bolts,
or suitable metal fasteners per side and two per corner (fasteners by others).
5. Install insulation if required.
6. Field flash – flashing should extend at least 4 inches beyond the horizontal flange
on roof curb. Flashing should also extend over the top flange surface where there
is a wood nailer for a leak resistant installation.
7. Apply Curb Seal (rubber gasket) to the top of roof curb to seal fan or ventilator to
curb to prevent air leaks and water penetration and to reduce the transmission of
vibration from fan to building.
8. Place fan or ventilator onto roof curb and center.
9. Secure fan’s curb cap to the roof curb using a minimum of two lag screws, anchor
bolts, or suitable metal fasteners per side (fasteners by others).
Notes:
•Forrubberroofs,refertoroofmanufacturerforroofcurbinstallation.
•Noreplacementpartsavailable.
•Forinstallationofspecialtycurbsandhighwindcurbs,seeCAPSforinstallationdetails.