Repair
8 308883T
Air Motor and Throat Service
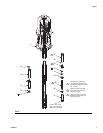
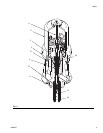
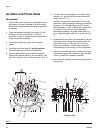
Refer to FIG. 4 for the following instructions.
Before starting, be sure to have all necessary parts on
hand. Repair kit 206728 is available for the motor.
Two accessory tools should be ordered. Use Padded
Pliers, 207579, to grip the trip rod without damaging its
surface. Use Gauge, 171818, to ensure the proper
clearance between the poppets and seat of the transfer
valve.
1. Flush the pump.
2. Relieve the pressure, see page 5.
3. Disconnect the hoses, remove the pump from its
mounting, and clamp the air motor base (5) in a
vise.
4. Use a strap wrench or pipe wrench on the extension
tube (64) to screw it out of the base (5). See F
IG. 4.
5. Pull the extension rod (57) down as far as it will go,
exposing the displacement rod (8).
6. Use a hammer and punch to remove the roll pin (74)
from the displacement rod (8), and unscrew the
extension rod (57) out of the displacement rod.
7. Manually push on the displacement rod (8) to move
the air motor piston (2) up as far as it will go.
Unscrew the cylinder cap nut (29a or 29b). Pull the
nut up. Grip the trip rod (11) with padded pliers, and
screw the nut off the rod. (F
IG. 4)
8. Remove the six screws (21) that hold the cylinder
(17) to the base. Carefully pull the cylinder straight
up off the piston (2).
9. Use a screw driver to push down on the trip rod
yoke (22), and snap the toggles down. Remove the
lockwires (31) from the adjusting nut (30) of the
transfer valves. Screw the top nuts off. Screw the
stems (1a) out of the grommets (12) and bottom
nuts. Take the valve poppets (1b) off the stems and
squeeze them firmly to check for cracks. (F
IG. 5)
10. Grip the toggle rockers (26) with a pliers. Compress
the springs (27), and swing the toggle assembly (L)
up and away from the piston lugs (M), and remove
the parts. Check to see that the valve actuator (13)
is supported by the spring clips (14), but slides eas-
ily into them. (F
IG. 5)
11. Remove the trip rod yoke (22), actuator (13), and
trip rod (11). Check the exhaust valve poppets (16)
for cracks.
NOTE: To remove cracked exhaust valve poppets (16),
stretch them out, and cut them with a sharp knife.
12. Remove one of the air motor plates (18 or 20). Pull
the piston (2) up out of the base (5). Remove the
throat packing nut (38) and throat seal (6).
NOTICE
In step 7, do not damage the plated surface of the trip
rod (11). A damaged trip rod could cause erratic air
motor operation. Use the special padded pliers,
207579, to grasp the rod.
NOTICE
To avoid damaging the cylinder wall, lift the cylinder
straight off of the piston. Never tilt the cylinder while
you are removing it.


